WO2017086044A1 - シール部材 - Google Patents
シール部材 Download PDFInfo
- Publication number
- WO2017086044A1 WO2017086044A1 PCT/JP2016/079587 JP2016079587W WO2017086044A1 WO 2017086044 A1 WO2017086044 A1 WO 2017086044A1 JP 2016079587 W JP2016079587 W JP 2016079587W WO 2017086044 A1 WO2017086044 A1 WO 2017086044A1
- Authority
- WO
- WIPO (PCT)
- Prior art keywords
- seal member
- rod
- pressure
- seal
- lip portion
- Prior art date
Links
Images
Classifications
-
- F—MECHANICAL ENGINEERING; LIGHTING; HEATING; WEAPONS; BLASTING
- F16—ENGINEERING ELEMENTS AND UNITS; GENERAL MEASURES FOR PRODUCING AND MAINTAINING EFFECTIVE FUNCTIONING OF MACHINES OR INSTALLATIONS; THERMAL INSULATION IN GENERAL
- F16J—PISTONS; CYLINDERS; SEALINGS
- F16J15/00—Sealings
- F16J15/16—Sealings between relatively-moving surfaces
- F16J15/32—Sealings between relatively-moving surfaces with elastic sealings, e.g. O-rings
- F16J15/3204—Sealings between relatively-moving surfaces with elastic sealings, e.g. O-rings with at least one lip
- F16J15/3232—Sealings between relatively-moving surfaces with elastic sealings, e.g. O-rings with at least one lip having two or more lips
-
- F—MECHANICAL ENGINEERING; LIGHTING; HEATING; WEAPONS; BLASTING
- F15—FLUID-PRESSURE ACTUATORS; HYDRAULICS OR PNEUMATICS IN GENERAL
- F15B—SYSTEMS ACTING BY MEANS OF FLUIDS IN GENERAL; FLUID-PRESSURE ACTUATORS, e.g. SERVOMOTORS; DETAILS OF FLUID-PRESSURE SYSTEMS, NOT OTHERWISE PROVIDED FOR
- F15B15/00—Fluid-actuated devices for displacing a member from one position to another; Gearing associated therewith
- F15B15/08—Characterised by the construction of the motor unit
- F15B15/14—Characterised by the construction of the motor unit of the straight-cylinder type
Definitions
- the present invention relates to a seal structure, and more particularly to a structure of a seal member used in a sliding gap between a rod (piston rod) and a cylinder in a hydraulic / pneumatic device or the like.
- the sealing member is improved every day.
- the present invention has been made to solve the above-described problems, and it is an object of the present invention to provide a sealing member that can further enhance the sealing performance of the sealing structure.
- the high pressure side and the low pressure side are partitioned in the sliding gap between the cylinder and the rod in the hydraulic / pneumatic equipment, and the sealing groove is provided annularly along the circumferential direction of the outer peripheral surface of the rod Is a sealing member that closes the sliding gap between the cylinder and the rod, and has the following configuration.
- a curved surface and an inclined surface are provided in a region where the first side surface and the third side surface of the heel portion intersect, and the curved surface is provided so as to be in contact with the first side surface and the inclined surface, The slope is provided so as to intersect with the third side surface.
- the projection length of the curved surface and the slope on the third side surface is 0.3 mm or more and 2 mm or less, the radius of the curved surface is 2 mm or more and 15 mm or less, The inclination angle with respect to the third side surface is 30 ° to 80 °.
- FIG. 3 is a cross-sectional view taken along line III in FIG. 2.
- FIG. It is a figure which shows the relationship between the contact width at the time of the pressure load of Example 2, and a contact surface pressure.
- FIG. It is a figure which shows the relationship between the contact width at the time of the pressure load of Example 3, and a contact surface pressure.
- FIG. 1 is a cross-sectional view showing a seal structure employed in the hydraulic cylinder in the embodiment.
- a cylinder 1 and a rod (piston rod) 2 are shown by broken lines for convenience of explanation.
- the seal structure shown in FIG. 1 is deformed with the pressure contact with the rod 2 and the reciprocating motion of the rod 2 (vertical direction in FIG. 1).
- pressure is applied to the seal structure. The state is not shown.
- An annular first seal groove 10G is provided along the circumferential direction of the outer peripheral surface of the rod 2.
- the first seal groove 10 ⁇ / b> G accommodates a first seal member 10 that closes the sliding gap between the cylinder 1 and the rod 2.
- the second seal groove 20G is provided in an annular shape along the circumferential direction of the outer peripheral surface of the rod 2 and on the high pressure side of the first seal groove 10G.
- a high-pressure hydraulic chamber is provided on the upper side.
- a second seal member 20 that closes a sliding gap between the cylinder 1 and the rod 2 is accommodated in the second seal groove 20G.
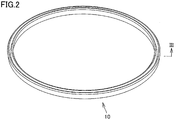
- FIG. 2 is a perspective view showing the structure of the first seal member 10
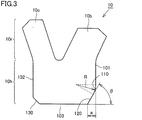
- FIG. 3 is a cross-sectional view taken along line III in FIG.
- the first seal member 10 has an annular shape as a whole, and is integrally formed of synthetic resin such as urethane resin, natural rubber, synthetic rubber, or fluororubber.
- the first seal member 10 has a substantially U-shaped cross section having an open side on the high pressure side.
- the heel portion 10h includes a heel portion 10h located on the low pressure side and a lip portion 10r located on the high pressure side in the sectional view shown in FIG.
- the heel portion 10h includes a first side face 101 located on the rod 2 side, a second side face 102 located opposite to the first side face 101, and a third side face 103 located on the high pressure side.
- the lip portion 10r includes a first lip portion 10b that expands toward the rod 2 side and a second lip portion 10c that expands toward the side opposite to the rod 2 side.
- the first lip portion 10b and the second lip portion 10c form a substantially U shape.
- a curved surface 110 and an inclined surface 120 are provided in a region where the first side surface 101 and the third side surface 103 of the heel portion 10h intersect, which is the low pressure side on the rod 2 side when viewed from the heel portion 10h. .
- the curved surface 110 is provided so as to be in contact with the first side surface 101 and the inclined surface 120, and the inclined surface 120 is provided so as to intersect with the third side surface 103.
- the projected length of the curved surface 110 and the inclined surface 120 onto the third side surface 103 is “a”, the radius of the curved surface 110 is “R”, and the inclination angle of the inclined surface 120 with respect to the third side surface 103 is “ ⁇ ”.
- the projection length “a” is 0.3 mm or more and 2 mm or less
- the radius “R” of the curved surface 110 is 2 mm or more and 15 mm or less.
- the inclination angle “ ⁇ ” of the inclined surface 120 with respect to the third side surface 103 is preferably 30 ° to 80 °. This point will be described in an embodiment described later.
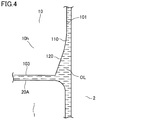
- FIG. 4 is a partially enlarged schematic diagram showing a sealing state in the “pulling step”
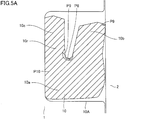
- FIG. 5A is a diagram showing a sealing pressure state of the first seal member 10 at the time of mounting
- FIG. 5B is a first sealing member at the time of mounting
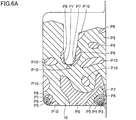
- FIG. 6A is a diagram showing a seal pressure state of the first seal member 10 when pressure is applied
- FIG. 6B is a diagram showing a relationship between the contact width and the contact surface pressure of FIG. It is a figure which shows the relationship between a contact width and a contact surface pressure.
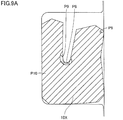
- P1 to P10 indicate internal pressure distributions, indicating that the internal pressure decreases from P1 to P10.
- the first lip portion 10 b has a form that expands toward the rod 2 side, and the region where the first side surface 101 and the third side surface 103 of the heel portion 10 h of the first seal member 10 intersect with each other. Further, by providing the curved surface 110 and the inclined surface 120, the heel portion 10h is in a non-contact state with the rod 2 even at the time of wearing, and the oil OL can be easily introduced into the cylinder 1 during the “pulling process”. It is possible to return to
- the curved surface 110 and the inclined surface 120 are provided in the region R1 in the region where the first side surface 101 and the third side surface 103 of the heel portion 10h intersect. Even if the contact width moves, the contact surface pressure can be kept smooth without generating the peak surface pressure. As a result, it is possible to reduce the resistance of oil to the inside of the cylinder 1 and to improve the oil suction characteristic by the seal structure using the first seal member 10 and to further improve the sealing performance.
- FIG. 7 shows a cross-sectional view of the first seal member 10X in the related art.
- FIG. 3 is a view corresponding to a cross section taken along line III-III in FIG. 2.
- the shapes of the first lip portion 10b and the second lip portion 10c of the lip portion 10r are the same as those of the first seal member 10 of the present embodiment.
- the slope 150 is provided in the region where the first side surface 101 and the third side surface 103 intersect, and no curved surface is provided.
- FIG. 8 is a partially enlarged schematic view showing a seal state in the “pulling step”
- FIG. 9A is a view showing a seal pressure state of the first seal member 10X at the time of mounting
- FIG. 9B is a first seal member at the time of mounting.
- 10A is a diagram showing the relationship between the contact width of 10X and the contact surface pressure
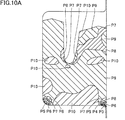
- FIG. 10A is a diagram showing the seal pressure state of the first seal member 10X at the time of pressure load
- FIG. 10B is the diagram of the first seal member 10X at the time of pressure load. It is a figure which shows the relationship between a contact width and a contact surface pressure.
- P1 to P10 indicate the distribution of internal pressure, and the internal pressure decreases from P1 to P10.
- the heel portion 10h of the first seal member 10X is not provided with a curved surface, and only the inclined surface 150 is provided.
- the heel portion 10h comes into contact with the rod 2, and a peak surface pressure is formed in the region R3 as shown in FIG. 9B.
- a peak surface pressure is present in the region R4.
- the oil suction characteristic was poor, which was one factor in causing oil leakage.
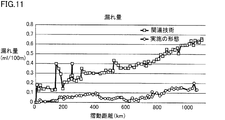
- FIG. 11 explains the amount of leakage between the first seal member 10 of the embodiment and the first seal member 10X of the related art.
- FIG. 11 is a diagram illustrating the relationship between the sliding distance and the leakage amount between the first seal member 10 of the embodiment and the first seal member 10X of the related art.
- Both the first seal member 10 and the first seal member 10X are synthetic resins such as urethane resin (hardness durometer A90, tensile strength Mpa 44.0, elongation 500%, compression set 40%, compression set test conditions. 8) (80 ° C.-70 h): Nippon Valqua Industries, Ltd., product number R5590)).
- urethane resin hardness durometer A90, tensile strength Mpa 44.0, elongation 500%, compression set 40%, compression set test conditions. 8 (80 ° C.-70 h): Nippon Valqua Industries, Ltd., product number R5590)).
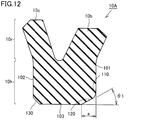
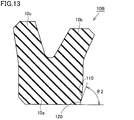
- Example 12 and 13 show a structure of a modified example of the first seal member 10 in the present embodiment.
- FIG. 12 shows the shape of the first seal member 10A having a relatively large “a”
- FIG. 13 shows the case of the first seal member 10B having a relatively large “ ⁇ ”.
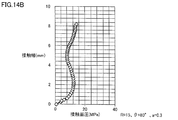
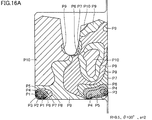
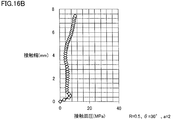
- FIGS. 14A to 16B show the relationship between the contact width and the contact surface pressure at the time of pressure loading, as specific examples 1 to 3.
- A 2
- P1 to P10 indicate the distribution of the internal pressure, and the internal pressure decreases from P1 to P10.
- Example 1 shown in FIG. 14A and FIG. 14B, no peak surface pressure is generated in the entire contact width, and good surface pressure is shown. I was able to confirm.
- Example 2 shown in FIG. 15A and FIG. 15B compared to Example 1 above, no peak surface pressure is generated in the entire contact width, and a better surface pressure is shown. It was confirmed that it had excellent sealing performance.
- Example 3 compared to Example 1 above, a minute peak surface pressure is generated in a region where the contact width is about 1 mm. Although it is not good at all, it is better than the related technology shown in FIG. 10A and FIG. 10B, so that it has been confirmed that it has a good sealing performance as a whole.
- the curved surface 110 and the inclined surface 120 are provided in the region where the first side surface 101 and the third side surface 103 of the heel portion 10h intersect, and the curved surface 110 includes the first side surface and the inclined surface 120.
- the inclined surface 120 is provided so as to intersect the third side surface 103.
- the projection length “a” of the curved surface 110 and the inclined surface 120 onto the third side surface 103 is set to 0.3 mm or more and 2 mm or less, and the radius “R” of the curved surface 110 is set to 2 mm or more and 15 mm or less.
- the inclination angle “ ⁇ ” with respect to the third side surface 103 is set to 30 ° to 80 °, it is possible to obtain more preferable sealing performance.
Landscapes
- Engineering & Computer Science (AREA)
- General Engineering & Computer Science (AREA)
- Mechanical Engineering (AREA)
- Physics & Mathematics (AREA)
- Fluid Mechanics (AREA)
- Sealing With Elastic Sealing Lips (AREA)
- Sealing Devices (AREA)
- Actuator (AREA)
- Electrical Discharge Machining, Electrochemical Machining, And Combined Machining (AREA)
Abstract
Description
図1を参照して、本実施の形態におけるシール構造について説明する。図1は、実施の形態における油圧シリンダに採用されるシール構造を示す断面図である。図1中において、シリンダ1およびロッド(ピストンロッド)2は、説明の便宜上破線で図示している。図1に示すシール構造は、ロッド2との圧接およびロッド2の往復運動(図1中の上下方向)にともなって変形するが、シール構造を明確に理解するため、シール構造には圧力が加わっていない状態を図示している。
図2および図3を参照して、本実施の形態における第1シール部材10について説明する。図2は、第1シール部材10の構造を示す斜視図、図3は、図2中のIII線矢視断面図である。
図12および図13に、本実施の形態における第1シール部材10の変形例の構造を示す。図12は、「a」を比較的大きく設けた第1シール部材10Aの場合の形状を示し、図13は「θ」を比較的大きく設けた第1シール部材10Bの場合を示す。
Claims (2)
- 油空圧機器におけるシリンダとロッドとの摺動隙間において高圧側と低圧側と仕切り、前記ロッドの外周面の周方向に沿って環状に設けられたシール溝の内部に収容されて、前記シリンダと前記ロッドとの摺動隙間を塞ぐシール部材であって、
低圧側に位置するヒール部と、
高圧側に位置するリップ部と、含み、
前記ヒール部は、
前記ロッド側に位置する第1側面、前記第1側面に対向位置する第2側面、および、高圧側に位置する第3側面を有し、
前記リップ部は、
前記ロッド側に向けて拡がる第1リップ部、および、前記ロッド側とは反対側に向けて拡がる第2リップ部を有し、
前記ヒール部の第1側面および前記第3側面が交わる領域には、湾曲面、および、斜面が設けられ、
前記湾曲面は、前記第1側面および前記斜面に対して接するように設けられ、
前記斜面は、前記第3側面と交わるように設けられている、シール部材。 - 前記湾曲面および前記斜面の前記第3側面への投影長さは、0.3mm以上2mm以下であり、
前記湾曲面の半径は、2mm以上15mm以下であり、
前記斜面の前記第3側面に対する傾斜角度、30°から80°である、請求項1に記載のシール部材。
Priority Applications (2)
| Application Number | Priority Date | Filing Date | Title |
|---|---|---|---|
| CN201680067739.1A CN108291648B (zh) | 2015-11-19 | 2016-10-05 | 密封构件 |
| KR1020187016112A KR102439898B1 (ko) | 2015-11-19 | 2016-10-05 | 시일 부재 |
Applications Claiming Priority (2)
| Application Number | Priority Date | Filing Date | Title |
|---|---|---|---|
| JP2015226690A JP6655365B2 (ja) | 2015-11-19 | 2015-11-19 | シール部材 |
| JP2015-226690 | 2015-11-19 |
Publications (1)
| Publication Number | Publication Date |
|---|---|
| WO2017086044A1 true WO2017086044A1 (ja) | 2017-05-26 |
Family
ID=58718096
Family Applications (1)
| Application Number | Title | Priority Date | Filing Date |
|---|---|---|---|
| PCT/JP2016/079587 WO2017086044A1 (ja) | 2015-11-19 | 2016-10-05 | シール部材 |
Country Status (5)
| Country | Link |
|---|---|
| JP (1) | JP6655365B2 (ja) |
| KR (1) | KR102439898B1 (ja) |
| CN (1) | CN108291648B (ja) |
| TW (1) | TWI696775B (ja) |
| WO (1) | WO2017086044A1 (ja) |
Families Citing this family (2)
| Publication number | Priority date | Publication date | Assignee | Title |
|---|---|---|---|---|
| JP7089389B2 (ja) * | 2017-08-02 | 2022-06-22 | 株式会社バルカー | メタルガスケット |
| JP2024044407A (ja) * | 2022-09-21 | 2024-04-02 | 株式会社東京精密 | リトラクト機構及びそれを備える寸法測定装置 |
Citations (4)
| Publication number | Priority date | Publication date | Assignee | Title |
|---|---|---|---|---|
| JPH11303863A (ja) * | 1998-04-15 | 1999-11-02 | Nippon Seiko Kk | シェル型ころ軸受 |
| JP2002122241A (ja) * | 2000-10-10 | 2002-04-26 | Kayaba Ind Co Ltd | 流体圧用パッキン |
| JP2008267449A (ja) * | 2007-04-18 | 2008-11-06 | Nok Corp | バックアップリング |
| JP2008309278A (ja) * | 2007-06-15 | 2008-12-25 | Nsk Ltd | 軸受ユニット |
Family Cites Families (13)
| Publication number | Priority date | Publication date | Assignee | Title |
|---|---|---|---|---|
| FR2408777A1 (fr) * | 1977-11-15 | 1979-06-08 | Dba | Coupelle d'etancheite pour generateurs de pression |
| US4687212A (en) * | 1986-12-16 | 1987-08-18 | Baraw Corporation | Seal assembly with stabilizing ribs |
| JP2005337440A (ja) | 2004-05-28 | 2005-12-08 | Kayaba Ind Co Ltd | シール構造及び油圧シリンダのシール構造 |
| JPWO2005121613A1 (ja) * | 2004-06-07 | 2008-04-10 | Nok株式会社 | シーリングシステム |
| US8840115B2 (en) * | 2007-03-09 | 2014-09-23 | Freudenberg-Nok General Partnership | Wide range temperature and pressure hydraulic cylinder sealing system |
| CN201461935U (zh) * | 2009-07-30 | 2010-05-12 | 南方天合底盘系统有限公司 | 高强度密封皮圈 |
| CN201606486U (zh) * | 2009-12-29 | 2010-10-13 | 深圳市富洋密封件有限公司 | 一种y型热塑性聚氨酯液压密封圈结构 |
| CN201836388U (zh) * | 2010-11-04 | 2011-05-18 | 上海麦特密封件有限公司 | Y型密封圈 |
| CN101994837B (zh) * | 2010-11-15 | 2013-04-03 | 徐州工程学院 | 一种减摩密封圈 |
| CN103123001A (zh) * | 2011-11-19 | 2013-05-29 | 李虎林 | 一种轴用组合封 |
| CN102563080A (zh) * | 2012-01-05 | 2012-07-11 | 上海大学 | 长短唇单边密封的y型橡胶动密封圈及其分段硫化工艺 |
| JP2014214769A (ja) | 2013-04-23 | 2014-11-17 | 日本バルカー工業株式会社 | シール構造 |
| CN103994228A (zh) * | 2014-05-13 | 2014-08-20 | 嘉兴新中南汽车零部件有限公司 | 角向唇状橡胶密封圈 |
-
2015
- 2015-11-19 JP JP2015226690A patent/JP6655365B2/ja active Active
-
2016
- 2016-10-05 WO PCT/JP2016/079587 patent/WO2017086044A1/ja active Application Filing
- 2016-10-05 KR KR1020187016112A patent/KR102439898B1/ko active IP Right Grant
- 2016-10-05 CN CN201680067739.1A patent/CN108291648B/zh active Active
- 2016-10-13 TW TW105133027A patent/TWI696775B/zh active
Patent Citations (4)
| Publication number | Priority date | Publication date | Assignee | Title |
|---|---|---|---|---|
| JPH11303863A (ja) * | 1998-04-15 | 1999-11-02 | Nippon Seiko Kk | シェル型ころ軸受 |
| JP2002122241A (ja) * | 2000-10-10 | 2002-04-26 | Kayaba Ind Co Ltd | 流体圧用パッキン |
| JP2008267449A (ja) * | 2007-04-18 | 2008-11-06 | Nok Corp | バックアップリング |
| JP2008309278A (ja) * | 2007-06-15 | 2008-12-25 | Nsk Ltd | 軸受ユニット |
Also Published As
| Publication number | Publication date |
|---|---|
| JP6655365B2 (ja) | 2020-02-26 |
| KR102439898B1 (ko) | 2022-09-02 |
| TW201719060A (zh) | 2017-06-01 |
| CN108291648B (zh) | 2020-09-22 |
| JP2017096332A (ja) | 2017-06-01 |
| KR20180081766A (ko) | 2018-07-17 |
| CN108291648A (zh) | 2018-07-17 |
| TWI696775B (zh) | 2020-06-21 |
Similar Documents
| Publication | Publication Date | Title |
|---|---|---|
| CN106133413B (zh) | 垫片 | |
| US9080672B2 (en) | Sealing device | |
| WO2014203609A1 (ja) | 密封装置 | |
| CN107869594B (zh) | 密封环及其应用 | |
| WO2017086044A1 (ja) | シール部材 | |
| CN104755817A (zh) | 活塞环 | |
| JP2007071329A (ja) | バックアップリング | |
| JP2005226517A (ja) | シール構造 | |
| JP6076789B2 (ja) | シール構造 | |
| JP5045358B2 (ja) | 密封構造 | |
| JP4877474B2 (ja) | 炭酸ガスシール用密封装置 | |
| JP2012215188A (ja) | 密封構造 | |
| KR20110013277A (ko) | 밀봉장치 | |
| US9371911B2 (en) | Reciprocating sealing device | |
| WO2021014798A1 (ja) | 密封装置 | |
| JP2011196505A (ja) | 摺動用シール | |
| JPH0266332A (ja) | 油圧緩衝器 | |
| JP6895357B2 (ja) | 密封装置 | |
| JP2011256952A (ja) | ロッドシール構造 | |
| JP7203971B2 (ja) | 密封装置 | |
| KR102144410B1 (ko) | 가스켓 | |
| JP2014190362A (ja) | シール構造 | |
| JP2014202221A (ja) | シールリング及び密封構造 | |
| JP2008045658A (ja) | 密封装置 | |
| JP5211927B2 (ja) | 密封装置 |
Legal Events
| Date | Code | Title | Description |
|---|---|---|---|
| 121 | Ep: the epo has been informed by wipo that ep was designated in this application |
Ref document number: 16866046 Country of ref document: EP Kind code of ref document: A1 |
|
| NENP | Non-entry into the national phase |
Ref country code: DE |
|
| ENP | Entry into the national phase |
Ref document number: 20187016112 Country of ref document: KR Kind code of ref document: A |
|
| WWE | Wipo information: entry into national phase |
Ref document number: 1020187016112 Country of ref document: KR |
|
| 122 | Ep: pct application non-entry in european phase |
Ref document number: 16866046 Country of ref document: EP Kind code of ref document: A1 |

