WO2016056435A1 - 鍛造方法および鍛造装置 - Google Patents
鍛造方法および鍛造装置 Download PDFInfo
- Publication number
- WO2016056435A1 WO2016056435A1 PCT/JP2015/077650 JP2015077650W WO2016056435A1 WO 2016056435 A1 WO2016056435 A1 WO 2016056435A1 JP 2015077650 W JP2015077650 W JP 2015077650W WO 2016056435 A1 WO2016056435 A1 WO 2016056435A1
- Authority
- WO
- WIPO (PCT)
- Prior art keywords
- forging
- vibration
- contact state
- forming hole
- punch
- Prior art date
Links
Images
Classifications
-
- B—PERFORMING OPERATIONS; TRANSPORTING
- B21—MECHANICAL METAL-WORKING WITHOUT ESSENTIALLY REMOVING MATERIAL; PUNCHING METAL
- B21J—FORGING; HAMMERING; PRESSING METAL; RIVETING; FORGE FURNACES
- B21J5/00—Methods for forging, hammering, or pressing; Special equipment or accessories therefor
- B21J5/006—Methods for forging, hammering, or pressing; Special equipment or accessories therefor using ultrasonic waves
-
- B—PERFORMING OPERATIONS; TRANSPORTING
- B21—MECHANICAL METAL-WORKING WITHOUT ESSENTIALLY REMOVING MATERIAL; PUNCHING METAL
- B21J—FORGING; HAMMERING; PRESSING METAL; RIVETING; FORGE FURNACES
- B21J5/00—Methods for forging, hammering, or pressing; Special equipment or accessories therefor
-
- B—PERFORMING OPERATIONS; TRANSPORTING
- B21—MECHANICAL METAL-WORKING WITHOUT ESSENTIALLY REMOVING MATERIAL; PUNCHING METAL
- B21J—FORGING; HAMMERING; PRESSING METAL; RIVETING; FORGE FURNACES
- B21J5/00—Methods for forging, hammering, or pressing; Special equipment or accessories therefor
- B21J5/02—Die forging; Trimming by making use of special dies ; Punching during forging
-
- B—PERFORMING OPERATIONS; TRANSPORTING
- B21—MECHANICAL METAL-WORKING WITHOUT ESSENTIALLY REMOVING MATERIAL; PUNCHING METAL
- B21J—FORGING; HAMMERING; PRESSING METAL; RIVETING; FORGE FURNACES
- B21J9/00—Forging presses
- B21J9/02—Special design or construction
-
- B—PERFORMING OPERATIONS; TRANSPORTING
- B21—MECHANICAL METAL-WORKING WITHOUT ESSENTIALLY REMOVING MATERIAL; PUNCHING METAL
- B21J—FORGING; HAMMERING; PRESSING METAL; RIVETING; FORGE FURNACES
- B21J9/00—Forging presses
- B21J9/10—Drives for forging presses
- B21J9/20—Control devices specially adapted to forging presses not restricted to one of the preceding subgroups
Definitions
- the present invention relates to a forging method and a forging device that perform forging while applying ultrasonic vibration.
- a forging device that performs such ultrasonic forging includes a mold, a vibrator attached to the mold, and an ultrasonic oscillator that drives the vibrator. Depending on the output of the ultrasonic oscillator, Ultrasonic vibration is applied to the mold.
- the present inventor performed ultrasonic forging using the forging device as described above, the voltage supplied from the ultrasonic oscillator to the vibrator suddenly increased and an overload (overload) error occurred in the ultrasonic oscillator.
- the phenomenon that the vibration stops during the molding was confirmed.
- the vibration state of the mold is disturbed during molding, and the amplitude of the vibrator is reduced due to the load of the mold. It was rising rapidly.
- the output value of the ultrasonic oscillator is likely to exceed the maximum output, the protection circuit is activated, the ultrasonic oscillator becomes an overload error, the ultrasonic oscillator stops and the mold vibration stops. .
- the present invention has been made in view of the above-described problems, can prevent the vibration state from being disturbed during molding, and reliably obtain the effects of applying vibration such as reduction of molding load and improvement of shape transferability.
- An object of the present invention is to provide a forging method and a forging apparatus that can perform the following.
- the present inventor diligently investigated in detail the cause of vibration disturbance that causes an overload error of the ultrasonic oscillator in the forging process of the ultrasonic forging.
- the present inventor has found a configuration that can achieve the above-mentioned object by repeatedly conducting detailed experiments and researches, and has made the present invention.
- the gist of the present invention is as follows.
- a forging method in which ultrasonic vibration is applied to a die body when a punch is punched into a molding hole of the die body to plastically process a forging material in the molding hole,
- the contact state of the forging material with respect to the inner peripheral surface of the forming hole is divided into an insufficient contact state, a sufficient contact state, and a complete contact state in order from the start of molding
- a forging method characterized in that application of ultrasonic vibration is started after transition from an insufficient contact state to a sufficient contact state.
- a forging device including a die body having a forming hole, a punch for plastic processing of a forging material in the forming hole by being driven into the forming hole, and vibration applying means for applying ultrasonic vibration to the die body.
- a forging apparatus comprising vibration starting means for driving the vibration applying means to start applying ultrasonic vibration after a predetermined time has elapsed after molding of the forging material by the punch is started.
- a forging device including a die body having a forming hole, a punch for plastic processing of a forging material in the forming hole by being driven into the forming hole, and vibration applying means for applying ultrasonic vibration to the die body.
- a load detecting means for detecting the load of the punch on the forged material
- Vibration start means for driving the vibration applying means to start applying ultrasonic vibration at a timing when the load of the punch reaches a preset vibration start load value based on information from the load detecting means.
- a forging device characterized by that.
- a forging device comprising a die body having a forming hole, a punch for plastic processing of a forging material in the forming hole by being driven into the forming hole, and a vibration applying means for applying ultrasonic vibration to the die body.
- the vibration start load value is “Lc1”
- the area of the pressing surface of the punch is “Ap”
- the cross-sectional area of the forming hole is “Aid”
- the outer diameter of the punch is “Dip”
- the outer diameter of the forging material is “Dm”
- the deformation resistance of the forging material is “ ⁇ m”
- the forging method of the invention [1] after the forging material contact state with respect to the inner peripheral surface of the forming hole shifts from an insufficient contact state to a sufficient contact state, application of ultrasonic vibration to the die body is started. As a result, it is possible to prevent the vibration form from being disturbed and unstable, and to reliably obtain the effects of applying vibration such as reduction of the molding load and improvement of shape transferability.
- vibration can be sufficiently applied to the die body, and the effect of applying vibration can be obtained more reliably.
- the insufficient contact state and the sufficient contact state can be clearly distinguished, and the above effect can be obtained more reliably.
- the timing for shifting to a sufficient contact state is predicted based on the elapsed time, the timing for starting application of ultrasonic vibration can be easily obtained.
- the timing for applying the ultrasonic vibration can be accurately obtained.
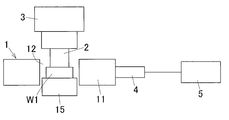
- FIG. 1 is a block diagram showing a forging apparatus capable of performing the forging method of the first embodiment of the present invention.
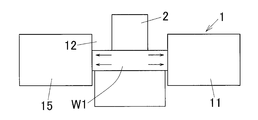
- FIG. 2A is a block diagram illustrating a state immediately after the start of molding in the forging die applied to the forging device of the embodiment.
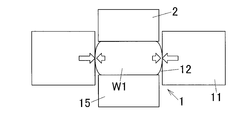
- FIG. 2B is a block diagram illustrating a state immediately before the end of molding in the forging die according to the embodiment.
- FIG. 3 is a graph showing the relationship between the surface pressure P and the process time t in ultrasonic forging.
- FIG. 4 is a plan view for explaining the contact state of the forging material with the inner peripheral surface of the die forming hole.
- FIG. 5A is a block diagram for explaining the relationship between surface pressure and vibration stress in a forging die.
- FIG. 5A is a block diagram for explaining the relationship between surface pressure and vibration stress in a forging die.
- FIG. 5B is a block diagram for explaining the relationship between the surface pressure and the vibration stress in the forging die.
- FIG. 5C is a block diagram for explaining the relationship between the surface pressure and the vibration stress in the forging die.
- FIG. 6 is a block diagram showing a forging apparatus capable of performing the forging method according to the second embodiment of the present invention.
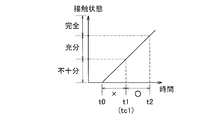
- FIG. 7A is a graph showing the relationship between the contact state of the forging material and the process time in ultrasonic forging.
- FIG. 7B is a graph showing the relationship between the maximum central angle between contact points and the process time in ultrasonic forging.
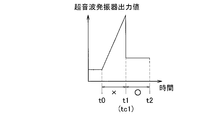
- FIG. 7C is a graph showing the relationship between the output value of the ultrasonic oscillator and the process time in ultrasonic forging.
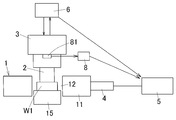
- FIG. 8 is a block diagram showing a forging apparatus capable of performing the forging method according to the third embodiment of the present invention.
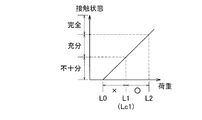
- FIG. 9A is a graph showing the relationship between the contact state of the forging material and the punch load in ultrasonic forging.
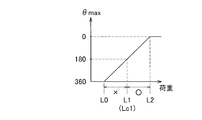
- FIG. 9B is a graph showing the relationship between the maximum central angle between contact points and the punch load in ultrasonic forging.
- FIG. 9C is a graph showing the relationship between the output value of the ultrasonic oscillator and the punch load in ultrasonic forging.
- FIG. 10 is a block diagram for explaining various conditions in the ultrasonic forging die.
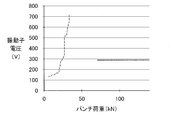
- FIG. 11A is a graph showing the relationship between the vibrator voltage and the punch load in the ultrasonic forging apparatus.
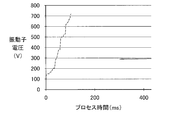
- FIG. 11B is a graph showing the relationship between the vibrator voltage and the process time (molding time) in the ultrasonic forging apparatus.
- FIG. 1 is a block diagram showing a forging apparatus capable of executing a forging method according to a first embodiment of the present invention
- FIGS. 2A and 2B are block diagrams showing a mold of the forging apparatus.
- the forging device is configured to perform plastic working on the forging material W1 to form a cup-shaped forged product W2.
- This forging device includes a die 1 constituting a lower die, a punch 2 constituting an upper die, an elevation drive mechanism 3 for raising and lowering the punch 2, a vibrator 4 for oscillating ultrasonic vibrations, and a vibrator 4 is provided as a basic component.
- the die 1 includes a cylindrical or donut-shaped die body 11 having a columnar molding hole 12 in the center, and a molding pin 15 disposed at a lower end portion in the molding hole 12 of the die body 11.
- the outer peripheral surface of the forged molded product W2 is molded by the inner peripheral surface of the molding hole 12, and the lower surface of the forged molded product W2 is molded by the upper end surface of the molding pin 15.
- the forming pin 15 may be configured to be movable in the vertical direction, and may also be used as a knockout pin for protruding the forged molded product from the forming hole 12 after forging. Moreover, you may make it provide a knockout mechanism separately, without making the shaping
- the punch 2 has the same axis as the forming hole 12 and can be moved up and down by driving the lifting drive mechanism 3. Then, as shown in FIG. 2A, with the forging material W1 placed in the forming hole of the die body 11, the punch 2 is lowered and driven into the forming hole 12, whereby a predetermined forming load is applied to the forging material W1. As shown in FIG. 2B, a forged product W2 corresponding to the shape in the mold is formed.
- a cylindrical forging material W is used as the forging material W, and a cup-shaped forging product W2 is formed.
- the vibrator 4 is attached to the outer peripheral surface of the die body 11.
- the vibrator 4 can oscillate ultrasonic vibration according to the output value of the ultrasonic oscillator 5, and the ultrasonic vibration wave oscillated from the vibrator 4 is dies through a bonding surface with the die body 11. It is transmitted to the main body 11.
- a horn may be interposed between the vibrator 4 and the die body 11 so that the ultrasonic vibration oscillated from the vibrator 4 may be transmitted to the die body 11 via the horn.
- the vibrator 4 and the ultrasonic oscillator 5 constitute vibration imparting means.
- the horn, the vibrator 4 and the ultrasonic oscillator 5 constitute a vibration applying means.
- a raw material of the forging raw material W1 what was manufactured by methods, such as cut
- the forging material W1 when the forging material W1 is placed in the forming hole 12 of the die 1, the punch 2 is lowered and the forging material W1 is plastically processed.
- this embodiment applies vibration, this embodiment is characterized by the timing of starting application of the ultrasonic vibration.
- the vibration form of the vibrator 4 becomes unstable, as described above, the ultrasonic oscillator 5 is overloaded and an error occurs.
- the ultrasonic wave is described in detail below. By specifying the timing of starting the application of vibration, the vibration form of the vibrator 4 is prevented from becoming unstable.
- a cylindrical shape is used as the forging material W1, but the shape of the forging material W1 is not limited to the cylindrical shape, and a polygonal column shape, a spherical shape, a polygonal shape, etc. Any shape may be used.
- FIG. 3 is a graph showing the relationship between the surface pressure P and the process time t in ultrasonic forging.
- the vertical axis shows the surface pressure P and the horizontal axis shows the process time t.
- the surface pressure P is a surface pressure with respect to the forging material W1 on the inner peripheral surface of the forming hole.
- the surface pressure P is not uniform and varies at each contact point with the inner peripheral surface of the forming hole, and the line segment shown in the graph of FIG. 3 corresponds to the maximum value Pm of the surface pressure P.
- “0” of the process time t corresponds to the timing when the forging material W1 is put into the forming hole 12 of the die 1. In this state, the forging material W1 and the inner peripheral surface of the forming hole are substantially not in contact with each other, and a certain clearance exists between them.
- Time “t0” corresponds to the timing at which the forging material W1 is pressurized (plastically deformed) by the descending punch 2 and the forging material W1 starts to contact the inner peripheral surface of the forming hole.
- This time “t0” corresponds to the timing at which the forging material W starts to be formed by the punch 2.
- the contact point of the forging material W1 with respect to the inner peripheral surface of the forming hole appears after this time “t0”, and the contact point is generated and increased in a stochastic manner as the forming proceeds thereafter.
- the forging material W1 in the process of plastic working the forging material W1 (forging molding process), from the start of molding, the forging material W1 is not sufficiently in contact with the inner peripheral surface of the molding hole (insufficient contact state), sufficient contact. It shifts in order to the state (sufficient contact state) which is in contact, and the state (complete contact state) where it is completely (substantially completely) contacted.
- the insufficient contact state refers to a state in which the contact point of the forging material W with respect to the inner peripheral surface of the forming hole is biased to a part in the circumferential direction of the inner peripheral surface of the forming hole.
- the sufficient contact state refers to a state in which the contact points of the forging material W with respect to the inner peripheral surface of the forming hole are dispersed and arranged over a long range in the circumferential direction of the inner peripheral surface of the forming hole.
- the complete contact state refers to a state in which the forging material W is in contact with the entire circumferential direction of the inner peripheral surface of the forming hole.
- the surface pressure P is “0” from time “0” to time “t0”, increases from time “t0” onward, and gradually increases as molding proceeds.
- Time “t1” corresponds to the timing of transition from an insufficient contact state to a sufficient contact state. During the time “t0 to t1”, an insufficient contact state is maintained.
- the forging material W1 fills the forming hole 12 and is brought into a complete contact state, and the forging material W1 flows between the outer peripheral surface of the punch 2 and the inner peripheral surface of the forming hole to form a cup shape. This corresponds to the timing at which the molding of the peripheral wall portion of the forged molded product W2 is started.
- the increase in the surface pressure Pm becomes gentle, and after the time “t2”, the surface pressure Pm increases with a gentle gradient until the molding is completed. That is, before time “t2”, the flow of metal (metal flow) is only in one radial direction as shown in FIG. 2A, whereas after time “t2”, the metal flow as shown in FIG. 2B. Changes in both the radial direction and the axial direction, so that the flow in the radial direction is reduced. Accordingly, at time “t2”, the increase in the surface pressure Pm becomes moderate.
- FIG. 4 is a plan view for explaining the contact state of the forging material W with the inner peripheral surface of the forming hole in the die.
- the contact point A has two or more contact points A.
- a line segment AO connecting one contact point A and the center O of the molding hole 12 and the other contact point A and the center of the molding hole 12.
- the maximum value ⁇ max of the center angles ⁇ between adjacent contact points is greater than 180 ° ( In the case of ⁇ max> 180 °, the contact state is insufficient.
- the maximum value ⁇ max is 180 ° or less (when ⁇ max ⁇ 180 °), a sufficient contact state is obtained.
- the contact state can be classified based on the center angle maximum value ⁇ max. For example, in the example shown in FIG. 4D, since ⁇ max exceeds 180 °, the contact state is insufficient. In the example shown in FIG. 5E, ⁇ max is 180 ° or less, so that a sufficient contact state is obtained.
- the contact state is sufficient. Further, when there is one contact point A, the contact state is insufficient.
- the center of the forming hole 12 is a least square circle fitted to the forming hole outline (inner peripheral surface). This least square circle is obtained by the least square method.
- the distance between adjacent contact points when the distance (circumferential length) along the inner peripheral surface of the forming hole between two adjacent contact points is the distance between adjacent contact points, the distance between adjacent contact points.
- the maximum value of is more than half of the entire circumference of the forming hole, a plurality of contact points A are arranged in a range less than half of the inner peripheral surface of the forming hole. This state corresponds to a state where ⁇ max exceeds 180 ° (a state where ⁇ max> 180 °), and is an insufficient contact state.
- This state corresponds to a state where ⁇ max is 180 ° or less (a state where ⁇ max ⁇ 180 °), and is a sufficient contact state.
- the cross-sectional shape (planar shape) of the forming hole 12 of the die body 11 is formed in a circular shape, but is not limited thereto, and in the present invention, the cross-sectional shape of the forming hole 12 is a polygonal shape, It may be formed in a non-circular shape such as an elliptical shape, an oval shape, or an irregular shape.
- an insufficient contact state and a sufficient contact state may be distinguished on the basis of the central angle ⁇ between adjacent contact points, and the distance (circumferential length) between adjacent contact points may be distinguished.
- an insufficient contact state and a sufficient contact state may be distinguished.
- the present invention is not limited to this, and in the present invention, the state (non-contact state) up to the point when molding is started after the forging material W1 is put into the molding hole 12 may be included in the insufficient contact state. . That is, a case where there is no contact point of the forging material W1 with respect to the inner peripheral surface of the forming hole (in the case of 0) may be an insufficient contact state.
- the vibration stress V is vibration stress on the inner peripheral surface of the forming hole in the die body 11 that vibrates due to vibration applied from the vibrator 4.
- This vibration stress V is a stress generated when the die main body 11 is expanded and contracted by vibration, and corresponds to a vibration stress generated in the radial direction at the interface between the inner peripheral surface of the forming hole and the forging material W1.
- the vibration stress V is based on the vibration of the vibrator 4 and is basically kept constant regardless of the process time t.
- time “t0.5” corresponds to the timing at which the surface pressure Pm becomes equal to the vibration stress V, and after this time “t0.5”, the surface pressure Pm exceeds the vibration stress V. become.
- This time “t0.5” is located between the times “t0 to t1”, but the contact state is insufficient as described above.
- the vibration mode (vibration mode) of the die body 11 and the vibrator 4 is stably maintained in a predetermined mode (for example, a radial vibration mode).
- the contact point is biased to a part in the circumferential direction in the insufficient contact state. Since the vibration is transmitted from the forging material W1 to only the deviated portion (part) of the inner peripheral surface of the forming hole, the forming hole is formed in the remaining portion (portion where there is no contact point). Since the inner peripheral surface and the forging material W1 are separated from each other, vibration is not transmitted between them. Therefore, the influence of vibration from the forging material W1 to the die body 11 is given in the circumferential direction.
- the vibration state of the die body 11 is disturbed, and due to the influence, the vibration form of the vibrator 4 is disturbed and unstable, and the amplitude of the vibrator 4 and the die body 11 is reduced.
- the voltage supplied from the ultrasonic oscillator 5 to the vibrator 4 suddenly increases in an attempt to maintain the initial vibration form, the ultrasonic oscillator 5 is overloaded, the safety circuit is activated, and an error occurs. To do. As a result, the ultrasonic oscillator 5 stops, and the vibration of the vibrator 4 and the die body 11 stops.
- the surface pressure P exceeds the vibration stress V, but the contact state remains insufficient.
- the state of the forging material W1 with respect to the die body 11 is in a state where the forging material W1 is in contact with a part of the inner peripheral surface of the forming hole, and the forging material W1 vibrates in the same phase as the die body 11. . If it does so, the part which is not contacting the shaping
- the vibration of the forging material W1 is not transmitted to a part of the circumferential direction of the die body 11, It is transmitted almost evenly over the entire area in the circumferential direction. Accordingly, the die body 11 and the vibrator 4 are maintained in a stable vibration form without being disturbed in the vibration state.
- the vibration of the forging material W1 is transmitted to the die body 11 from almost the entire circumference in the circumferential direction, as in the sufficient contact state. Will be. Accordingly, vibration is not transmitted from the forging material W1 to the die body 11 in an uneven manner, and the die body 11 and the vibrator 4 are maintained in a predetermined vibration form.
- the effect of ultrasonic vibration is sufficiently ensured by setting the timing for starting application of ultrasonic vibration by the vibrator 4 to the die body 11 after shifting to a sufficient contact state.
- the production load is effectively prevented from being stopped due to the occurrence of an overload error of the ultrasonic oscillator 5 while reliably reducing the molding load and improving the shape transferability.
- the effect of ultrasonic vibration can be increased as the application of ultrasonic vibration is started as early as possible in the initial stage of forging. For this reason, in this embodiment, it is preferable to start application of ultrasonic vibration immediately after shifting to a sufficient contact state. Specifically, it is preferable to start applying ultrasonic vibration within 30 ms (milliseconds) from the time when the contact state is sufficiently reached.
- FIG. 6 is a block diagram showing a forging apparatus (forging die) capable of executing the forging method according to the second embodiment of the present invention.
- the forging device includes a lifting control device 6 and a signal start control device 7, and the vibration start control device 7 has a reference time (vibration start time) obtained by a method described later. It is set in advance.
- the lifting control device 6 Based on the information from the lifting drive mechanism 3, the lifting control device 6 detects the time when the punch 2 descends and presses the forging material W to start forming. For example, in the case of a mechanical lift drive mechanism (press) 3, the lift control device 6 determines that the punch 2 has reached the molding start height based on output information from a sensor that detects the rotation angle of the crankshaft of the press.
- the time point is detected as the molding start time, or based on the output information from the sensor that detects the slide position of the punch 2, the lifting control device 6 detects the time point when the punch 2 reaches the molding start height as the molding start time. To do.
- the lift control device 6 that has detected the molding start time in this way outputs a signal related to the molding start time to the vibration start control device 7.
- the signal start control device 7 that has received the signal measures the time (process elapsed time) from the molding start time based on the built-in timer 71. Subsequently, the vibration start control device 7 transmits a vibration start signal to the ultrasonic oscillator 5 at a timing when the measurement time reaches the reference time.
- the ultrasonic oscillator 5 that has received the vibration start signal outputs power for driving the vibrator, and the application of vibration to the die body 11 by the vibrator 4 is started.
- the voltage of the vibrator 4 may be set to 500 V to 900 V, for example.
- the lifting control device 6 detects the timing when the molding is completed based on information from the lifting drive mechanism 3. For example, on the basis of output information from a sensor that detects the rotation angle of the crankshaft of the press and output information from a sensor that detects the slide position of the press, the elevating control device 6 has reached the point when it reached the bottom stroke dead center of the press. Is detected as the molding completion time.
- the lift control device 6 that has detected the molding completion time transmits a signal related to the molding completion to the ultrasonic oscillator 5.
- the ultrasonic oscillator 5 that has received the molding completion signal stops the output to the vibrator 4, thereby stopping the ultrasonic vibration of the die body 11 by the vibrator 4.
- Such forging is repeatedly performed, and forged products are sequentially produced.
- the elevation control device 6 and the vibration start control device 7 are configured by, for example, a microcomputer.
- the vibration start control device 7 functions as vibration start means.
- FIG. 7A is a graph showing the relationship between the contact state of the forging material and the process elapsed time
- FIG. 7B is a graph showing the relationship between the center angle maximum value ⁇ max between the contact points and the process elapsed time
- FIG. 7C is the output of the ultrasonic oscillator. It is a graph which shows the relationship between a value and process elapsed time.
- the time corresponding to “t1” in the forging apparatus shown in FIG. 6 may be set as the vibration start time “tc1”.
- forging is performed by temporarily setting “t0” corresponding to the molding start time as the swing start time “tc1” in the forging device of FIG.
- the reference time “tc1” is set to a time slightly delayed from the temporarily set time “t0”, and forging is similarly performed to confirm that overload occurs.
- the temporarily set reference time “tc1” is gradually set to a later time, and the earliest time among the times when the vibration state is not disturbed and overload does not occur is experimentally determined. Find out. Then, the time is set to the regular reference time “tc1”, and the reference time “tc1” is set in the forging apparatus shown in FIG.
- the earliest time at which an overload error does not occur is set as the reference time “tc1”.
- the present invention is not limited to this, and the present invention may be a time at which no overload error occurs.
- any time can be set as the regular reference time “tc1”.
- the timing for starting application of ultrasonic vibration is determined based on the elapsed time, it can be easily implemented.
- the predicted value is a stochastic phenomenon and has fluctuations.
- the forming speed of the forging material W1 varies depending on various factors. Therefore, it is preferable to set the predicted value of the timing for shifting to a sufficient contact state with a margin. For example, a predicted value having a certain width (range) may be obtained, and an appropriate time within the range may be set as the reference time tc1 in consideration of the surrounding environment and molding conditions.
- FIG. 8 is a block diagram showing a forging apparatus (forging die) capable of executing the forging method according to the third embodiment of the present invention.
- the forging device includes a load detector 81 that detects a load on the forging material W1 of the punch 2 and a vibration start control device 8 that acquires a signal related to the punch load from the load detector 81. Yes.
- a reference load value (vibration start load value) obtained by a method described later is set in advance.
- the vibration start control device 8 detects the load of the punch 2 on the forging material W (punch load) when the punch 2 descends based on the information from the load detector 81, and the punch load is the reference load value.
- the vibration start signal is transmitted to the ultrasonic oscillator 5 at the timing of reaching.
- the ultrasonic oscillator 5 that has received the vibration start signal outputs power for driving the vibrator, the vibrator 4 starts to vibrate, and the application of vibration to the die body 11 is started.
- the voltage of the vibrator 4 may be set to 500 V to 900 V, for example.
- the lifting control device 6 detects the timing when the molding is completed based on the information from the lifting drive mechanism 3 and transmits a signal related to the molding completion to the ultrasonic oscillator 5.
- the ultrasonic oscillator 5 that has received the molding completion signal stops the output to the vibrator 4, thereby stopping the ultrasonic vibration of the die body 11 by the vibrator 4.
- Such forging is repeatedly performed, and forged products are sequentially produced.
- the vibration start control device 8 is constituted by a microcomputer or the like and functions as a vibration start means. Furthermore, the load detector 81 functions as a load detection means.
- FIG. 9A is a graph showing the relationship between the contact state of the forging material and the punch load
- FIG. 9B is a graph showing the relationship between the contact point center angle maximum value ⁇ max and the punch load
- FIG. 9C is the output value of the ultrasonic oscillator and the punch load. It is a graph which shows the relationship.
- L0 is a load value at the timing when the punch 2 descends and molding is started
- L1 is an insufficient contact state ( ⁇ max> 180 °) to a sufficient contact state
- the reference load value (vibration start load value) “Lc1” in the forging device shown in FIG. 8 may be set to “L1”.
- forging is performed by temporarily setting no load (0 kN) as the reference load value Lc1 in the forging device of FIG.
- the temporarily set reference load value “Lc1” is set to a value slightly higher than 0 kN, and forging is performed in the same manner to confirm that overload occurs.
- the temporarily set reference load value “Lc1” is set to a gradually increased value, and the smallest load among the loads in which the vibration state is not disturbed and overload does not occur is tested. Find out.
- the load value is set to a normal reference load value “Lc1”, and the reference load value “Lc1” is set in the forging apparatus shown in FIG.
- the smallest load that does not cause an overload error is set as the reference load value “Lc1”.
- the present invention is not limited to this, and any load that does not cause an overload error may be used in the present invention.
- any load can be set as the reference load value “Lc1”.
- the forging method according to the third embodiment since the timing for shifting from the punch load to a sufficient contact state (timing for starting vibration application) is predicted, the forging method may be affected by fluctuations in the molding speed of the forging material W1. Absent. For this reason, the forging method according to the third embodiment can predict the timing of vibration application start with high accuracy compared to the forging method according to the second embodiment predicted from the process elapsed time, and an overload error occurs. The molding load can be reduced and the shape transferability can be improved more reliably while preventing the above problem.
- the forging method of the fourth embodiment determines the timing for starting application of ultrasonic vibration based on the punch load, as in the third embodiment, but when starting vibration.
- the load value (reference load value) “Lc1” is different from that of the third embodiment.
- the inventor experimentally said that in ultrasonic forging, the transition point from the insufficient contact state to the sufficient contact state coincides with the boundary point of occurrence of overload error in the ultrasonic oscillator.
- the punch load (reference load value) “Lc1” at the timing of shifting to a sufficient contact state is experimentally obtained.
- the various condition data in the forging die for ultrasonic forging include the punch area (the area of the pressing surface) “Ap”, the inner diameter “Did” of the forming hole, and the cross-sectional area “Aid” of the forming hole.
- the outer diameter “Dip” of the punch, the outer diameter “Dm” of the forging material, and the deformation resistance “ ⁇ m” of the forging material are derived and the punch load at the timing of shifting to a sufficient contact state. Therefore, if a relational expression that correlates these factors is derived and the punch load at the timing of shifting to a sufficient contact state can be calculated from the relational expression, ultrasonic forging is performed using the calculated value (vibration start load value). By doing so, it is possible to eliminate the disturbance of the vibration state and the occurrence of an overload error.
- the thickness of the forging material, the clearance “Did ⁇ Dm”, The range is determined in consideration of the effect of strain rate.
- the expression (1-2) shows the influence of the punch area “Ap” on the reference load value “Lc1”. The larger the punch area “Ap”, the higher the reference load value “Lc1”. Further, the expression (1-2) shows the influence on the reference load value “Lc1” due to the molding hole cross-sectional area “Aid”. As the molding hole cross-sectional area “Aid” increases, the reference load value “Lc1” also increases. Get higher.
- the punch area “Ap” is calculated from the punch outer diameter “Dip” by using the expression (1-3) indicating the relationship between the punch area “Ap” and the punch outer diameter “Dip”. Can be calculated.
- the forming hole cross-sectional area “Aid” is expressed by using the equation (1-4) indicating the relationship between the forming hole cross-sectional area “Aid” and the forming hole inner diameter “Did”. Can be calculated from the inner diameter “Did” of the forming hole.
- Equation (1-5) shows the influence of the deformation resistance “ ⁇ m” of the forging material on the reference load value “Lc1”. As the deformation resistance “ ⁇ m” increases, “R ⁇ ” increases. The load value “Lc1” also increases.
- the vibration start load value “Lc1” calculated by the above equation (1-1) is set in the forging device shown in FIG. 8 as in the third embodiment.
- the forging material for example, one having a deformation resistance of 10 MPa or more can be used.
- the ultrasonic vibration frequency applied to the die body is set to 10 to 50 kHz, for example.
- the vibration state can be prevented from being disturbed in the same manner as described above, and overload error can be prevented while reducing the molding load and shape transferability. Can be improved reliably.
- the vibration start load value “Lc1” obtained by the above equation (1-1) has a certain range, and is compared with the vibration start load value “Lc1” obtained experimentally in the third embodiment.
- the accuracy may be inferior.
- the equation (1-1) uses the die size and the material deformation resistance which are the main factors for determining the vibration start load value “Lc1”. Since it is affected by the friction coefficient at the interface, the strain rate of the forging material, etc., the load value “Lc1” obtained by the equation (1-1) may be inaccurate. Therefore, it is preferable to experimentally obtain a more accurate vibration start load value “Lc1” from the load value “Lc1” obtained by Expression (1-1) as a temporary reference load value.
- the initial conditions of the experiment are close to the appropriate conditions, making it easy to obtain accurate experimental results, reducing the number of repetitions of the measurement, and greatly reducing the time required for the experiment.
- the vibration start load value “Lc1” can be obtained efficiently.
- a temporary vibration start load value “Lc1” is obtained by the equation (1-1), and the vibration start load value “Lc1” is set as an initial value in the forging device in the third embodiment.
- forging is repeatedly performed to obtain an appropriate vibration start load value “Lc1”.
- the vibration start load value “Lc1” can be obtained with high accuracy and efficiency.
- Example 1 A forging device (see FIG. 8) similar to that of the third embodiment was prepared.
- the forming hole inner diameter “Did” of the die body 11 in the die 1 is 24 mm
- the forming hole cross-sectional area “Aid” is 452 mm 2
- the outer diameter of the die body 11 is “Dod” is 162 mm.
- the thickness “td” of the die body 11 is 40 mm.
- the outer diameter “Dp” of the punch 2 is 21 mm
- the punch area “Ap” is 346 mm 2 .
- the material (die steel number) of the die 1 and the punch 2 is SKD11.
- the forging material W1 to be forged is cylindrical.
- the forged material W1 has an outer diameter “Dm” of 23.5 mm and a thickness “Tm” of 9.3 mm.
- the material (alloy number) of the forging material W1 is A6061-O, and the deformation resistance “ ⁇ m” is 68.2 Mpa. Furthermore, the temperature of the forging material W1 was normal temperature.
- the forged molded product W2 to be molded has a bottomed cylindrical cup shape, and has an outer diameter of ⁇ 24 mm, an inner diameter of ⁇ 21 mm, and a plate thickness of 5 mm.
- the punch load value (vibration start load value) at the timing when the forging material W1 shifts from the insufficient contact state to the sufficient contact state using the equation (1-1) described in the fourth embodiment. ) “Lc1” was calculated.
- the lower limit value of “Lc1” was 40 kN and the upper limit value was 107 kN.
- the amplitude “Ado” of ultrasonic vibration applied from the vibrator 4 to the outer peripheral surface of the die was 0.014 mm (pp), and the frequency “f” was 20.3 kHz. Further, the upper limit value of the output value (vibrator voltage) of the ultrasonic oscillator 5 was set to 700V.
- Example 1 the punch load value (set load value) for starting ultrasonic vibration was set to 70 kN, which is within the range of the calculated vibration start load value “Lc1”. That is, forging is performed by temporarily setting 73.5 kN, which is an intermediate value between vibration start load values 40 kN to 107 kN calculated in advance, as the initial value of the reference load value “Lc1” in the forging device (see FIG. 8). It was confirmed that no overload error occurred in the ultrasonic oscillator 5 (the output value was less than 700V).
- the temporarily set reference load value “Lc1” was changed little by little before and after, forging was performed, and a lower limit value of 70 kN, which is a lower limit value of the reference load value “Lc1” that does not cause an overload error, was found.
- Example 2 As shown in Table 1, the above-described implementation was performed except that the punch load value (reference load value) “Lc1” for starting ultrasonic vibration was set to 100 kN within the range of the vibration start load value “Lc1” calculated in advance. Ultrasonic forging was performed in the same manner as in Example 1.
- the vibration mode of the vibrator 4 was stable from the start of vibration to the end of molding, and no overload error occurred in the ultrasonic oscillator 5.
- the reference load value set in the forging device is the same as that of Example 1 except that the reference load value is set to 30 kN which is outside the range of the vibration start load value “Lc1” calculated from the equation (1-1). Similarly, ultrasonic forging was performed.
- the bond processing surface is stretched to generate a new surface. Therefore, the portion where the forging material W1 is in contact with the inner peripheral surface of the forming hole Can be confirmed by appearance observation. As a result, the locations where the forging material W1 is in contact with the inner peripheral surface of the forming hole are arranged in a substantially dispersed manner, and it has been confirmed that the forging material W1 is in a sufficient contact state.
- forging was performed by temporarily setting the reference load value “Lc1” to 0 kN, and it was confirmed that an overload error occurred in the ultrasonic oscillator. Thereafter, while gradually increasing the temporarily set reference load value “Lc1”, the vibrator voltage value and the presence or absence of an overload error were confirmed, and the smallest load that did not cause an overload error was obtained.
- the reference load value “Lc1” was 70 kN as in Example 1. Further, while gradually increasing the temporarily set reference load value “Lc1”, the vibrator voltage value and the occurrence of an overload error were confirmed. The result is shown in the graph of FIG. 11A.
- a forging device (see FIG. 6) shown in the second embodiment was prepared.
- the material and dimensions of a die such as a die or a punch
- the material and dimensions of a forging material and the dimensions of a forged product are the same as in the first embodiment.
- the amplitude and frequency of the ultrasonic vibration and the output upper limit value of the ultrasonic oscillator are the same as in the first embodiment.
- the vibration start time “Lt1” corresponding to the process elapsed time from the molding start time to the vibration start time was obtained in the same manner as in the second embodiment.
- forging was performed by temporarily setting the vibration start time (reference time) “Lt1” as the molding start time, and it was confirmed that an overload error occurred in the ultrasonic oscillator. After that, while gradually delaying the temporarily set reference time “Lt1”, the vibrator voltage value and the presence / absence of an overload error were checked, and the earliest time at which no overload error occurred was obtained.
- the reference time “Lt1” was 300 ms (milliseconds). Further, while gradually delaying the temporarily set reference time “Lt1”, the vibrator voltage value and the occurrence of an overload error were confirmed. The result is shown in the graph of FIG. 11B.
- the forging method of the present invention can be used for a forging device or the like that performs die forging using ultrasonic vibration.
Landscapes
- Engineering & Computer Science (AREA)
- Mechanical Engineering (AREA)
- Forging (AREA)
Priority Applications (2)
| Application Number | Priority Date | Filing Date | Title |
|---|---|---|---|
| DE112015004620.8T DE112015004620T5 (de) | 2014-10-09 | 2015-09-30 | Schmiedeverfahren und Schmiedeeinrichtung |
| US15/518,085 US10449596B2 (en) | 2014-10-09 | 2015-09-30 | Forging method and forging device |
Applications Claiming Priority (2)
| Application Number | Priority Date | Filing Date | Title |
|---|---|---|---|
| JP2014-207885 | 2014-10-09 | ||
| JP2014207885A JP6454510B2 (ja) | 2014-10-09 | 2014-10-09 | 鍛造方法および鍛造装置 |
Publications (1)
| Publication Number | Publication Date |
|---|---|
| WO2016056435A1 true WO2016056435A1 (ja) | 2016-04-14 |
Family
ID=55653050
Family Applications (1)
| Application Number | Title | Priority Date | Filing Date |
|---|---|---|---|
| PCT/JP2015/077650 WO2016056435A1 (ja) | 2014-10-09 | 2015-09-30 | 鍛造方法および鍛造装置 |
Country Status (4)
| Country | Link |
|---|---|
| US (1) | US10449596B2 (de) |
| JP (1) | JP6454510B2 (de) |
| DE (1) | DE112015004620T5 (de) |
| WO (1) | WO2016056435A1 (de) |
Families Citing this family (3)
| Publication number | Priority date | Publication date | Assignee | Title |
|---|---|---|---|---|
| JP6454510B2 (ja) * | 2014-10-09 | 2019-01-16 | 昭和電工株式会社 | 鍛造方法および鍛造装置 |
| CN108543898A (zh) * | 2018-05-10 | 2018-09-18 | 江苏大学 | 超声辅助精锻方法与装置 |
| CN113020524A (zh) * | 2021-03-01 | 2021-06-25 | 中冶陕压重工设备有限公司 | 一种高l型耐磨衬板成型用锻压座及衬板成型方法 |
Citations (6)
| Publication number | Priority date | Publication date | Assignee | Title |
|---|---|---|---|---|
| JP2001286935A (ja) * | 2000-04-07 | 2001-10-16 | Amada Eng Center Co Ltd | 曲げ加工方法及びプレスブレーキ |
| JP2004098137A (ja) * | 2002-09-10 | 2004-04-02 | Rezakku:Kk | ナイフ曲げ加工装置,その方法 |
| JP2005193266A (ja) * | 2004-01-06 | 2005-07-21 | Amada Co Ltd | プレスブレーキによる折曲げ加工方法及びプレスブレーキ |
| JP2005193240A (ja) * | 2003-12-26 | 2005-07-21 | Amada Co Ltd | 曲げ加工装置及びその方法 |
| JP2007213640A (ja) * | 2006-02-07 | 2007-08-23 | Fujitsu Ltd | キャリッジアセンブリの組立方法 |
| JP2009279596A (ja) * | 2008-05-20 | 2009-12-03 | Nippon Steel Corp | 金属の鍛造方法及び金属の鍛造装置 |
Family Cites Families (6)
| Publication number | Priority date | Publication date | Assignee | Title |
|---|---|---|---|---|
| GB2206304B (en) * | 1987-06-30 | 1991-07-03 | Metal Box Plc | Method and apparatus for reducing the mouth of a tubular body. |
| GB8906998D0 (en) * | 1989-03-28 | 1989-05-10 | Metal Box Plc | Maintaining preferred vibration mode in an annular article |
| US5249450A (en) * | 1992-06-15 | 1993-10-05 | Micron Technology, Inc. | Probehead for ultrasonic forging |
| JP5302592B2 (ja) * | 2008-07-31 | 2013-10-02 | 高周波熱錬株式会社 | ワークピースの肥大加工方法 |
| JP6454510B2 (ja) * | 2014-10-09 | 2019-01-16 | 昭和電工株式会社 | 鍛造方法および鍛造装置 |
| JP6588240B2 (ja) * | 2015-06-04 | 2019-10-09 | 昭和電工株式会社 | 鍛造方法 |
-
2014
- 2014-10-09 JP JP2014207885A patent/JP6454510B2/ja active Active
-
2015
- 2015-09-30 WO PCT/JP2015/077650 patent/WO2016056435A1/ja active Application Filing
- 2015-09-30 DE DE112015004620.8T patent/DE112015004620T5/de not_active Withdrawn
- 2015-09-30 US US15/518,085 patent/US10449596B2/en not_active Expired - Fee Related
Patent Citations (6)
| Publication number | Priority date | Publication date | Assignee | Title |
|---|---|---|---|---|
| JP2001286935A (ja) * | 2000-04-07 | 2001-10-16 | Amada Eng Center Co Ltd | 曲げ加工方法及びプレスブレーキ |
| JP2004098137A (ja) * | 2002-09-10 | 2004-04-02 | Rezakku:Kk | ナイフ曲げ加工装置,その方法 |
| JP2005193240A (ja) * | 2003-12-26 | 2005-07-21 | Amada Co Ltd | 曲げ加工装置及びその方法 |
| JP2005193266A (ja) * | 2004-01-06 | 2005-07-21 | Amada Co Ltd | プレスブレーキによる折曲げ加工方法及びプレスブレーキ |
| JP2007213640A (ja) * | 2006-02-07 | 2007-08-23 | Fujitsu Ltd | キャリッジアセンブリの組立方法 |
| JP2009279596A (ja) * | 2008-05-20 | 2009-12-03 | Nippon Steel Corp | 金属の鍛造方法及び金属の鍛造装置 |
Also Published As
| Publication number | Publication date |
|---|---|
| JP6454510B2 (ja) | 2019-01-16 |
| DE112015004620T5 (de) | 2017-06-22 |
| US10449596B2 (en) | 2019-10-22 |
| JP2016074026A (ja) | 2016-05-12 |
| US20170312809A1 (en) | 2017-11-02 |
Similar Documents
| Publication | Publication Date | Title |
|---|---|---|
| WO2016056435A1 (ja) | 鍛造方法および鍛造装置 | |
| Gorbatyuk et al. | Production of periodic bars by vibrational drawing | |
| JP6155321B2 (ja) | 成形プロセスでポット形状部品を製造する方法 | |
| JP6673760B2 (ja) | 突起部成形装置、突起部成形方法 | |
| KR101637139B1 (ko) | 프레스 성형 방법 | |
| JP5692478B1 (ja) | カップ状部材のプレス成形方法 | |
| JP5981884B2 (ja) | 熱間据込鍛造装置、及び熱間据込鍛造方法 | |
| EP2606993A1 (de) | Matrize zum Setzen von Stanznieten | |
| JP6859718B2 (ja) | 深絞り成形方法 | |
| WO2015025769A1 (ja) | 金属加工用ダイ | |
| JP6588240B2 (ja) | 鍛造方法 | |
| JP5626501B1 (ja) | ボス付き円筒容器の成形方法 | |
| JP6102449B2 (ja) | 中空押出成形装置及び中空押出成形方法 | |
| RU2451569C2 (ru) | Способ объемного выдавливания деталей типа стакана концентричным угловым прессованием на горизонтальном экструзионном гидравлическом прессе | |
| KR101825660B1 (ko) | 마찰 교반 홀 클린칭을 통한 이종소재 접합방법 | |
| Hung et al. | The influence of ultrasonic-vibration on double backward-extrusion of aluminum alloy | |
| Yamashita et al. | Punchless Piecing Process of Aluminum Tube Wall by Impulsive Water Pressure | |
| JP2016074026A5 (de) | ||
| JP2015024427A (ja) | 金属材の加工方法 | |
| JP2002346682A (ja) | 厚板の据込み−バーリング加工方法及びその金型 | |
| RU2402401C1 (ru) | Способ объемной горячей штамповки деталей типа стаканов и чаш | |
| JP5949463B2 (ja) | カップ状部材のプレス成形法 | |
| RU2551036C1 (ru) | Устройство для формообразования тонкостенных осесимметричных деталей усеченной сужающейся формы | |
| RU2391174C1 (ru) | Способ объемной горячей штамповки деталей типа чаш и стаканов | |
| Presz et al. | Initial Micro-Clinching Analysis |
Legal Events
| Date | Code | Title | Description |
|---|---|---|---|
| 121 | Ep: the epo has been informed by wipo that ep was designated in this application |
Ref document number: 15849353 Country of ref document: EP Kind code of ref document: A1 |
|
| WWE | Wipo information: entry into national phase |
Ref document number: 15518085 Country of ref document: US Ref document number: 112015004620 Country of ref document: DE |
|
| 122 | Ep: pct application non-entry in european phase |
Ref document number: 15849353 Country of ref document: EP Kind code of ref document: A1 |
