WO2018047600A1 - 研削砥石及びその製造方法 - Google Patents
研削砥石及びその製造方法 Download PDFInfo
- Publication number
- WO2018047600A1 WO2018047600A1 PCT/JP2017/029594 JP2017029594W WO2018047600A1 WO 2018047600 A1 WO2018047600 A1 WO 2018047600A1 JP 2017029594 W JP2017029594 W JP 2017029594W WO 2018047600 A1 WO2018047600 A1 WO 2018047600A1
- Authority
- WO
- WIPO (PCT)
- Prior art keywords
- base metal
- fixed
- grinding
- fixed abrasive
- workpiece
- Prior art date
Links
Images
Classifications
-
- B—PERFORMING OPERATIONS; TRANSPORTING
- B24—GRINDING; POLISHING
- B24D—TOOLS FOR GRINDING, BUFFING OR SHARPENING
- B24D3/00—Physical features of abrasive bodies, or sheets, e.g. abrasive surfaces of special nature; Abrasive bodies or sheets characterised by their constituents
-
- B—PERFORMING OPERATIONS; TRANSPORTING
- B24—GRINDING; POLISHING
- B24D—TOOLS FOR GRINDING, BUFFING OR SHARPENING
- B24D5/00—Bonded abrasive wheels, or wheels with inserted abrasive blocks, designed for acting only by their periphery; Bushings or mountings therefor
-
- B—PERFORMING OPERATIONS; TRANSPORTING
- B24—GRINDING; POLISHING
- B24D—TOOLS FOR GRINDING, BUFFING OR SHARPENING
- B24D3/00—Physical features of abrasive bodies, or sheets, e.g. abrasive surfaces of special nature; Abrasive bodies or sheets characterised by their constituents
- B24D3/02—Physical features of abrasive bodies, or sheets, e.g. abrasive surfaces of special nature; Abrasive bodies or sheets characterised by their constituents the constituent being used as bonding agent
- B24D3/04—Physical features of abrasive bodies, or sheets, e.g. abrasive surfaces of special nature; Abrasive bodies or sheets characterised by their constituents the constituent being used as bonding agent and being essentially inorganic
Definitions
- the present invention relates to a grinding wheel used for grinding a workpiece made of a metal material, a ceramic material or the like, and a method of manufacturing the same.
- a grinding wheel for grinding a workpiece made of a metal material, a ceramic material or the like for example, a base metal having a workpiece facing surface facing the workpiece, and abrasive grains such as diamond or cBN on the workpiece facing surface are suitable. It is known to have an abrasive layer or grinding layer held by a bonding material (see Patent Document 1). Then, when grinding a work using such a grinding wheel, the grinding wheel is attached to a suitable grinding device, and the base metal is fed at a high speed while rotating around its axis to feed it toward the work, The grinding layer disposed on the workpiece facing surface of the base metal is brought into contact with the workpiece. By doing so, the abrasive grains exposed on the surface of the grinding layer become cutting edges, and the work is ground.
- JP, 2010-46771 A Japanese Patent Application Laid-Open No. 63-283865
- the technical subject of this invention is excellent in the discharge
- the present invention has a base metal having a workpiece facing surface for facing a workpiece, and a fixed abrasive wire in which a large number of abrasive grains are fixed to a core wire,
- the abrasive wire is fixed so as to extend adjacent to the workpiece facing surface of the base metal, whereby a grinding portion for workpiece grinding is formed on the workpiece facing surface, and adjacent fixed abrasive particles are formed.
- a grinding wheel characterized in that a discharge groove for chip discharge, which is a recess between wires, is formed.
- the workpiece-facing surface of the base metal is formed of an outer peripheral surface around the rotation axis of the base metal, and the fixed abrasive wire is formed on the outer peripheral surface of the base metal along the rotational axis direction.
- the fixed abrasive wire which is fixed to the base metal in a spirally wound state, whereby the grinding portion is formed on the outer peripheral surface of the base metal and adjacent to the rotation axis direction.
- the discharge groove is formed by the concave portion of And, more preferably, the fixed abrasive wire has a first end and a second end at both ends in the longitudinal direction, and the first end is fixed to one end side of the base metal in the rotation axis direction The second end is fixed to the other end side of the base metal in the direction of the rotation axis of the base metal, and the intermediate part located between the first end and the second end is the base metal. Relative to the outer peripheral surface, it is wound so as to be capable of relative movement in the direction of the rotation axis in a non-sticking state.
- the work-facing surface of the base metal is an end face on one end side in the rotation axis direction of the base metal, and the fixed abrasive wire is on the end face of the base metal.
- the grinding portion is formed on the end face of the base metal, and the radial direction of the base metal is fixed to the base metal in a spirally wound state around the rotation axis.
- the said discharge groove may be formed of the recessed part between the fixed abrasive wires which adjoin each other.
- the fixed abrasive wire has a first end and a second end at both ends in the longitudinal direction, and the first end is on one side in the radial direction of the end face of the base metal.
- An intermediate portion which is fixed, the second end is fixed on the other side in the radial direction of the base metal, and an intermediate portion located between the first end and the second end is opposed to the end face of the base metal.
- a spirally recessed guide groove is engraved on the end face of the base metal, and the fixed abrasive wire is disposed in the guide groove along the longitudinal direction of the guide groove. It may be fixed to the base metal in a fixed state.
- a grinding wheel in which a grinding portion for grinding a workpiece and a discharge groove for discharging chips are formed on the workpiece-facing surface of a base metal having a workpiece-facing surface for facing a workpiece.
- a fixed abrasive wire having an outer peripheral surface around the rotation axis of the base metal as the work-facing surface, and a fixed abrasive wire having abrasive grains fixed to the core wire is formed on the outer peripheral surface of the base metal in the rotational axis direction.
- the grinding portion is formed on the outer peripheral surface by spirally winding from one end side to the other end side, and the discharge groove is formed by the concave portion between the fixed abrasive wires adjacent in the rotation axis direction.
- a method of manufacturing a grinding wheel comprising the steps of forming and securing the first end and the second end in the longitudinal direction of the fixed abrasive wire to the base metal.
- a method of manufacturing a grinding stone in which a grinding portion for grinding a workpiece and a discharge groove for discharging chips are formed on the workpiece-facing surface of a base metal having a workpiece-facing surface facing a workpiece.
- the fixed abrasive wire having an end face on one end side in the rotation axis direction of the base metal as the work-facing surface and the abrasive grains fixed to the core wire is placed on the end face of the base metal around its rotation axis.
- a method of manufacturing a grinding wheel characterized by the present invention is provided.
- the fixed abrasive wire is fixed to the workpiece facing surface facing the workpiece in the base metal, whereby the grinding portion and chips for grinding the workpiece on the workpiece facing surface of the base metal A discharge groove for discharge is simultaneously formed. Therefore, it is possible to provide a grinding wheel which is excellent in chip dischargeability and can improve the grinding efficiency, and a method of manufacturing the grinding wheel.
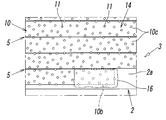
- FIG. 2 is a partial enlarged side view schematically showing an area A surrounded by an alternate long and short dash line in FIG.
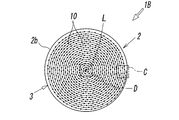
- FIG. 2 is a partial enlarged side view schematically showing a region B surrounded by an alternate long and short dash line in FIG. 1.
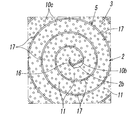
- FIG. 1 It is a top view which shows typically 2nd Embodiment of the grinding stone which concerns on this invention.
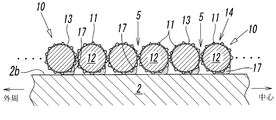
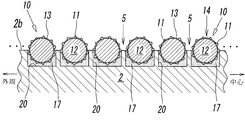
- FIG. 7 is a partially enlarged cross-sectional view showing an intermediate portion of the fixed abrasive wire fixed to the base metal of FIG. 6 in an enlarged manner.
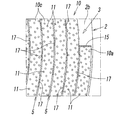
- FIG. 7 is a partial enlarged plan view schematically showing a region C surrounded by an alternate long and short dash line in FIG. 6.
- FIG. 7 is a partial enlarged plan view schematically showing a region D surrounded by an alternate long and short dash line in FIG. 6. It is a top view which shows typically 3rd Embodiment of the grinding stone which concerns on this invention.
- FIG. 11 is a partially enlarged cross-sectional view showing an intermediate portion of the fixed abrasive wire fixed to the base metal of FIG. 10 in an enlarged manner.
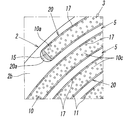
- FIG. 11 is a partial enlarged plan view schematically showing an area E surrounded by an alternate long and short dash line in FIG. 10.
- FIG. 11 is a partial enlarged plan view schematically showing a region F surrounded by an alternate long and short dash line in FIG. 10.
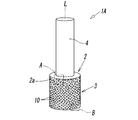
- the grinding wheel 1A is for grinding a workpiece W such as a metal material or a ceramic, and the base metal 2 having a workpiece facing surface facing the workpiece W, and the workpiece grinding surface provided on the workpiece facing surface And a grinding unit 3.
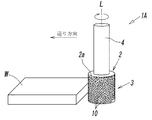
- the base metal 2 was attached to a suitable grinding device (not shown) and was rotated about its rotation axis L with respect to the base metal 2 Feeding is performed in a state, and the grinding portion 3 provided on the work grinding surface of the base metal 2 (the outer peripheral surface 2a of the base metal 2 described later) is brought into contact with the work W.
- the base metal 2 is formed in a cylindrical or cylindrical shape and formed in a circular cross-section, for example, by a metal such as stainless steel, aluminum, super steel, etc.
- the work opposing surface is the base metal. It comprises a circular outer peripheral surface 2a around the rotation axis L.
- the base metal 2 is integrally provided with a shaft 4 formed in a round rod shape smaller in diameter than that.
- the shaft 4 is a portion to be clamped by the grinding device.
- the base metal 2 is attached to the grinding apparatus through the shaft 4 so that it can rotate in the three axial directions while rotating about the axis L by the driving force of the grinding apparatus.
- the outer diameters of the base metal 2 and the shaft 4 and the lengths in the direction of the rotation axis L can be arbitrarily set in accordance with the dimensions of the workpiece to be ground.
- the fixed abrasive wire 10 having flexibility described later spirals along the direction of the rotation axis L on the outer peripheral surface 2 a of the base metal 2. It is formed by being fixed to the base metal 2 in a wound state. And the abrasive grain 11 exposed to the surface of the fixed abrasive wire 10 becomes a cutting blade, and the said workpiece
- the fixed abrasive wire 10 used for the grinding wheel 1A fine wires such as diamond or cubic boron nitride (cBN) can be used as the core wire 12 made of metal such as piano wire and having flexibility.
- the abrasive grains 11 are fixed in a single layer state (single particle state).
- fixing of the abrasive grains 11 to the core wire 12 is performed by an appropriate fixing method, but when the abrasive grains 11 are fixed in a single layer state on the core wire 12 as in the present embodiment, Since the spontaneous growth effect of the abrasive grains 11 does not occur, when the abrasive grains 11 are disintegrated, the sharpness in the disaggregated portion becomes dull.
- the retention strength of the abrasive grains 11 to the core wire 12 is enhanced. ing. Therefore, it is possible to suppress the dropout of the abrasive grains 11 from the core wire 12 as much as possible and to suppress the deterioration of the fixed abrasive wire 10, that is, the grinding portion 3 and reduce the replacement frequency of the grinding wheel 1A and the fixed abrasive wire 10 can do.
- the grinding unit 3 is arranged so that one fixed abrasive wire 10 extends from the one end side of the base metal 2 along the rotation axis L direction with respect to the outer peripheral surface 2 a of the base metal 2. It is configured by continuously winding in a single layer toward the end side.
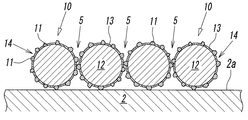
- the cross section of the core wire 12 that is, the cross section of the fixed abrasive wire 10 is substantially circular, as shown in FIG.
- a recess 5 is formed on the outer peripheral surface 2a of the base metal 2 between the fixed abrasive wires 10, 10 adjacent to each other in the direction of the rotation axis L.
- the concave portion 5 is formed of a valley-like space between the adjacent fixed abrasive wires 10 and 10, and is spirally formed from one end side to the other end side along the rotation axis L direction of the base metal 2 It is continuous.
- the above-mentioned recessed part 5 is a discharge groove which improves the dischargeability of the chips of the work W in the same manner as the chip pocket 14 between the adjacent abrasive grains 11 and 11 on the outer peripheral surface of the fixed abrasive wire 10 when grinding the work W. Act as.
- this fixed abrasive wire 10 is one in fixed abrasive wire 10 and 10 comrades which adjoin in the rotating shaft L direction.
- a state in which the tip portion (edge portion) of the abrasive grain 11 in the fixed abrasive wire 10 is in contact with the other fixed abrasive wire 10, that is, the average abrasive grain diameter of the abrasive grain 11 or the abrasive grain 11 from the metal plating layer 13 In a state in which a gap of about the amount of protrusion is formed, it is tightly wound on the outer peripheral surface 2a of the base metal 2 (see FIGS. 3 to 5).
- the fixed abrasive wire 10 has a first end and a second end at both ends in the longitudinal direction (longitudinal direction of the core wire 12). Then, as shown in FIG. 4, the first end 10 a of the fixed abrasive wire 10 is connected to one end side of the outer peripheral surface 2 a of the base metal 2 in the rotational axis L direction (that is, the shaft 4 in the outer peripheral surface 2 a is connected And the second end 10b of the wire 10 is positioned on the other end side of the outer peripheral surface 2a (opposite to the base in the rotational axis L direction) (as shown in FIG. 5). Fixed to the tip end side).
- the intermediate portion 10 c of the fixed abrasive wire 10 located between the first end 10 a and the second end 10 b is wound in a non-adherent state with respect to the outer peripheral surface 2 a of the base metal 2.
- the intermediate portion 10c can move relative to the outer peripheral surface 2a. That is, since the intermediate portion 10c of the wire 10 is not fixed to the base metal 2, it is slightly displaced in the rotation axis L direction or the circumferential direction on the outer peripheral surface 2a of the base metal 2 due to cutting resistance or the like. Or it can be slightly twisted around the central axis of the wire 10.
- reference numeral 16 denotes a fixing portion formed by fixing the second end 10b of the fixed abrasive wire 10 to the base metal 2 by the fixing means.
- the grinding wheel 1A is attached to the grinding device via the shaft 4 provided integrally with the base metal 2, and the grinding wheel 1A is Various grinding conditions relating to the feed speed, the number of rotations, the cut amount to the workpiece W, etc. are set. Then, after setting the grinding conditions, the grinding wheel 1A is rotated about the rotation axis L to feed the workpiece W toward the work W. Then, the workpiece W and the grinding portion 3 composed of the fixed abrasive wire 10 spirally wound around the workpiece facing surface of the base metal 2, that is, the outer peripheral surface 2a of the base metal 2 are in contact with each other.
- the workpiece W is gradually ground in the feed direction by the abrasive grains 11 exposed on the surface of the surface 10.
- the grinding process using this grinding wheel 1A is a dry process that does not use a grinding fluid, it is of course possible to work using a grinding fluid according to the processing conditions.
- Chips generated during grinding enter into the above-mentioned chip pockets 14 of the fixed abrasive wire 10 and are formed as discharge grooves for chips formed between the fixed abrasive wires 10, 10 adjacent in the direction of the rotation axis L.
- the chips that have entered the recess 5 are discharged to the outside by the rotation of the grinding wheel 1A.
- the fixed abrasive wire 10 is wound along the rotation axis L at substantially uniform intervals on the outer peripheral surface 2 a of the base metal 2, the recessed portion 5 extended in the circumferential direction of the base metal 2 Also, they are in a state of being disposed at substantially uniform intervals in the direction of the rotation axis L of the grinding wheel 1. Therefore, the concave portion 5 can be uniformly opposed to the workpiece W at any position of the grinding portion 3, whereby the chips can be discharged efficiently.
- this wire 10 is an intermediate portion located between the first end 10a and the second end 10b. 10c, the base metal 2 is wound so as to be able to move relative to the base metal 2 in a non-sticking state, and due to its grinding resistance, it slightly displaces or reciprocates or oscillates on the outer peripheral surface 2a of the base metal 2. It is possible to Therefore, for example, even if the workpiece W is made of a clogged material such as a soft material, the chips can be shaken off from the recess 5 and efficiently discharged.
- the process of manufacturing the said grinding stone 1A is demonstrated.
- the base metal 2 made of a metal material such as stainless steel, aluminum or super steel as described above and having the outer peripheral surface 2a around the rotation axis L and the core wire 12 made of a metal material such as a piano wire
- a long fixed-abrasive wire 10 is prepared, in which fine abrasive grains 11 made of or cBN are fixed.
- the fixed abrasive wire 10 is wound around the outer peripheral surface 2a of the base metal 2 to form a grinding portion 3 for grinding the work W and a recess 5 (discharge groove) for chip discharge. Move to the step.
- the fixed abrasive wire 10 is spirally tightened to the outer peripheral surface 2 a of the base metal 2 along the axis L direction. Tightly wound in the shape. Then, the fixed particle wire 10 is continuously and densely wound from the one end side to the other end side of the base metal 2 in the rotation axis L direction, so that one layer is fixed to the outer peripheral surface 2a of the base metal 2 A grinding portion 3 composed of abrasive wire 10 is formed. At the same time, a recess 5 (discharge groove) for chip discharge is formed between the fixed abrasive wires 10, 10 adjacent to each other in the rotational axis L direction.
- a winding method of the fixed abrasive wire 10 with respect to the base metal 2 it can carry out by using a predetermined
- both ends of the fixed abrasive wire 10 wound around the base metal 2 are cut or the like to form a first end and a second end at both ends in the longitudinal direction (core 12 direction), and the first end 10a Is fixed to one end side of the base metal 2 in the rotation axis L direction by an appropriate fixing method such as soldering, brazing, welding and the like. Further, in the same manner as the first end 10a, the second end 10b of the wire 10 is fixed to the other end side of the base metal 2 in the rotation axis L direction. As a result, the grinding wheel 1A in the present embodiment can be obtained.
- the fixed abrasive wire 10 fixed to the base metal 2 when the fixed abrasive wire 10 fixed to the base metal 2 is removed, for example, when a fixing means such as the above-described soldering is used, the fixed portion may be removed by an appropriate method such as laser heating. it can.
- the first end 10a of the fixed abrasive wire 10 is formed by cutting or the like. Is fixed to one end side of the base metal 2 and then the wire 10 is spirally wound from one end side to the other end side of the base metal 2 and then the second end 10b of the wire 10 is cut or the like It may be formed and fixed to the other end side of the base metal 2.
- the fixed abrasive wire 10 in which the abrasive grains 11 are fixed to the core wire 12 is spirally wound around the outer peripheral surface 2 a of the base metal 2 along the rotation axis L direction.
- the grinding portion 3 for grinding the workpiece W is formed, and at the same time, between the fixed abrasive wires 10 and 10 adjacent in the direction of the rotation axis L, for discharging chips.
- the recess 5 discharge groove
- the said base metal 2 is comprised so that it may be attached to a grinding apparatus via the shaft 4, it does not restrict to this, It is a base metal which has the attachment hole penetrated in thickness direction like a flat grindstone. It may be such that it is mounted on the spindle in the grinding apparatus via the mounting hole.
- the example which the said grinding stone 1 uses for surface grinding process is shown in FIG. 2, you may use not only this but for example, cylindrical grinding process or internal surface grinding process.
- the fixed abrasive wire 10 is fixed to the outer peripheral surface 2a of the base metal 2 at two points of the first end 10a and the second end 10b. It may be fixed to the base metal 2 at three or more locations including the central portion of the wire 10 wound around.
- the workpiece facing surface facing the workpiece W in this case is a substantially circular shape disposed on one side in the direction of the rotation axis L of the base metal 2 (the tip side located opposite to the shaft 4 in the axis L direction).
- the end face 2b is a point where the grinding portion 3 for grinding the work and the recess 5 for chip discharge are provided on the end face 2b.
- the grinding wheel 1B of the second embodiment is mainly used when performing lapping, and is provided on the end face 2b by pressing the end face 2b side of the base metal 2 rotating about the axis L against the work W
- the surface of the workpiece W is smoothed by the grinding portion 3.
- the remaining structure is substantially the same as that of the grinding wheel 1A according to the first embodiment, so the same reference numerals as those of the grinding wheel 1A according to the first embodiment are attached to the same main components.
- the description of the effects based on the parts and their constituent parts is omitted to avoid redundant description.
- the end face 2b of the base metal 2 has a uniformly flat surface, and the fixed abrasive wire 10 spirals around the rotation axis L on the end face 2b. It is fixed in a state of being wound in a shape.
- the grinding portion 3 is formed on the end face 2 b of the base metal 2, and the recess 5 for discharging chips between the fixed abrasive wires 10 and 10 adjacent in the radial direction of the base metal 2.
- the winding pitch in the radial direction of the base metal 2 and the number of turns thereof, the number of wires 10, etc. are arbitrary, but in the present embodiment, one fixed abrasive wire 10 is used. It is closely wound in a spiral manner from the vicinity of the outer peripheral edge to the substantially central position on the end face 2b.
- the first end 10a of the fixed abrasive wire 10 is fixed to the outer peripheral edge side of the end face 2b of the base metal 2,
- the second end 10b of the fixed abrasive wire 10 is fixed at a substantially central position of the end face 2b.
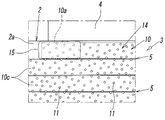
- the intermediate portion 10c located between the first end 10a and the second end 10b has a predetermined distance from the end face 2b along the longitudinal direction of the fixed abrasive wire 10. It is fixed intermittently. Therefore, in the intermediate portion 10c, the fixed portion 17 fixed to the end surface 2b of the base metal 2 and the non-fixed portion not fixed to the end surface 2b of the base metal 2 are alternately arranged along the longitudinal direction. (See FIGS. 8 and 9). As a result, the non-sticking portion is configured to be displaced or rocked on the end face 2 b of the base metal 2 due to cutting resistance or the like in the grinding process of the workpiece W.
- the fixing means of the fixed abrasive wire 10 to the base metal 2 is performed by soldering, brazing, welding or the like as in the first embodiment, and in the present embodiment, as shown by reference numeral 17 in FIG.
- the fixed abrasive wire 10 is point-joined by spot welding such as resistance welding, laser welding, or arc welding.
- spot welding such as resistance welding, laser welding, or arc welding.
- each fixed part 17 of the fixed abrasive wire 10 is located in the radial direction inner side of the base metal 2, you may be located in the radial direction outer side. Further, 15 in FIG.
- FIG. 8 is a fixed portion formed by fixing the first end 10a of the fixed abrasive wire 10 to the end face 2b of the base metal 2 at the position near the outer peripheral edge of the end face 2b by the fixing means.
- 16 in FIG. 9 is a fixing portion formed by fixing the second end 10b to the end face 2b at the approximate center position of the end face 2b by the fixing means.
- the base metal 2 and the fixed abrasive wire 10 are prepared, and the fixed abrasive wire 10 is placed on the end face 2b of the base 2 and the rotation axis L It fixes with respect to this end surface 2b, winding tightly around spirally.
- the fixed abrasive wire 10 is wound from the outer peripheral edge side of the base metal 2 toward the center side a plurality of times.
- the winding start end side (first end portion 10a side) of the fixed abrasive wire 10 is fixed to the base metal by fixing means such as spot welding at a position near the outer peripheral edge of the end face 2b.
- the fixed abrasive wire 10 is spirally wound toward the center of the end face 2b, the fixed abrasive wire 10 is fixed to the base metal 2 at a predetermined interval along the length direction of the fixed abrasive wire 10. . This is sequentially repeated, and finally, the winding end side (second end portion 2b side) of the fixed abrasive wire 10 is fixed to the base metal 2 at a substantially central position (near the rotation axis L) of the end surface 2b of the base metal 2. Do. Then, in the fixed abrasive wire 10, excess portions on the winding start end side and the winding end side are cut or the like.
- the fixed abrasive wire 10 is spirally fixed to the end face 2 b of the base metal 2, and between the fixed abrasive wires 10, 10 adjacent in the radial direction of the base metal 2.
- a grinding wheel 1B in which the recess 5 for chip discharge is formed.
- both ends of the fixed abrasive wire 10 are cut to form the first end 10a and the second end 10b in advance, and they are used as a base metal as described above. It is also possible to fix to the end face 2b while winding it on the end face 2b.
- the fixed abrasive wire 10 is wound from the outer peripheral edge side of the base metal toward the center, but it is of course possible to wind from the central side toward the outer peripheral edge side. It is also possible to weld the fixed abrasive wire 10 sequentially from the outer side of the base metal 2 in the radial direction.
- the grinding wheel 1C according to the third embodiment differs from the grinding wheel 1B according to the second embodiment in that the end face 2b forming a workpiece-facing surface facing the workpiece W is recessed substantially spirally around the rotation axis L.
- a guide groove 20 is provided, and the fixed abrasive wire 10 is disposed in the guide groove 20 in a spirally wound state along the guide groove 20, and the guide groove 20 is in this state. It is a point fixed to the base metal inside.
- the spiral guide groove 20 continues without break from the vicinity of the outer peripheral edge to the central portion of the end face 2 b of the base metal 2.
- the guide groove 20 has a substantially rectangular cross-sectional shape, and the groove width is formed to be slightly larger than the diameter of the fixed abrasive wire 10, and the groove depth Is shallower than the diameter of the fixed abrasive wire 10. Therefore, when the fixed abrasive wire 10 is accommodated in the groove 20 along the longitudinal direction of the guide groove 20, the substantially arc-shaped surface of the fixed abrasive wire 10 is made of the above-mentioned base metal 2 as shown in FIG.
- the workpiece W can be ground by the fixed abrasive wire 10 protruding from the end face 2 b and protruding therefrom.
- the recess 5 for chip discharge is between the fixed abrasive wires 10, 10 adjacent to each other in the radial direction of the base metal 2. It is formed. Further, the winding pitch of the fixed abrasive wire 10, 10 for determining the width of the recess 5 substantially corresponds to the radial pitch of the guide groove 20 adjacent in the radial direction of the base metal 2; In the embodiment, the winding pitch of the guide groove 20 is such that the abrasive grains 11 of the adjacent fixed abrasive wires 10, 10 do not contact each other with the fixed abrasive wire 10 accommodated in the guide groove 20. It is set to be separated to such an extent that
- a resin adhesive is used as a fixing means of the fixed abrasive wire 10. Then, with the adhesive, as shown in FIG. 12 or FIG. 13, the first end 10 a of the fixed abrasive wire 10 is a groove end at one end side (the outermost side) in the length direction in the guide groove 20. The second end 10b is fixed at the position 20a, and is fixed at the position of the groove end 20b on the other end side (central side) of the guide groove 20 in the longitudinal direction.
- the middle portion 10 c of the fixed abrasive wire is fixed to the base metal 2 intermittently along the length direction of the fixed abrasive wire 10 in the guide groove 20.
- the fixed portion 15-17 of the abrasive wire 10 may be configured to be slightly displaced on the end face 2b while being fixed to the end face 2b. Further, in the example shown in FIG. 11, the fixed abrasive wire 10 is fixed to the base metal 2 in a non-contact state at the groove bottom of the guide groove 20, but the guide groove is in contact with the groove bottom. It may be fixed within 20.
- a process of manufacturing the grinding wheel 1C shown in the third embodiment will be described.
- the end face 2b of the base metal 2 is swirled around the rotation axis L of the base metal 2.
- Shaped guide grooves 20 are formed.
- the step of forming the guide groove 20 is performed, for example, by a laser processing machine or the like, whereby a spiral groove having an appropriate groove width and groove depth is formed at a predetermined winding pitch.
- a resin-based adhesive is filled in the groove end 20a at one end located on the outermost side and the groove end 20b at the other end located on the innermost side in the guide groove 20, and Between the groove end portions 20a and 20b, adhesive is intermittently filled at predetermined intervals along the longitudinal direction of the guide groove 20. By doing so, an adhesive layer (portion of the fixing portion 15-17) is formed on the portion of the guide groove 20 filled with the adhesive. Then, the process proceeds to the fixing step described below, in which the fixed abrasive wire 10 is moved along the longitudinal direction of the guide groove 20 before the adhesive layer is cured. Place inside.
- the fixed abrasive wire 10 which is formed to have a length corresponding to the length of the guide groove and has the first end 10a and the second end 10b in advance is used, of course, As described in the manufacturing process of the grinding wheel 1B according to the second embodiment, after fixing the long fixed abrasive wire 10 to the base metal 2 (in the guide groove 20), both ends of the fixed abrasive wire 10 are cut The first end 10a and the second end 10b may be formed.
- the fixed abrasive wire 10 is spirally wound along the longitudinal direction of the guide groove 20, and as shown in FIG. 13, the second end of the fixed abrasive wire 10
- the portion 10 b is disposed so as to substantially coincide with the other groove end 20 b of the guide groove 20.
- the fixed abrasive wire 10 is spirally fixed to the end face 2 b of the base metal 2, and between the fixed abrasive wires 10, 10 adjacent in the radial direction of the base metal 2.
- the guide groove 20 is formed by a laser processing machine, but may be formed by cutting with, for example, a cutting blade of a cutting tool.
- a part of the fixed abrasive wire 10 may be accommodated in the guide groove 20, and a part of the outer peripheral surface of the fixed abrasive wire 10 may be protruded to the outside. If possible, for example, it may have a substantially circular cross section or a substantially V-shaped cross section.
Landscapes
- Engineering & Computer Science (AREA)
- Mechanical Engineering (AREA)
- Chemical & Material Sciences (AREA)
- Inorganic Chemistry (AREA)
- Polishing Bodies And Polishing Tools (AREA)
Priority Applications (2)
| Application Number | Priority Date | Filing Date | Title |
|---|---|---|---|
| KR1020197004911A KR20190044063A (ko) | 2016-09-06 | 2017-08-18 | 연삭숫돌 및 그 제조 방법 |
| CN201780046162.0A CN109789533A (zh) | 2016-09-06 | 2017-08-18 | 磨削砂轮及其制造方法 |
Applications Claiming Priority (2)
| Application Number | Priority Date | Filing Date | Title |
|---|---|---|---|
| JP2016-173666 | 2016-09-06 | ||
| JP2016173666A JP6755550B2 (ja) | 2016-09-06 | 2016-09-06 | 研削砥石及びその製造方法 |
Publications (1)
| Publication Number | Publication Date |
|---|---|
| WO2018047600A1 true WO2018047600A1 (ja) | 2018-03-15 |
Family
ID=61562270
Family Applications (1)
| Application Number | Title | Priority Date | Filing Date |
|---|---|---|---|
| PCT/JP2017/029594 WO2018047600A1 (ja) | 2016-09-06 | 2017-08-18 | 研削砥石及びその製造方法 |
Country Status (5)
| Country | Link |
|---|---|
| JP (1) | JP6755550B2 (zh) |
| KR (1) | KR20190044063A (zh) |
| CN (1) | CN109789533A (zh) |
| TW (1) | TWI705875B (zh) |
| WO (1) | WO2018047600A1 (zh) |
Families Citing this family (4)
| Publication number | Priority date | Publication date | Assignee | Title |
|---|---|---|---|---|
| SG11202008280TA (en) | 2018-03-05 | 2020-09-29 | Univ Saitama Medical | Pharmaceutical composition for treating or preventing heterotopic ossification |
| CN111015533B (zh) * | 2019-12-31 | 2022-04-12 | 枣庄北航机床创新研究院有限公司 | 一种小尺寸抛光工具及其制作方法 |
| KR102438282B1 (ko) * | 2020-08-07 | 2022-08-30 | 문덕주 | 연마제품 및 연마제품 제조방법 |
| CN117300927B (zh) * | 2023-11-28 | 2024-02-02 | 太原理工大学 | 适用于圆柱形砂轮的磨粒有序排布方法及砂轮的制备方法 |
Citations (2)
| Publication number | Priority date | Publication date | Assignee | Title |
|---|---|---|---|---|
| JPS63283865A (ja) * | 1987-05-14 | 1988-11-21 | Brother Ind Ltd | 鋳鉄ボンドダイヤモンドまたはcbn砥石 |
| JP2015142947A (ja) * | 2014-01-31 | 2015-08-06 | コマツNtc株式会社 | 内周面加工用工具 |
Family Cites Families (6)
| Publication number | Priority date | Publication date | Assignee | Title |
|---|---|---|---|---|
| US3939612A (en) * | 1971-06-02 | 1976-02-24 | Dresser Industries, Inc. | Reinforced grinding wheel |
| CH641396A5 (en) * | 1979-10-04 | 1984-02-29 | Arthur Werner Staehli | Flat-lapping or polishing wheel |
| DE3332085A1 (de) * | 1983-09-06 | 1985-03-21 | Festo KG, 7300 Esslingen | Werkzeug zum aufrauhen, abtragen oder zerspanen |
| JP2010046771A (ja) | 2008-08-22 | 2010-03-04 | Asahi Diamond Industrial Co Ltd | 超砥粒ホイール |
| KR101192157B1 (ko) * | 2010-12-07 | 2012-10-17 | 지앤피테크놀로지 주식회사 | 디스플레이 패널, 반도체 기판 등의 표면가공을 위한 연마용 롤러장치 |
| CN103659530B (zh) * | 2012-09-03 | 2016-05-18 | 舒能(苏州)工业技术有限公司 | 一种s型弯管打磨磨具 |
-
2016
- 2016-09-06 JP JP2016173666A patent/JP6755550B2/ja active Active
-
2017
- 2017-08-17 TW TW106127898A patent/TWI705875B/zh not_active IP Right Cessation
- 2017-08-18 WO PCT/JP2017/029594 patent/WO2018047600A1/ja active Application Filing
- 2017-08-18 CN CN201780046162.0A patent/CN109789533A/zh active Pending
- 2017-08-18 KR KR1020197004911A patent/KR20190044063A/ko unknown
Patent Citations (2)
| Publication number | Priority date | Publication date | Assignee | Title |
|---|---|---|---|---|
| JPS63283865A (ja) * | 1987-05-14 | 1988-11-21 | Brother Ind Ltd | 鋳鉄ボンドダイヤモンドまたはcbn砥石 |
| JP2015142947A (ja) * | 2014-01-31 | 2015-08-06 | コマツNtc株式会社 | 内周面加工用工具 |
Also Published As
| Publication number | Publication date |
|---|---|
| TWI705875B (zh) | 2020-10-01 |
| KR20190044063A (ko) | 2019-04-29 |
| TW201819113A (zh) | 2018-06-01 |
| JP6755550B2 (ja) | 2020-09-16 |
| CN109789533A (zh) | 2019-05-21 |
| JP2018039066A (ja) | 2018-03-15 |
Similar Documents
| Publication | Publication Date | Title |
|---|---|---|
| WO2018047600A1 (ja) | 研削砥石及びその製造方法 | |
| JP4421476B2 (ja) | 研磨機用ブラシの製造方法および研磨機用ブラシ | |
| US6295977B1 (en) | Method and device for simultaneously cutting off a multiplicity of wafers from a workpiece | |
| EP1987921A1 (en) | Brush-like grindstone | |
| US20060130823A1 (en) | Gear type machining tip and tool attaching the same thereon | |
| JP5701211B2 (ja) | 研磨剤を含浸する電鋳製薄型カッティングソー及びコアドリル | |
| US3436871A (en) | Abrasive cutting tools | |
| JP2002273663A (ja) | レジンボンドワイヤソー | |
| JP6786075B2 (ja) | ホイールブラシおよび砥材束ホルダ | |
| JP2019077080A (ja) | チップソー | |
| JP5599526B2 (ja) | エンドミルの製造装置 | |
| JP5700682B2 (ja) | ロータリドレッサ | |
| JP2008178938A (ja) | ワイヤソー | |
| JPH01135414A (ja) | 切削具 | |
| JP2800475B2 (ja) | ダイヤモンドコアビットの製造方法 | |
| JP3606742B2 (ja) | 台金にクリアランスを有するコアビット | |
| JP2007050471A (ja) | ドレッシング方法及びロータリドレッシング装置 | |
| JP2008119819A (ja) | 凹部入り砥石の製造方法 | |
| JP7356185B2 (ja) | 加工用砥石及びコアドリル | |
| JP5468110B2 (ja) | 凹部入り砥石の製造方法 | |
| JP2002036121A (ja) | 薄刃砥石 | |
| JPH06339865A (ja) | 超音波研削用カップ砥石及びこれを用いた 超音波研削加工機 | |
| JP4948122B2 (ja) | 傾斜溝入り砥石 | |
| JP2006136957A (ja) | 研削ホイール | |
| JP2003031749A (ja) | 半導体装置製造用パンチ |
Legal Events
| Date | Code | Title | Description |
|---|---|---|---|
| 121 | Ep: the epo has been informed by wipo that ep was designated in this application |
Ref document number: 17848543 Country of ref document: EP Kind code of ref document: A1 |
|
| ENP | Entry into the national phase |
Ref document number: 20197004911 Country of ref document: KR Kind code of ref document: A |
|
| NENP | Non-entry into the national phase |
Ref country code: DE |
|
| 122 | Ep: pct application non-entry in european phase |
Ref document number: 17848543 Country of ref document: EP Kind code of ref document: A1 |
