JP4006150B2 - Printing control method and apparatus - Google Patents
Printing control method and apparatus Download PDFInfo
- Publication number
- JP4006150B2 JP4006150B2 JP31312399A JP31312399A JP4006150B2 JP 4006150 B2 JP4006150 B2 JP 4006150B2 JP 31312399 A JP31312399 A JP 31312399A JP 31312399 A JP31312399 A JP 31312399A JP 4006150 B2 JP4006150 B2 JP 4006150B2
- Authority
- JP
- Japan
- Prior art keywords
- page
- image
- job
- preview
- Prior art date
- Legal status (The legal status is an assumption and is not a legal conclusion. Google has not performed a legal analysis and makes no representation as to the accuracy of the status listed.)
- Expired - Fee Related
Links
Images


Description
【0001】
【発明の属する技術分野】
本発明は、印刷制御方法および装置および媒体に関するもので、特にパーソナルコンピュータ等の情報処理とプリンタからなるシステムにおける印刷制御方法および装置および媒体に関するものである。
【0002】
【従来の技術】
従来、文書編集や画像編集のためのアプリケーションプログラムによって編集された文書あるいは画像といったデータを印刷する際に、実際に用紙上に印刷する前に、印刷されるイメージを印刷されるレイアウトで画面上に表示して利用者に提示する印刷プレビュー機能が知られている。
【0003】
利用者は、この印刷プレビュー機能を利用して印刷される画像をチェックすることで、理想のレイアウトが実現できるまで再編集を行うことができる。
【0004】
【発明が解決しようとする課題】
しかしながら、アプリケーションプログラムにより提供される印刷プレビュー機能は、プリンタドライバにより設定可能な種々の印刷条件を反映した画像をプレビュー画像として表示することができない。例えば用紙の綴じ代をプリンタドライバによって指定しても、アプリケーションプログラムによる印刷プレビュー機能では、それらをプレビュー画像に反映して表示できない。このため、プレビュー画像におけるレイアウトと実際に印刷される画像におけるレイアウトとが異なり、印刷プレビューの意味が失われてしまう。
【0005】
本発明は上記従来例に鑑みて成されたもので、レイアウト等の印刷設定を正確に反映したプレビュー表示、特に中差しが指定された場合に、製本後のレイアウトを反映した印刷プレビュー表示が可能な印刷制御方法及び装置を提供することを目的とする。
【0006】
【課題を解決するための手段】
上記目的を達成するために本発明は次のような構成からなる。すなわち、格納された印刷データを印刷する際に、印刷済みのシートの間に別途供給される挿入シートを挿入する中差しを指定可能な印刷制御装置における印刷制御方法であって、印刷設定画面を介して、中差し設定を含む印刷設定を入力する印刷設定入力工程と、入力された印刷データを、前記印刷設定入力工程を介して入力された印刷設定と共に一時的に格納する格納工程と、前記格納工程で格納されている印刷設定に基づいて、前記印刷データの各ページの画像オブジェクトのプレビュー画像を表示領域に表示するプレビュー表示工程と、前記印刷設定入力手段により入力された印刷設定に中差し設定がなされているか判断する判断工程を備え、前記判断工程により中差し設定がなされていると判断された場合に、前記プレビュー表示工程は、各ページのプレビュー画像に対して中差しされるシートの画像を付加した画像を表示領域に表示する。
【0007】
さらに好ましくは、前記プレビュー表示工程は、前記各ページのプレビュー画像に対して中差しされるシートの画像を付加した画像として、各ページごとに、中差し用紙の上に各ページを重ねた状態で、各ページのプレビュー画像を表示領域に表示する。
【0008】
さらに好ましくは、前記プレビュー表示工程は、付加された中差し用紙の画像がポインタにより指し示された場合に、該画像が中差し用紙であることを示す旨をプレビュー画面上に表示する。
【0011】
【発明の実施の形態】
以下、本発明を適用するのに好適である実施例について説明を行う。
【0012】
<プリンタ制御システムの構成>
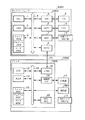
図1は本発明の実施例を示すプリンタ制御システムの構成を説明するブロック図である。なお、本発明の機能が実行されるのであれば、単体の機器であっても、複数の機器からなるシステムであっても、LAN,WAN等のネットワークを介して接続がなされ処理が行われるシステムであっても本発明を適用できる。
【0013】
同図において、ホストコンピュータ3000は、ROM3のプログラム用ROMあるいは外部メモリ11に記憶された文書処理プログラム等に基づいて図形、イメージ、文字、表(表計算等を含む)等が混在した文書処理を実行するCPU1を備え、システムバス4に接続される各デバイスをCPU1が総括的に制御する。また、このROM3のプログラム用ROMあるいは外部メモリ11には、CPU1の制御プログラムであるオペレーティングシステムプログラム(以下OS)等を記憶し、ROM3のフォント用ROMあるいは外部メモリ11には上記文書処理の際に使用するフォントデータ等を記憶し、ROM3のデータ用ROMあるいは外部メモリ11には上記文書処理等を行う際に使用する各種データを記憶する。RAM2は、CPU1の主メモリ、ワークエリア等として機能する。
【0014】
キーボードコントローラ(KBC)5は、キーボード9や不図示のポインティングデバイスからのキー入力を制御する。CRTコントローラ(CRTC)6は、CRTディスプレイ(CRT)10の表示を制御する。7はディスクコントローラ(DKC)で、ブートプログラム、各種のアプリケーション、フォントデータ、ユーザファイル、編集ファイル、プリンタ制御コマンド生成プログラム(以下プリンタドライバ)等を記憶するハードディスク(HD)、フロッピーディスク(FD)等の外部メモリ11とのアクセスを制御する。プリンタコントローラ(PRTC)8は、双方向性インタフェイス(インタフェイス)21を介してプリンタ1500に接続されて、プリンタ1500との通信制御処理を実行する。
【0015】
なお、CPU1は、例えばRAM2上に設定された表示情報RAMへのアウトラインフォントの展開(ラスタライズ)処理を実行し、CRT10上でのWYSIWYGを可能としている。また、CPU1は、CRT10上の不図示のマウスカーソル等で指示されたコマンドに基づいて登録された種々のウインドウを開き、種々のデータ処理を実行する。ユーザは印刷を実行する際、印刷の設定に関するウインドウを開き、プリンタの設定や、印刷モードの選択を含むプリンタドライバに対する印刷処理方法の設定を行える。
【0016】
プリンタ1500は、CPU12により制御される。プリンタCPU12は、ROM13のプログラム用ROMに記憶された制御プログラム等あるいは外部メモリ14に記憶された制御プログラム等に基づいてシステムバス15に接続される印刷部(プリンタエンジン)17に出力情報としての画像信号を出力する。また、このROM13のプログラムROMには、CPU12の制御プログラム等を記憶する。ROM13のフォント用ROMには上記出力情報を生成する際に使用するフォントデータ等が記憶され、ROM13のデータ用ROMには、ハードディスク等の外部メモリ14がないプリンタの場合には、ホストコンピュータ上で利用される情報等が記憶されている。
【0017】
CPU12は入力部18を介してホストコンピュータとの通信処理が可能となっており、プリンタ内の情報等をホストコンピュータ3000に通知できる。RAM19は、CPU12の主メモリや、ワークエリア等として機能するRAMで、図示しない増設ポートに接続されるオプションRAMによりメモリ容量を拡張することができるように構成されている。なお、RAM19は、出力情報展開領域、環境データ格納領域、NVRAM等に用いられる。前述したハードディスク(HD)、ICカード等の外部メモリ14は、メモリコントローラ(MC)20によりアクセスを制御される。外部メモリ14は、オプションとして接続され、フォントデータ、エミュレーションプログラム、フォームデータ等を記憶する。また、18は前述した操作パネルで操作のためのスイッチおよびLED表示器等が配されている。
【0018】
また、前述した外部メモリ14は1個に限らず、複数個備えられ、内蔵フォントに加えてオプションカード、言語系の異なるプリンタ制御言語を解釈するプログラムを格納した外部メモリを複数接続できるように構成されていてもよい。更に、図示しないNVRAMを有し、操作パネル1501からのプリンタモード設定情報を記憶するようにしてもよい。
【0019】
図2は、プリンタ等の印刷装置が直接接続されているか、あるいはネットワーク経由で接続されているホストコンピュータにおける典型的な印刷処理の構成図である。アプリケーション201、グラフィックエンジン202、プリンタドライバ203、およびシステムスプーラ204は、外部メモリ11に保存されたファイルとして存在し、実行される場合にOSやそのモジュールを利用するモジュールによってRAM2にロードされ実行されるプログラムモジュールである。また、アプリケーション201およびプリンタドライバ203は、外部メモリ11のFDや不図示のCD−ROM、あるいは不図示のネットワークを経由して外部ディスク11のHDに追加することが可能となっている。外部メモリ11に保存されているアプリケーション201はRAM2にロードされて実行されるが、このアプリケーション201からプリンタ1500に対して印刷を行う際には、同様にRAM2にロードされ実行可能となっているグラフィックエンジン202を利用して出力(描画)を行う。
【0020】
グラフィックエンジン202は、印刷装置ごとに用意されたプリンタドライバ203を同様に外部メモリ11からRAM2にロードし、アプリケーション201の出力をプリンタドライバ203に設定する。そして、アプリケーション201から受け取るGDI(Graphic Device Interface)関数からDDI(Device Driver Interface)関数に変換して、プリンタドライバ203へDDI関数を出力する。プリンタドライバ203は、グラフィックエンジン202から受け取ったDDI関数に基づいて、プリンタが認識可能な制御コマンド、例えばPDL(Page Description Language)に変換する。変換されたプリンタ制御コマンドは、OSによってRAM2にロードされたシステムスプーラ204を経てインタフェイス21経由でプリンタ1500へ印刷データとして出力される仕組みとなっている。
【0021】
本実施形態の印刷システムは、図2で示すプリンタとホストコンピュータからなる印刷システムに加えて、更に第3図に示すように、アプリケーションからの印刷データを一旦中間コードデータでスプールする構成を有する。
【0022】
<本実施形態における印刷関連のソフトウエアモジュール>
図3は、図2のシステムを拡張したもので、グラフィックエンジン202からプリンタドライバ203へ印刷命令を送る際に、一旦中間コードからなるスプールファイル303を生成する構成をとる。図2のシステムでは、アプリケーション201が印刷処理から開放されるのはプリンタドライバ203がグラフィックエンジン202からのすべての印刷命令をプリンタの制御コマンドへ変換し終った時点である。これに対して、図3のシステムでは、スプーラ302がすべての印刷命令を中間コードデータに変換し、スプールファイル303に出力した時点である。通常、後者の方が短時間で済む。また、図3で示すシステムにおいては、スプールファイル303の内容に対して加工することができる。これによりアプリケーションからの印刷データに対して、拡大縮小や、複数ページを1ページに縮小して印刷する等、アプリケーションの持たない機能を実現することができる。
【0023】
これらの目的のために、図2のシステムに対し、図3の様に中間コードデータでスプールする様、システムの拡張がなされてきている。なお、印刷データの加工を行うためには、通常プリンタドライバ203が提供するウインドウから設定を行い、プリンタドライバ203がその設定内容をRAM2上あるいは外部メモリ11上に保管する。
【0024】
以下、図3の詳細を説明する。図に示す通り、この拡張された処理方式では、グラフィックエンジン202からの印刷命令であるDDI関数をディスパッチャ301が受け取る。ディスパッチャ301がグラフィックエンジン202から受け取った印刷命令(DDI関数)が、アプリケーション201からグラフィックエンジン202へ発行された印刷命令(GDI関数)に基づくものである場合には、ディスパッチャ301は外部メモリ11に格納されているスプーラ302をRAM2にロードし、プリンタドライバ203ではなくスプーラ302へ印刷命令(DDI関数)を送付する。
【0025】
スプーラ302は受け取った印刷命令を解析し、ページ単位に中間コードに変換してスプールファイル303に出力する。このページ単位に格納されている中間コードのスプールファイルをページ描画ファイル(PDF:Page Description File)と呼ぶ。また、スプーラ302は、プリンタドライバ203に対して設定されている印刷データに関する加工設定(Nup、両面、ステイプル、カラー/モノクロ指定等)をプリンタドライバ203から取得してジョブ単位のファイルとしてスプールファイル303に保存する。この時部単位に格納されている設定ファイルをジョブ設定ファイル(簡略してSDF:Spool Description Fileと呼ぶこともある)と呼ぶ。このジョブ設定ファイルについては後述する。なお、スプールファイル303は外部メモリ11上にファイルとして生成するが、RAM2上に生成されても構わない。更にスプーラ302は、外部メモリ11に格納されているスプールファイルマネージャ304をRAM2にロードし、スプールファイルマネージャ304に対してスプールファイル303の生成状況を通知する。その後、スプールファイルマネージャ304は、スプールファイル303に保存された印刷データに関する加工設定の内容に従って印刷を行えるか判断する。
【0026】
スプールファイルマネージャ304がグラフィックエンジン202を利用して印刷を行えると判断した際には、外部メモリ11に格納されているデスプーラ305をRAM2にロードし、デスプーラ305に対して、スプールファイル303に記述された中間コードのページ描画ファイルの印刷処理を行うように指示する。
【0027】
デスプーラ305はスプールファイル303に含まれる中間コードのページ描画ファイルをスプールファイル303に含まれる加工設定情報を含むジョブ設定ファイルに従って加工し、GDI関数を再生成し、もう一度グラフィックエンジン202経由でGDI関数を出力する。
【0028】
ディスパッチャ301がグラフィックエンジン202から受け取った印刷命令(DDI関数)がデスプーラ305からグラフィックエンジン202へ発行された印刷命令(GDI関数)に基づいたものである場合には、ディスパッチャ301はスプーラ302ではなく、プリンタドライバ203に印刷命令を送る。
【0029】
プリンタドライバ203はグラフィックエンジン202から取得したDDI関数に基づいてページ記述言語等からなるプリンタ制御コマンドを生成し、システムスプーラ204経由でプリンタ1500に出力する。
【0030】
更に、図3では、これまで説明した拡張システムに加えて、プレビューア306、設定変更エディタ307を配し、プレビュー、印刷設定変更、複数ジョブの結合を可能にした例を示している。
【0031】
印刷プレビュー、印刷設定変更、複数ジョブの結合を行うためには、まずユーザが図9に示すプリンタドライバのプロパティにおいて、「出力先の指定」を行う手段であるプルダウンメニュー901において「ストア」を指定する必要がある。なお、プレビューだけをみたい場合は、出力先の指定として「プレビュー」を選択することによっても可能である。
【0032】
このようにプリンタドライバのプロパティで設定されている内容は設定ファイルとしてOSが提供する構造体(WindowsOSでは、DEVMODEと呼ばれる)に格納される。その構造体には、例えばスプールファイル303に含まれる加工設定中にスプールファイルマネージャ304にストアを行うかどうかの設定が含まれており、スプールファイルマネージャ304がプリンタドライバを介して加工設定を読み込み、ストア指定がなされていた場合、前述したようにスプールファイル303にページ描画ファイルとジョブ設定ファイルとが生成・格納され、図16のようにスプールファイルマネージャのウィンドウ画面がポップアップされ、スプールファイル303にスプールされたジョブがリスト表示される。図16には、4つのジョブがスプールされている例を示しており、メニューバーもしくは、そのすぐ下のメニューアイコンを押下することにより、ジョブの操作を行うことができる。メニューバーとメニューアイコンの操作の数は同じである。操作種類としては、ジョブを選択した状態で、「印刷」、中間コードのスプールファイルをそのまま残して印刷を行わせる「セーブして印刷」、印刷設定を考慮したジョブの出力プレビューを見るための「プレビュー」、中間コードのスプールファイルを削除する「削除」、中間コードのスプールファイルのコピーを生成する「複製」、複数の中間コードのスプールファイルのジョブを結合して1つのジョブにする「結合」、結合ジョブを元の複数のジョブに分割する「分割」、単体ジョブもしくは結合ジョブの印刷設定(レイアウト設定やフィニッシング設定等)を変更する「ジョブ編集」、あるジョブの印刷順序を最初にする「先頭に移動」、あるジョブの印刷順序を1つ早くする「1つ上に移動」、あるジョブの印刷順序を1つお則する「1つ下に移動」、あるジョブの印刷順序を最後にする「最後に移動」の以上11個の操作がある。
【0033】
スプールファイルマネージャのウィンドウ画面(図16)上で、ある単体ジョブもしくは結合ジョブのプレビュー指定がされた場合、外部メモリ11に格納されているプレビューア306をRAM2にロードし、プレビューア306に対して、スプールファイル303に記述された中間コードのジョブのプレビュー処理を行うように指示する。
【0034】
(プレビューア)
プレビューア306はスプールファイル303に含まれる中間コードのページ描画ファイル(PDF)を順次読み出し、スプールファイル303に格納されているジョブ設定ファイル(SDF)に含まれる加工設定情報の内容に従って加工し、グラフィックエンジン202に対してGDI関数を出力し、グラフィックエンジン202が自身のクライアント領域に描画データを出力することによって、画面上の出力が可能となる。
【0035】
グラフィックエンジン202は、指定された出力先に応じて適切なレンダリングを行うことが可能である。このことから、プレビューア306は、デスプーラ305同様に、スプールファイル303に含まれる中間コードをスプールファイル303に含まれる加工設定の内容に従って加工し、グラフィックエンジン202を利用して出力する方法で実現可能となる。このようにプリンタドライバで設定されている加工設定をジョブ設定ファイルとしてスプールファイル303に格納し、このジョブ設定ファイルに基づいてページ描画ファイルのデータを加工して出力することにより、実際の描画データがどのように印刷されるか、更には、Nup(Nページの論理ページを1ページの物理ページに縮小配置して印刷する処理)指定されている場合、両面印刷されている場合、製本印刷指定されている場合、スタンプが指定されている場合、それぞれに応じて、プリンタで出力されるものに近い印刷プレビューをユーザに提供することができる。なお、従来の文書作成等のアプリケーションソフトウェアが有しているプレビュー機能は、あくまでそのアプリケーションにおけるページ設定に基づいて描画しているため、プリンタドライバでの印刷設定が反映されず、実際に印刷出力されるプレビューをユーザに認識させることはできなかった。
【0036】
上記のようにプレビュー処理を行うことにより、図17のようにスプールファイル303に含まれる印刷の加工設定の大プレビューがプレビューア306によって画面上に表示され、その後、ユーザの非表示指示によって、プレビューア306がクローズされ、制御がスプールファイルマネージャのウィンドウ画面(図16)に移行する。
【0037】
そして、ユーザがプレビューア306によって表示された内容に従って、印刷を行うならば、スプールファイルマネージャ304上で、「印刷」もしくは「セーブして印刷」を指示することにより印刷要求を発行する。印刷要求は前述したように、デスプーラ305によりジョブ設定ファイルに基づいてページ描画ファイルを加工してGDI関数を生成し、グラフィックエンジン202に伝えられ、ディスパッチャ301経由で、プリンタドライバ203に印刷命令が送られ、印刷が実行される。
【0038】
(設定変更エディタ)
次に、設定変更エディタ307を用いた設定変更について説明する。
【0039】
その実現方法としては、プレビュー同様、図9において「ストア」指定されたジョブに関して設定可能である。同様のフローによりスプールファイルマネージャ304がポップアップされ、スプールされたジョブがリスト表示される。スプールファイルマネージャのウィンドウ画面(図16)上で、「ジョブ編集」が指定され、設定変更指示がされた場合、外部メモリ11に格納されている設定変更エディタ307をRAM2にロードし、設定変更エディタ307に対して、現在またはデフォルトの加工設定の表示を行うように指示する。そして図18のようなジョブ設定画面が表示される。
【0040】
設定変更エディタ307は、「ジョブ編集」が指定されたジョブのジョブ設定ファイルをスプールファイル303から取得し、そのジョブ設定ファイルに指定されている設定項目に基づいて図18のジョブ設定画面のデフォルト値を変更する。図18に示す例では、「ジョブ編集」指定されたジョブのジョブ設定ファイルには、部数:1部、印刷方法:片面、ステイプル:なし、レイアウト:1ページ/枚等が指定されていることになる。
【0041】
この設定変更エディタ307でもスプールファイル303に含まれる中間コードのページ描画ファイルをスプールファイル303に格納されているジョブ設定ファイルに含まれる加工設定の内容に従って加工し、グラフィックエンジン202を用いて自身のクライアント領域に出力することによって、図18に示す画面上の小プレビュー出力が可能となる。
【0042】
またここで、スプールファイル303に格納されているジョブ設定ファイルに含まれる加工設定の内容を変更、修正することが可能である。その際、プリンタドライバ203の設定可能な項目を設定変更エディタ307上のユーザインターフェイスに持っていても、プリンタドライバ203自身のユーザインターフェイスを呼び出しても構わない。図18に示すように、分数、印刷方法(片面、両目、製本印刷)、ステイプル(サドルフィニッシャー等)、ページレイアウト、配置順等の指定ができ、また「詳細設定」を押下することにより、プリンタドライバで指定できる項目の大半を設定しなおすことが可能となる。ただし、解像度、グラフィックモード等の印刷品位に関する設定の変更は許可しないものとする。
【0043】
ここで変更された変更項目は設定変更エディタ307上の認証要求に従い、変更が認証され、制御がスプールファイルマネージャ304に移行する。変更が認証されたものは、印刷設定の変更を保存することになるが、オリジナルのジョブ設定ファイルには保存せずに、ジョブ編集等で用いられるジョブ出力用設定ファイルを新たに生成して保存することになる。ジョブ出力用設定ファイルについての詳細は、図10以降で後述する。
【0044】
そして、ユーザがプレビューア306での確認同様、設定変更内容に従って、印刷を行うならば、スプールファイルマネージャ304上で、印刷要求を発行する。印刷要求はグラフィックエンジン202に伝えられ、ディスパッチャ301経由で、プリンタドライバ203に印刷命令が送られ、印刷が実行される。
【0045】
また、スプールファイルマネージャのウィンドウ画面(図16)では、複数の印刷ジョブを結合し、一つの印刷ジョブとして印刷するように指定することが可能である。これも、プレビュー、設定変更同様、図9のプリンタドライバのプロパティにおいて出力先を「ストア」指定されたジョブが前提となる。
【0046】
ユーザが印刷ジョブの結合を行う場合、まず、アプリケーション201からプリンタドライバ203を呼び出し、図9に示すようなユーザインターフェイス上からストアを選択する。前記同様、この選択により、スプールファイル303にストアされ、図16のようにスプールファイルマネージャのウィンドウ画面(図16)がポップアップされる。スプールされたジョブはスプールファイルマネージャのウィンドウ上にリスト表示される。アプリケーション201から同様の操作をすることにより、スプールファイルマネージャ304上に複数ジョブのリスト表示がされることになる。
【0047】
ここで、複数ジョブを選択し、「結合」が指定された場合、外部メモリ11に格納されている設定変更エディタ307をRAM2にロードし、設定変更エディタ307に対して、リスト上の先頭ジョブまたはデフォルトの加工設定の表示を行うように指示する。そして図18のような結合設定画面が表示される。ここでは、設定変更エディタ307を結合設定画面として用いているが、別モジュールのものを用いても構わない。
【0048】
この設定変更エディタ307は、スプールファイル303に含まれる中間コードのページ描画ファイルをスプールファイル303に格納されているジョブ設定情報に含まれる加工設定の内容に従って加工し、結合ジョブとして指定されたすべてのジョブに対して、グラフィックエンジン202を用いて自身のクライアント領域に出力することによって、画面上の出力を行う。その際、図18に示すプレビュー領域に選択された全てのジョブの小プレビューが可能となる。また、結合ジョブを生成する際に、それぞれの単体ジョブのジョブ設定ファイルを拡張したジョブ出力用設定ファイルを生成する。このジョブ出力用設定ファイルは、ジョブ編集を行う際にも生成されるものであり、1つのジョブに対して1つできるものであり、結合ジョブの場合もまた1つ生成される。
【0049】
ここではそれぞれのジョブに対して、結合する前の加工設定で表示することも、結合ジョブとして統一の加工設定に変更、修正して表示することも可能である。その際、プリンタドライバ203の設定可能な項目を設定変更エディタ307上のユーザインターフェイスに持っていても、プリンタドライバ203自身のユーザインターフェイスを呼び出しても構わない。
【0050】
ここで結合されたジョブ及び変更された変更項目は、前述したように、設定変更エディタ307上の認証要求に従い、変更が認証され、制御がスプールファイルマネージャ304に移行する。これらの操作により、先に選択された複数ジョブは、スプールファイルマネージャのウィンドウ上で一つの結合ジョブとして表示される。
【0051】
そして、ユーザがプレビューア306での確認同様、設定変更内容に従って、印刷を行うならば、スプールファイルマネージャ304上で、印刷要求を発行する。印刷要求はグラフィックエンジン202に伝えられ、ディスパッチャ301経由で、プリンタドライバ203に印刷命令が送られ、印刷が実行される。
【0052】
<レーザビームプリンタの構成>
図4は、プリンタ1500の一例である両面印刷機能を有するカラーレーザプリンタの断面図である。
【0053】
このプリンタはホストコンピュータ3000より入力した印刷データに基づいて得られる各色毎の画像データで変調されたレーザ光をポリゴンミラー31により感光ドラム15を走査して静電潜像を形成する。そして、この静電潜像をトナー現像して可視画像を得、これを中間転写体9へ全色について多重転写してカラー可視画像を形成する。そして更に、このカラー可視画像を転写材2へ転写し、転写材2上にカラー可視画像を定着させる。以上の制御を行う画像形成部は、感光ドラム15を有するドラムユニット、接触帯電ローラ17を有する一次帯電部、クリーニング部、現像部、中間転写体9、用紙カセット1や各種ローラ3、4、5、7を含む給紙部、転写ローラ10を含む転写部及び定着部25によって構成されている。
【0054】
ドラムユニット13は、感光ドラム(感光体)15と感光ドラム15のホルダを兼ねたクリーニング機構を有するクリーナ容器14とを一体に構成したものである。このドラムユニット13はプリンタ本体に対して着脱自在に支持され、感光ドラム15の寿命に合わせて容易にユニット交換可能に構成されている。上記感光ドラム15はアルミシリンダの外周に有機光導電体層を塗布して構成し、クリーナ容器14に回転可能に支持されている。感光ドラム15は、図示しない駆動モータの駆動力が伝達されて回転するもので、駆動モータは感光ドラム15を画像形成動作に応じて反時計回り方向に回転させる。感光ドラム15の表面を選択的に露光させることにより静電潜像が形成されるように構成されている。スキャナ部30では、変調されたレーザ光を、モータ31aにより画像信号の水平同期信号を同期して回転するポリゴンミラーにより反射し、レンズ32、反射鏡33を介して感光ドラムを照射する。
【0055】
現像部は、上記静電潜像を可視画像化するために、イエロー(Y)、マゼンダ(M)、シアン(C)の現像を行う3個のカラー現像器20Y、20M、20Cと、ブラック(B)の現像を行う1個のブラック現像器21Bとを備えた構成を有する。カラー現像器20Y、20M、20C及びブラック現像器21Bには、スリープ20YS、20MS、20CS及び21BSと、これらスリープ20YS、20MS、20CS、21BSそれぞれの外周に圧接する塗布ブレード20YB、20MB、20CB及び21BBとがそれぞれ設けられる。また3個のカラー現像器20Y、20M、20Cには塗布ローラ20YR、20MR、20CRが設けられている。
【0056】
また、ブラック現像器21Bはプリンタ本体に対して着脱可能に取り付けられており、カラー現像器20Y、20M、20Cは回転軸22を中心に回転する現像ロータリー23にそれぞれ着脱可能に取り付けられている。
【0057】
ブラック現像器21Bのスリープ21BSは感光ドラム15に対して例えば300μm程度の微小間隔を持って配置されている。ブラック現像器21Bは、器内に内蔵された送り込み部材によってトナーを搬送すると共に、時計回り方向に回転するスリープ21BSの外周に塗布ブレード21BBによって塗布するように摩擦帯電によってトナーへ電荷を付与する。また、スリープ21BSに現像バイアスを印加することにより、静電潜像に応じて感光ドラム15に対して現像を行って感光ドラム15にブラックトナーによる可視画像を形成する。
【0058】
3個のカラー現像器20Y、20M、20Cは、画像形成に際して現像ロータリー23の回転に伴って回転し、所定のスリープ20YS、20MS、20CSが感光ドラム15に対して300μm程度の微小間隔を持って対向することになる。これにより所定のカラー現像器20Y、20M、20Cが感光ドラム15に対向する現像位置に停止し、感光ドラム15に可視画像が作成される。
【0059】
カラー画像形成時には、中間転写体9の1回転毎に現像ロータリー23が回転し、イエロー現像器20Y、マゼンダ現像器20M、シアン現像器20C、次いでブラック現像器21Bの順で現像工程がなされ、中間転写体9が4回転してイエロー、マゼンダ、シアン、ブラックのそれぞれのトナーによる可視画像を順次形成し、その結果フルカラー可視画像を中間転写体9上に形成する。
【0060】
中間転写体9は、感光ドラム15に接触して感光ドラム15の回転に伴って回転するように構成されたもので、カラー画像形成時に時計回り方向に回転し、感光ドラム15から4回の可視画像の多重転写を受ける。また、中間転写体9は画像形成時に後述する転写ローラ10が接触して転写材2を挟持搬送することにより転写材2に中間転写体9上のカラー可視画像を同時に多重転写する。中間転写体の外周部には、中間転写体9の回転方向に関する位置を検知するためのTOPセンサ9a及びRSセンサ9bと、中間転写体に転写されたトナー像の濃度を検知するための濃度センサ9cが配置されている。
【0061】
転写ローラ10は、感光ドラム15に対して接離可能に支承された転写帯電器を備えたもので、金属軸を中抵抗発泡弾性体により巻回することによって構成されている。
【0062】
転写ローラ10は、図4に実線で示すように中間転写体9上にカラー可視画像を多重転写している間は、カラー可視画像を乱さぬように下方に離開している。そして、上記中間転写体9上に4色のカラー可視画像が形成された後は、このカラー可視画像を転写材2に転写するタイミングに合わせてカム部材(不図示)により転写ローラ10を図示点線で示す上方に位置させる。これにより転写ローラ10は転写材2を介して中間転写体9に所定の押圧力で圧接すると共に、バイアス電圧が印加され、中間転写体9上のカラー可視画像が転写材2に転写される。
【0063】
定着部25は、転写2を搬送させながら、転写されたカラー可視画像を定着させるものであり、転写材2を加熱する定着ローラ26と転写材2を定着ローラ26に圧接させるための加圧ローラ27とを備えている。定着ローラ26と加圧ローラ27とは中空状に形成され、内部にそれぞれヒータ28、29が内蔵されている。即ち、カラー可視画像を保持した転写材2は定着ローラ26と加圧ローラ27とにより搬送されると共に、熱及び圧力を加えることによりトナーが表面に定着される。
【0064】
可視画像定着後の転写材2は、その後排紙ローラ34、35、36によって排紙部37へ排出して画像形成動作を終了する。
【0065】
クリーニング手段は、感光ドラム15上及び中間転写体9上に残ったトナーをクリーニングするものであり、感光ドラム15上に形成されたトナーによる可視画像を中間転写体9に転写した後の廃トナーあるいは、中間転写体9上に作成された4色のカラー可視画像を転写材2に転写した後の廃トナーは、クリーナ容器14に蓄えられる。
【0066】
印刷される転写材(記録用紙)2は、給紙トレイ1から給紙ローラ3により取り出されて中間転写体9と転写ローラ10との間に挟まれるようにして搬送されてカラートナー画像が記録され、定着部25を通過してトナー像が定着される。片面印刷の場合には、案内38が上方の排紙部に記録用紙を導くように搬送経路を形成するが、両面印刷に対しては、下方の両面ユニットに導くように経路を形成する。
【0067】
両面ユニットに導かれた記録用紙は、搬送ローラ40によりトレイ1の下部(二点鎖線で示す搬送経路)に一旦送り込まれた後に逆方向に搬送され、両面トレイ39に送られる。両面トレイ39上では、用紙は給紙トレイ1に載置された状態とは表裏が逆になり、また搬送方向について前後が逆になっている。この状態で再びトナー像の転写、定着を再度行うことで、両面印刷ができる。
【0068】
<印刷用中間データの保存処理>
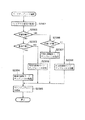
図5は、スプーラ302における、スプールファイル303の生成におけるページ単位保存ステップの処理をフローチャートで示したものである。
【0069】
まずステップ501では、スプーラ302は、アプリケーションからグラフィックエンジン202を介して印刷要求を受けつける。アプリケーションにおいては、図8に示すような印刷設定を入力するダイアログが表示され、このダイアログから入力された印刷設定がプリンタドライバよりスプーラ303に渡される。図8に示す設定入力ダイアログにおいては、801のような1物理ページにレイアウトする論理ページの数を決定するような設定項目等を含んでいる。
【0070】
ステップ502では、スプーラ302は、受け付けた印刷要求がジョブ開始要求か判定し、もしステップ502でジョブ開始要求であると判断した場合には、ステップ503に進み、スプーラ302は、中間データを一時的に保存するためのスプールファイル303を作成する。続いて、ステップ504では、スプーラ302は、スプールファイルマネージャ304へ印刷処理の進捗を通知し、続くステップ505でスプーラ302のページ数カウンタを1に初期化する。ここで、スプールファイルマネージャ304においては、印刷が開始されたジョブに対するジョブの情報や加工設定などをスプールファイル303より読み込み、記憶する。
【0071】
一方、ステップ502において、ジョブ開始要求ではなかったと判断した場合には、ステップ506に進む。
【0072】
ステップ506では、スプーラ302は、受け付けた要求がジョブ終了要求かどうかの判別を行う。ジョブ終了要求でないと判断した場合には、ステップ507に進み、改ページかどうかの判別を行う。もしもステップ507で改ページであると判断した場合には、ステップ508に進み、スプールファイルマネージャ304へ印刷処理の進捗を通知する。そしてページ数カウンタをインクリメントして、中間コードを格納しているページ描画ファイルを閉じ、次のページ描画ファイルを生成する。
【0073】
ステップ507において、受け付けた印刷要求が改ページではないと判断した場合には、ステップ509に進み、スプーラ302は、ページ描画ファイルへの中間コードの書き出しの準備を行う。
【0074】
次に、ステップ510では、印字要求をスプールファイル303へ格納するため、スプーラ302は、印字要求のDDI関数の中間コードへの変換処理を行う。ステップ511では、スプーラ302は、ステップ510において格納可能な形に変換された印刷要求(中間コード)をスプールファイル303のページ描画ファイルへ書き込む。その後、ステップ501に戻り、再びアプリケーションからの印刷要求を受けつける。この一連のステップ501からステップ511までの処理を、アプリケーションよりジョブ終了要求(End Doc)を受け取るまで続ける。また、スプーラ302は、同時にプリンタドライバ203からDEVMODE構造体に格納されている加工設定等の情報を取得し、ジョブ設定ファイルとしてスプールファイル303に格納する。一方、ステップ506にて、アプリケーションからの印刷要求がジョブ終了であると判断した場合には、アプリケーションからの印刷要求は全て終了であるので、ステップ512に進み、スプールファイルマネージャ304へ印刷処理の進捗を通知し、処理を終える。
【0075】
<スプールファイルの生成>
図6は、スプールファイルマネージャ304における、スプールファイル303生成プロセスと以降説明する印刷データ生成プロセスの間での制御の詳細をフローチャートで示したものである。
【0076】
ステップ601では、スプールファイルマネージャ304は、スプーラ302あるいはデスプーラ305からの印刷処理の進捗通知を受け付ける。
【0077】
ステップ602では、スプールファイルマネージャ304は、もし進捗通知が前述のステップ504において通知されるスプーラ302からの印刷開始通知であるかどうか判定し、もしそうであればステップ603へ進み、印刷の加工設定をスプールファイル303から読み込み、ジョブの管理を開始する。一方、ステップ602において、スプーラ302からの印刷開始通知でなければステップ604へ進み、スプールファイルマネージャ304は、進捗通知が前述のステップ508において通知されるスプーラ302からの1論理ページの印刷終了通知であるかどうか判定する。ここで1論理ページの印刷終了通知であればステップ605へ進み、この論理ページに対する論理ページ情報を格納する。そして、続くステップ606では、この時点でスプールが終了したn論理ページに対して、1物理ページの印刷が開始できるかを判定する。ここで、印刷可能である場合はステップ607へ進み、印刷する1物理ページに対して割り付けれられる論理数から物理ページ番号を決定する。
【0078】
物理ページの計算については、例えば、加工設定が1物理ページに4論理ページを配置するような設定の場合、第1物理ページは第4論理ページがスプールされた時点で印刷可能となり、第1物理ページとなる。続いて、第2物理ページは第8論理ページがスプールされた時点で印刷可能となる。
【0079】
また、論理ページ数の総数が1物理ページに配置する論理ページ数の倍数でなくても、ステップ512におけるスプール終了通知によって1物理ページに配置する論理ページが決定可能である。
【0080】
そして、ステップ608では、図10に示すような形式で、印刷可能となった物理ページを構成する論理ページ番号と、その物理ページ番号などの情報がジョブ出力用設定ファイル(物理ページ情報を含むファイル)に保存され、物理ページ情報が1物理ページ分追加されたことがデスプーラ305に通知される。その後ステップ601に戻り、次の通知を待つ。本実施例においては、印刷データ1ページ、即ち1物理ページを構成する論理ページがスプールされた時点で印刷ジョブのスプールが全て終了していなくても印刷処理が可能である。
【0081】
一方、ステップ604において、進捗通知がスプーラ302からの1論理ページの印刷終了通知でなかった場合ステップ609へ進み、スプールファイルマネージャ304は、前述のステップ512において通知されるスプーラ302からのジョブ終了通知であるかどうかを判定する。ここで、ジョブ終了通知である場合、前述のステップ606へ進む。一方、ジョブ終了通知でない場合、ステップ610へ進み、スプールファイルマネージャ304は、受け付けた通知がデスプーラ305からの1物理ページの印刷終了通知であるかどうか判定する。ここで、1物理ページの印刷終了通知である場合はステップ612へ進み、加工設定の印刷が全て終了したかを判定する。印刷終了した場合、ステップ612へ進み、デスプーラ305に印刷終了の通知を行う。一方、加工設定に対する印刷がまだ終了していないと判断した場合、前述の606へ進む。本実施例におけるデスプーラ305は印刷処理を行う単位として1物理ページ数を想定している。また、ステップ608では、1物理ページの印刷処理を行うのに必要な情報をファイルに逐次保存し、再利用可能な形式にしているが、再利用不要な場合には、共有メモリ等高速な媒体を使用し、1物理ページ単位で次々と上書きする実装にして、速度とリソースを節約するような実装形式であってもよい。また、デスプールの進捗よりもスプールの進捗の方が早い場合や全ページのスプール終了後からデスプールが開始されるような場合には、ステップ608で1物理ページ毎にページ印刷可能を通知せずに、デスプール側の進捗に応じて、複数物理ページもしくは全物理ページが印刷可能になったという通知内容にして、通知回数を節約することが可能である。
【0082】
ステップ610において、通知がデスプーラ305からの1物理ページの印刷終了通知でないと判断された場合、ステップ613へ進み、スプールファイルマネージャ304は、デスプーラ305からの印刷終了通知かどうかを判定する。通知がデスプーラ305からの印刷終了通知と判定された場合、ステップ614へ進み、スプールファイルマネージャ304は、スプールファイル303の該当するページ描画ファイルの削除を行い処理を終える。ただし、一方、デスプーラ305からの印刷終了通知でなかった場合はステップ615へ進み、その他通常処理を行い、次の通知を待つ。
【0083】
<スプールファイルの出力>
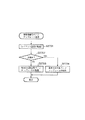
図7は、デスプーラ305における、印刷データの生成プロセスの詳細をフローチャートで示したものである。
【0084】
デスプーラ305は、スプールファイルマネージャ304からの印刷要求に応じて、スプールファイル303から必要な情報(ページ描画ファイルおよびジョブ設定ファイル)を読み出して印刷データを生成する。生成された印刷データにおけるプリンタへの転送方法については図3で説明した通りである。
【0085】
印刷データの生成では、まず、ステップ701において、前述のスプールファイルマネージャ304からの通知を入力する。続くステップ702では、デスプーラ305は、入力された通知がジョブの終了通知かどうか判定し、ジョブ終了通知であるならばステップ703へ進み、終了フラグを立て、ステップ705へ進む。一方、ステップ702においてジョブ終了通知でない場合は、ステップ704に進み、前述のステップ608における1物理ページの印刷開始要求が通知されたかどうか判定する。ステップ704において開始要求と判定されなかった場合は、ステップ710へ進み、その他エラー処理を行い、ステップ701へ戻り次の通知を待つ。一方、ステップ704において1物理ページの印刷開始要求と判定された場合は、ステップ705へ進み、デスプーラ305は、ステップ704で通知を受けた印刷処理可能な物理ページのIDを保存する。続くステップ706では、デスプーラ305は、ステップ705で保存した物理ページIDのすべてのページに関して印刷処理が済んでいるかどうか判定する。ここで全物理ページの処理が済んでいる場合は、ステップ707へ進み、前述のステップ703で終了フラグが立てられているのか判定する。終了フラグがたっている場合は、ジョブの印刷が終了したとみなし、デスプーラ305の処理終了の通知をスプールファイルマネージャ304に通知し、処理を終える。ステップ707で、終了フラグが立っていないと判定された場合は、ステップ701へ戻り次の通知を待つ。一方、ステップ706で、印刷可能な物理ページが残っていると判定された場合には、ステップ708へ進み、デスプーラ305は、保存された物理ページIDから未処理の物理ページIDを順に読み出し、読み出した物理ページIDに対応する物理ページの印刷データ生成に必要な情報を読み込み、印刷処理を行う。印刷処理はスプールファイル303に格納された印刷要求命令をデスプーラ305においてグラフィックエンジン202が認識可能な形式(GDI関数)に変換し、転送する。本実施例のような、複数論理ページを1物理ページにレイアウトするような加工設定(以下Nページ印刷)については、このステップで縮小配置を考慮にいれながら変換する。必要な印刷処理が終えたならば、続くステップ709において1物理ページの印刷データ生成終了の通知をスプールファイルマネージャ304に対して行う。そして再びステップ706へ戻り、ステップ705で保存しておいた印刷可能な物理ページIDすべてについて印刷処理を行うまで繰り返す。
【0086】
以上が、ディスパッチャ301、スプーラ302、スプールファイルマネージャ304、デスプーラ305を用いた印刷処理の流れである。上記のように処理することにより、スプーラ302が中間コードを生成してスプールファイル303に格納するタイミングでアプリケーション201が印刷処理から開放されるので、プリンタドライバ203に直接出力するよりも短時間で済む。また、スプールファイル303にプリンタドライバの印刷設定を踏まえた中間ファイル(ページ描画ファイル、ジョブ設定ファイル)として一時保存しているので、実際に印刷されるべき印刷プレビューをユーザに認識させることや、複数のアプリケーションにより生成した印刷ジョブの結合や並び替えが可能となり、印刷設定の変更を行う場合にも、再度アプリケーションを立ち上げて印刷をすることなしにユーザに行わせることを可能とする。
【0087】
ここで、スプーラ302を用いた印刷処理において、デスプーラ305によりグラフィックエンジン202への印刷要求時にジョブ出力用設定ファイルが生成されるが、プレビューやジョブ結合等を行う場合もジョブ出力用設定ファイルが生成される。ジョブ出力用設定ファイルは、単体ジョブの場合はジョブ設定ファイルと同等のものであり、結合ジョブの場合は複数のジョブ設定情報に基づいて生成されるものである。ここでジョブ出力用設定ファイルについて説明する。
【0088】
<ジョブ出力用設定ファイルの構成>
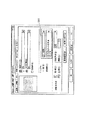
図10は、ステップ608において、スプールファイルマネージャ304が生成する印刷可能となった物理ページを構成する情報を保存しているジョブ出力用設定ファイルの例を示す。フィールド1001は、ジョブを識別するためのIDで、本情報を保存しているファイル名や共有メモリの名称という形で保持することも可能である。フィールド1002はジョブ設定情報である。ジョブ設定情報には、グラフィックエンジン202に対してジョブの印刷を開始するために必要な構造体、Nページ印刷の指定、ページ枠などの追加描画の指定、部数、ステープルなどのフィニッシング指定など、1つのジョブに対して1つしか設定できない情報が含まれている。ジョブ設定情報1002には、ジョブに対する機能に応じて必要なだけ情報が保存される。フィールド1003はジョブの物理ページ数で、本フィールド以降、この数の分だけ物理ページ情報が保存されていることを示す。本実施例では、印刷可能な物理ページ数を通知する方式であるので、このフィールドは無くても動作可能である。これ以降、フィールド1004から最後までフィールド1003の数だけ物理ページ情報が格納される。物理ページ情報については図12で説明する。
【0089】
図11は、図10のフィールド1002に図示されたジョブ設定情報の一例である。フィールド1101は全物理ページ数である。フィールド1102は、全論理ページ数である。フィールド1101および1102は、印刷データに追加して、ページ数などを付加情報として印刷する場合などに利用する。印刷が続いている際には、両フィールドは暫定的な値、もしくは、印刷が終了するまでスプールファイルマネージャ304は印刷可能な物理ページの情報の作成を延期する。フィールド1103は本印刷ジョブを何部印刷するかを指定する部数情報である。フィールド1104は、フィールド1103で複数部印刷する設定の場合、部単位で印刷するかどうかの指定である。フィールド1104はステープル、パンチ、Z折などのフィニッシング情報で、プリンタ本体もしくは外部にフィニッシャーがある場合に指定される。フィールド1106は付加印刷情報で、ページ枠などの飾り、日付などの付加情報、ユーザ名、ページ数、ウォーターマーク印刷等、ジョブに対して付加する情報が保存される。機能が増えるに従って本ジョブ設定情報に含まれるフィールドの数も増加し、例えば、両面印刷が可能な場合は、両面印刷の指定を保存するフィールドが追加される。
【0090】
図12は、図10のフィールド1004に図示された物理ページ情報の一例を示す。最初のフィールド1201は物理ページ番号で、印刷順序の管理や、物理ページ番号を追加印刷する際に使用される値である。フィールド1202は物理ページ設定情報で、物理ページ毎にレイアウトやカラー・モノクロの指定が可能である場合、レイアウトやカラー・モノクロの設定が保存される。フィールド1203は本物理ページに割り付けられる論理ページ数で、1物理ページに4ページを割り付ける場合には4もしくは4ページ印刷を示すIDが保存される。フィールド1204以降はフィールド1203で指定された数だけ論理ページの情報が保存される。アプリケーション201から印刷されたページ数によっては、1203で指定されるページ数よりも実際のページデータ数が少なくなる場合がある。その場合には、論理ページ情報に空ページを示す特別なデータを保存して対応する。
【0091】
図13は、1202の物理ページ設定情報の例である。フィールド1301は物理ページ上への論理ページの配置順で、Nページ印刷で、物理ページ上に論理ページを配置する順番(左上から横へ、左上から下へ等)の指定が保存されている。システムによっては、配置順ではなく、フィールド1204以降の論理ページ情報の順番をページ番号順ではなく、配置順に応じた順序で配することで1301の設定を代用する場合もある。フィールド1302は両面印刷の表・裏の情報で、例えば綴じ代を表裏でそろえる際に使用される。フィールド1303はカラーページかモノクロページかの指定で、プリンタがモノクロモードとカラーモードを持つ場合、カラーページとモノクロページが混在する文書で、カラーページをカラーモードで、モノクロページをモノクロモードで印刷したい場合などに使用される値である。この情報を持つことにより、オートカラーモードとして、ページ単位にカラープリンタで処理を変更することが可能となる。つまり、カラーページは、中間転写体(中間転写ドラム、中間転写ベルト)もしくは転写体(転写ドラム、転写ベルト)がデバイスカラーの数分、YMCKなら4回転し、モノクロページは、ブラックだけ1回転することにより転写制御することを可能とする。フィールド1304は付加印刷情報で、物理ページに対して、ページ数や、日付などの付加情報を印刷する場合に使用される。物理ページ設定情報も、システムの機能に応じてフィールドが追加される。
【0092】
図14は、1204で示された論理ページ情報の一例を示す。フィールド1401は論理ページのIDで、このIDを利用して、スプールファイル303から論理ページに対応するページ描画ファイルの中間コードを参照する。このIDを利用して論理ページの中間コードへアクセス可能であれば良く、ファイルやメモリポインタであっても、論理ページを構成する中間コード自身が入っていてもよい。フィールド1402は論理ページ番号で論理ページ番号を付加情報として印刷する場合や、論理ページIDの補助情報に使用される。フィールド1403のフォーマット情報には、論理ページ単位で指定可能である各種設定項目が保存される。例えば、ページ枠などの付加印刷情報、拡縮率などの論理ページ単位に指定される各種設定の情報が保存される。また、必要であれば、論理ページ単位のカラー・モノクロ情報などの論理ページに対する属性情報を保存する事も可能である。逆に、論理ページ単位で設定を切りかえる事や論理ページ単位での属性情報が不要であるようなシステムでは、フィールド1403は不要である。
【0093】
ジョブ出力用設定ファイルは、上記のように構成されている。なお、ジョブ設定ファイルもほぼ同様であり、印刷体裁(片面、両面、製本印刷)、印刷レイアウト(Nup、ポスター印刷)、付加情報(ウォーターマーク、日付、ユーザ名の付加)、部数、用紙サイズ情報がジョブとして有しており、物理ページ毎に、論理ページの配置順、両面印刷の表面か、裏面か、カラーモード等から構成されている。
【0094】
更に、図3では、これまで説明した拡張システムに加えて、ジョブの設定変更機能を持つ設定変更エディタ307を配した例を示している。本実施例ではジョブの設定内容は、単体ジョブは、ジョブ設定ファイルに、また結合ジョブは、図10に示したジョブ出力用設定ファイル中に含まれており、中間コードを保存しているページ描画ファイル303とは独立しているため、ジョブ出力用設定ファイルを作り変えることでジョブの設定変更が可能である。設定変更エディタ307は単独で、あるいはスプールファイルマネージャ304と連携して、ジョブ出力用設定ファイルを作り変え、あるいは、一部を書き換えることでジョブの設定変更機能を実現している。
【0095】
<設定変更の処理手順>
図15は、設定変更エディタ307におけるジョブ設定変更処理プロセスの詳細をフローチャートで示したものである。
【0096】
まずステップ1501では、設定変更エディタは、ジョブ設定ファイルもしくはジョブ出力用設定ファイルを読み込む。ジョブ出力用設定ファイルはプレビューア305、デスプーラ303が読み込むものと同じファイルである。次に、ステップ1502へ進み、読み込んだ結果を、ユーザに表示する。ステップ1503で、図18に示したようなユーザインターフェイス上で、ユーザとの対話を行い、前述したメニューの指定等により設定内容を変更する。このステップは、対話形式でなく、ファイルなどに書きこまれた設定変更の内容に応じて変更するバッチ形式でもよい。次にステップ1504へ進み、ステップ1501で設定変更エディタは、最初に読み込んだ内容と、現在指定されている設定内容に変更があったかどうかの判定を行う。設定内容に変更が合った場合は、ステップ1505へ進み、新規のジョブ出力用設定ファイルを生成し、変更があったことをスプールファイルマネージャに通知して終了する。ステップ1505で、変更がないと判定された場合は、変更がなかったことをスプールファイルマネージャに通知して終了する。このように新規のジョブ出力用設定ファイルを生成するが、図18のユーザインタフェース画面において、「OK」ボタンが選択されることにより、新規のジョブ出力用設定ファイルが有効となり、古いジョブ出力用設定ファイルは削除される。また、ジョブ出力用設定ファイルからの変更ではなく、単体ジョブのジョブ設定ファイルの場合は削除せずに保存しておく。また、図18の画面で「初期状態に戻す」ボタンが選択された場合は、新規のジョブ出力用設定ファイルを削除し、古いジョブ出力用設定ファイルが有効となり、表示に反映させる。本実施例では、設定変更エディタ307を別モジュールとして説明しているが、単にスプールファイルマネージャ304のユーザインターフェイスの一部であってもよい。設定変更エディタ307で実際に変更内容をジョブ出力用設定ファイルに書きこまずに、設定変更の内容のみをスプールファイルマネージャ304へと通知するだけで、実際のジョブ出力用設定ファイルの変更はスプールファイルマネージャ304側で行う実装形式でもよい。
【0097】
図3では、更に、複数印刷ジョブを結合し、一つの印刷ジョブとして印刷する拡張システムが図示されているが、結合ジョブをデスプール・プレビューするための拡張について説明する。
【0098】
通常、中間形式のスプールファイル303はジョブ単位で作成される。単独ジョブの場合は、処理対象ジョブファイル中の各論理ページの中間コードを順に読み出して処理を行うので、フィールド1401の論理ページIDは、各論理ページがファイルのどこに位置しているのかを示す相対あるいは絶対オフセットで実現可能である。結合ジョブの場合はフィールド1401のジョブIDから、スプールファイルと、そのジョブに属するページ情報を特定する必要がある。本実施例では、スプールファイルを識別するIDを論理ページIDに付加することで、スプールファイルを特定する方式とする。この場合、主な変更点はフィールド1401のみで済む。スプールファイルが識別できれば、ページ部分の読み込みは単独ジョブの処理と同じロジックで処理することが可能であるからである。また、スプールファイルが各論理ページ毎に別ファイルの形で保存されている場合は、論理ページのファイル名をそのままフィールド1401の論理ページIDとする実装形もある。
<ストア処理時のプレビュー表示>
次に、前述したように中間データ及びジョブ出力用設定ファイルとして保存された印刷ジョブに基づいて印刷プレビュー画像を表示する手順について説明する。利用者は、アプリケーションプログラムからの印刷時に、図9のように印刷ジョブのストア処理を指定することで、図5の手順によって中間コードとジョブ出力用設定ファイルとにより定義される印刷ジョブを作成させることができる。この結果、図16のように、現在格納されている印刷ジョブのリストが表示される。利用者は印刷ジョブりストから所望の印刷ジョブを指定して、印刷ジョブの編集,結合,すでに結合されているジョブへの印刷ジョブの追加,結合されたジョブ内におけるの印刷ジョブの順序変更などの操作を行うことができる。
【0099】
この際、印刷ジョブをリストから指定して編集や結合等の操作をボタンやメニューなどから指定すると、図18に示したようなジョブ全体にわたる印刷プレビュー画面が表示される。なお、この印刷プレビュー画面は、通常のアプリケーションなどで用意されているプレビュー画面などのように、ページ単位で表示するものと異なり、単一の、あるいは結合された印刷ジョブ全体にわたって、ページのつながりなど、ページ間の関係についてもプレビュー表示できる。
【0100】
図19は、アプリケーションプログラム等で作成したデータを、ストア指定をして印刷させた場合の手順である。図9の画面で出力先としてメニュー901から「ストア」を選択しておき、印刷させせると、図9の手順が実行される。まず、ステップS1901においてスプーラを起動し、中間データおよびジョブ出力設定ファイルを生成して格納する。「ストア」が指定された場合には、スプーラは印刷開始をスプールマネージャに対して指示せず、中間データは印刷されずに保持される。この状態の印刷ジョブを、本実施形態ではストアされた印刷ジョブと呼ぶことにする。
【0101】
そして、ステップS1901で中間データに変換されて保持されている印刷ジョブを、すでにストアされている印刷ジョブリストにステップS1902において追加する。ただし、本実施形態では、ストアされた印刷ジョブは、ストアされた印刷ジョブを管理するためのプログラム(図3のプレビューア306および設定変更エディタ307)の実行中だけ保持され、その実行を終了するとストアされた印刷ジョブは消去される。しかしながら、いったんストアした印刷ジョブは、それを積極的に削除するまでは保持するようにしてもよい。
【0102】
ストアされた印刷ジョブのリストに新たな印刷ジョブが追加されると、ステップS1903において、図16に示すようにそれらジョブのリストを表示する。なお、中間データとして保持されている印刷ジョブを保持されているジョブ、その中から、結合あるいは編集のために選択されたジョブを対象ジョブと呼ぶことにする。
【0103】
<ジョブリストの表示>
図20は図19のステップS1903の詳細を示すフロー図である。なお、図20の手順は、ジョブリスト中からジョブが選択された場合など、表示すべき状態に変更が生じる都度実行され、ジョブリスト表示が更新される。
【0104】
まず、ステップS2001において、複数のジョブが選択されているか判定する。否の場合にはステップS2002において選択されているジョブがあるか判定する。選択されているジョブがある場合には、そのジョブを注目ジョブとし、また、編集ボタンをイネーブルにする。編集ボタンは、図16におけるボタン1608である。図16はまさに単一のジョブが選択された状態であり、編集ボタンがイネーブルになっている。
【0105】
一方、選択されているジョブがない場合には、ステップS2004において、最後に選択されていたジョブを注目ジョブとする。最後に選択されていたジョブがなければ、すなわち、最初にジョブリストを表示する場合にはジョブリストの先頭のジョブを注目ジョブとする。
【0106】
注目ジョブが決定されると、ステップS2005において、その注目ジョブと結合できないジョブを保持されているジョブ全体から探し出し、それが注目ジョブと結合できない旨と結合できない理由とを所定のメモリ領域等に設定する。なお、注目ジョブと結合できないジョブとは、例えば、指定された解像度や1画素あたりのビット数、あるいはグラフィックモードのいずれかが注目ジョブとは異なるジョブである。
【0107】
最後に、ステップS2006において、ジョブリストを表示する。この際、ステップS2005で結合できない旨およびその理由が設定されたジョブについては、そのジョブを表示した欄に、注目ジョブと結合できない旨を示すシンボルとその理由とが表示される。図26はこの様子を示している。選択されたジョブ2601に対して、ジョブ2602は結合可能であるが、ジョブ2603以下は結合できないために、その旨示すシンボルが左側に、結合できない理由がコメント欄に表示されている。
【0108】
一方複数のジョブが選択されている場合には、ステップS2007において選択されたジョブ同士が結合可能か判定され、結合可能であればステップS2008において結合ボタン(図16のボタン1606)がイネーブル(操作可能状態)にされ、ステップS2006に進んでジョブリストが表示される。
【0109】
また、選択されたジョブすべてを結合できない場合には、ステップS2009において、保持されているジョブすべてについて結合できない旨が設定される。ステップS2006では、ステップS2009において結合できない旨設定されたジョブについて、その旨を示すシンボルやコメントを表示する。
【0110】
このようにして、ジョブリストが表示される。前述したように、図20の手順はジョブリストからジョブが選択される都度再実行されるために、選択されたジョブに応じて、結合の可否や、編集操作や結合操作の可・不可を利用者に提示することができる。
【0111】
<編集・結合操作>
表示されたジョブリストからジョブが選択された状態で、編集ボタン(選択ジョブが単一の場合)や結合ボタン(選択ジョブが複数の場合)が操作されると、図21の手順が遂行される。なお、結合不可能なジョブが選択されている場合には結合操作はできない。
【0112】
まずステップS2101において、操作が結合操作であるか判定される。結合操作であれば、ステップS2102において、選択されているジョブ出力用設定ファイルを仮に結合する。この操作は確定されていないので、仮のジョブ出力用ファイルを作成してそれを使用する。なお、ジョブの結合時には、各ジョブの設定をそのまま用いず、一部の設定を変更して統一している。
【0113】
統一の仕方としては、所定の設定に変更したり、先頭のジョブに他のジョブが合わせたり、クリアしたりしている。例えば、結合されるジョブの印刷方法の指定は、それらがすべて両面印刷の場合以外には片面印刷に統一される。また、綴じ代やステープル指定、正順/逆順の別、フェイスアップ/ダウンの別、インサータの使用などは先頭のジョブに合わせられる。部数や製本指定などはクリアされる。
【0114】
そして、ステップS2102で結合されたジョブ出力用設定ファイル、あるいは編集の対象として選択されたジョブのジョブ出力用設定ファイルを用いて、ステップS2103においてプレビュー表示を実行し、ステップS2104で対象ジョブ一覧を表示する。プレビュー画面には、編集あるいは結合の対象となるジョブに含まれる全ページのサムネール画像がそのレイアウトに従って表示される。また、対象ジョブ一覧には、編集あるいは結合操作の対象となっているジョブの名称やページ数、ページレイアウトが一覧表示される。この一覧表示において、結合操作の場合にはジョブの順序を所望の順序に入れ替えることができるし、所望のジョブを対象ジョブ群から削除することもできる。このように対象ジョブを操作した場合には、図21の手順は再実行され、プレビュー画面および対象ジョブ一覧が再表示される。
【0115】
また、対象ジョブの印刷設定を変更することも可能である。変更できる項目は、ジョブ出力用設定ファイルの編集によって変更することができる項目である。中間データを操作する必要がある項目は、本実施形態では操作させていない。しかしながら、処理時間や必要な資源などを考慮しなければ、すべての項目を再設定させることもできる。本実施形態のシステムで再設定可能な項目としては、印刷方法(片面/両面/製本)や、部数、ステープルの有無などがある。
【0116】
<対象ジョブの印刷プレビュー表示>
図22は、図16に示した印刷ジョブのリスト表示画面において、利用者がジョブ編集や結合等、所望の操作を指示した場合に、図18のようなジョブプレビュー画面を表示する手順を示すフローチャートであり、図21のステップS2103の詳細に相当する。
【0117】
図22において、まず、ステップS2201で対象ジョブそれぞれのレイアウト設定を取得する。レイアウト設定項目には、印刷方法、ページレイアウト、ページ枠、フィニッシング、給紙切り替え等の項目があるが、これら情報は図10乃至図13に示したジョブ出力用設定ファイルから取得される。
【0118】
ここで、レイアウト設定項目について簡単に説明しておく。設定される項目の例を挙げると次のようなものがある。
(1)印刷方法:片面/両面/製本のいずれかが指定される。片面および両面は周知の通りである。製本は、印刷された用紙を2つ折りにしてとじ合わせるだけで本の体裁になるように印刷する方法である。製本印刷が指定された場合には、2つ折りにする単位として、1部分まとめて2つ折りにする方法と、所定枚数を指定し、所定枚数ごとに2つ折りにしてからそれを重ね合わせてとじる方法とが指定できる。この2つ折りにする単位を製本単位と呼ぶ。
【0119】
製本印刷の場合、例えば2枚の出力用紙を重ね合わせて2つ折りにすることで製本するために、アプリケーションで作成された論理ページ順に印刷することはできない。製本された状態で右乃至左から(これは別途指定される)ページを繰ることで、論理ページ順にページが配置されるよう、予め論理ページの出力順、すなわち、どの物理ページにどのようにどの論理ページを配置するかを決定しておく。論理ページの順序は、排紙がフェイスアップかフェイスダウンかによっても異なる。
【0120】
製本印刷は、ページの順序を考えずに形式だけを考えれば両面2アップ印刷に相当するために、論理ページ4ページ分が1枚のシートに印刷される。したがって必要な枚数Sは、S=論理ページ数/4(少数部切り上げ)によって与えられる。例えば排紙方式をフェイスアップ、製本単位をS枚とした場合、第P番目の製本単位の第Q枚目のシートの表面(初めに印刷される面)には、第(4×(P−1)+2×Q−1)論理ページと第(4×(P−1)+4×S−2×(Q−1))論理ページが、その裏面には第(4×(P−1)+2×Q)論理ページと第(4×(P−1)+4×S−2×Q−1)論理ページが配置される。フェイスアップの場合には、裏面と表面とを入れ替えればよい。
(2)製本開き方向:見開きの方向を示し、上開き、右開き、左開きが指定できる。
(3)製本単位:前述したとおり、2つ折りにする単位を示す。
(4)ページレイアウト:Nアップ印刷と呼ばれる、N論理ページをシートの1面に納めるレイアウトや、ポスター印刷と呼ばれる、1論理ページを複数のシートに分割して印刷するレイアウトを指定できる。
(5)フィニッシング:印刷後の処理を指定できる。例えば、インサータと呼ばれる外付けの装置により、印刷したシートとは別途供給されるシートを表紙として挿入することができる。
(6)給紙切り替え:給紙の仕方を指定する。例えば、中差しと呼ばれる指定を行うと、2つの給紙口を用いて、一方の給紙口から供給されるシートに印刷し、他方の給紙口から供給されるシートを印刷されるシートの間に挿入して排出する。すなわち、2つの給紙口から交互にシートを使用する。
【0121】
レイアウトとして指定できる項目には以上のようなものがある。
【0122】
次に、ステップS2202において論理ページ情報が取得される。論理ページとは、アプリケーションプログラムなどで作成されたデータにおけるページであり、Nアップ印刷が指定された場合には、複数の論理ページがひとつの物理ページ、すなわち1枚のシートの片面に印刷されることになる。この論理ページ情報は、図14に示した通りである。
【0123】
ステップS2203では、ステップS2201およびステップS2202において取得した情報に基づいて、ページテンプレートを描画する。ページテンプレートとは、レイアウトに応じた各物理ページの枠組みであり、指定された用紙サイズや片面/両面/製本の指定、縦長/横長などのレイアウトに対応したものが描画される。ただしポスター印刷が指定されている場合には組み合わせた状態がプレビュー表示されるために、この限りではない。
【0124】
次にステップS2204で、プレビュー表示される各ページに付されるページ番号を描画する。ここでは、レイアウトに応じて論理ページあるいは物理ページ順にページが付される。これにより、利用者は印刷プレービュー画面上で、レイアウトに応じた正確なページ番号を見ることができる。
【0125】
ステップS2205では、各ページテンプレートに対応して、論理ページを描画する。ここでは、図10乃至図14に示したジョブ出力用設定ファイルが参照され、ひとつの物理ページ上に、ジョブ出力用設定ファイルに登録された設定に従って論理ページを描画する。描画される論理ページの中間データは、図14に示した論理ページ情報を参照して獲得される。
【0126】
最後に、ステップS2206において、総ページ数あるいは必要枚数が描画される。総ページ数とは論理ページ数であり、必要枚数とは出力される用紙の枚数である。
【0127】
(ページテンプレート描画)
図23は、図22のステップS2203の詳細を示すフロー図である。ステップS2301においてレイアウト設定を取得し(かっこ書きなのは図22のステップS2201でレイアウトを取得しているためである)、ステップS2302,ステップS2303で印刷方法判定する。製本印刷であればステップS2304で製本印刷用のページテンプレートを取得し、両面印刷であればステップS2309で両面印刷用のページテンプレートを取得する。
【0128】
片面印刷であれば、ステップS2306で中差し印刷であるか判定する。中差し印刷とは、出力される印刷済みの用紙の間に別途供給される用紙を挿入して排出する印刷方法で、例えばオーバーヘッドプロジェクタ用の透過原稿を印刷する場合などに利用される。中差し印刷であれば、中差し印刷用のページテンプレートをステップS2207で取得し、中差し印刷でなければステップS2308で片面印刷用のページテンプレートを取得する。
【0129】
最後に、ステップS2305で取得したページテンプレートのデータに従ってページテンプレートを描画する。
【0130】
(ページ番号描画)
図24は、図22のステップS2204の詳細を示すフロー図である。ステップS2401においてレイアウト設定を取得し(かっこ書きなのは図22のステップS2201でレイアウトを取得しているためである)、ステップS2402,ステップS2403で印刷方法判定する。製本印刷であればステップS2404で製本印刷用にページ番号を描画し、両面印刷であればステップS2406で両面印刷用にページ番号を描画する。片面印刷であれば、ステップS2405で片面印刷用のページ番号を描画する。
【0131】
(論理ページ描画)
図25は、図22のステップS2205の詳細を示すフロー図である。ステップS2501においてレイアウト設定を取得し(かっこ書きなのは図22のステップS2201でレイアウトを取得しているためである)、ステップS2502,ステップS2503で印刷方法判定する。製本印刷であればステップS2504で製本印刷用に論理ページを描画し、両面印刷であればステップS2506で両面印刷用に論理ページを描画する。片面印刷であれば、ステップS2505で片面印刷用の論理ページを描画する。なお、論理ページの描画においては、ジョブ出力用設定ファイルおよび論理ページ情報に従って論理ページを描画するために、印刷方法に応じた場合分けを行わないような処理とすることもできる
<プレビュー表示の詳細>
上述のように、レイアウトの指定に応じて印刷プレビュー画面が表示される。以下ではの詳細について説明する。
【0132】
(中差し指定時のプレビュー)
印刷方法として片面が指定された場合、複数の給紙口を備えた印刷装置であれば中差しの指定を行うことができる。中差しを指定する画面の例が図37に示されている。図37においては、「Enable Cover Insertion Unit」なるチェックボックスがチェックされており、これによって中差しのフラグ等がセットされ、印刷時および印刷プレビュー時にこのフラグを参照して中差しが実行される。
【0133】
ページテンプレートを描画する際に、図23のステップS2307では中差し用のページテンプレートを取得している。このテンプレートの例が図38に示されている。このように、中差しが指定されている場合、2枚の用紙が重なった様子を示すページテンプレートが利用され、その上側に論理ページが描画される。
【0134】
こうして、プレビュー画面上においても、中差しされること、また、中差しがされた結果を確認できる。また、図示していないが、図35と同様、中差しされた用紙を示す画像をポインタで指し示すと、その画像が中差し用紙であることを示す文字列、例えば「中差し用紙」といった文字列が表示される。
【0135】
<製本印刷時プレビュー表示>
次に、印刷方法として製本印刷が指定されている場合のプレビュー表示の仕方について、その詳細を説明する。
【0136】
図27、図28、図29は、それぞれ製本印刷時のページテンプレート取得、ページ番号描画、論理ページ描画手順を示すフローチャートである。それぞれ、図23のステップS2304、図24のステップS2404、図25のステップS2504に相当する。
【0137】
(製本印刷用ページテンプレートの取得)
図27において、ステップS2701でレイアウト設定を取得すると、ステップS2702で製本後の開き方が上開きに設定されているか判定し、上開きであればステップS2704で製本印刷用上開きページのテンプレートを取得する。上開き用のページテンプレートを用いて描画されたプレビュー画面の例が図34(B)に示されている。左側から順に第1ページ、第2,3ページ、という順に表示されている。上開きの製本印刷プレビュー時には、本の体裁は横長になるので、表紙(第1ページ)および裏表紙(第8ページ)は横長のテンプレートとなる。中間は上方向への見開きとなるので、ページ3402のように、水平方向の綴じ目を中心として上下に見開いた状態で表示できるテンプレートが利用される。
【0138】
また、上開きでない場合、すなわち左右開きの場合にはステップS2703において左右開き用のページテンプレートを取得する。この例は図30に示されている。この場合には、見開きは左右方向になるために、ページ3001のように垂直方向の綴じ目を中心として見開いた上他で表示できるテンプレートが利用される。右開き・左開きの別は、テンプレートでは区別する必要はない。
【0139】
このようにして取得したテンプレートが、図23のステップS2305で描画される。なお、後述するように表紙インサートが指定されている場合には、表紙はインサータから給紙されるため、印刷の対象にはならないが、プレビュー画面には表紙として表示される。そのために、インサートされる表紙のテンプレートも描画される。
【0140】
(製本印刷用ページ番号描画)
図28においては、ステップS2801でレイアウト設定を取得すると、ステップS2802で製本後の開き方が右開きに設定されているか判定し、右開きであればステップS2805で製本右開き用のページ番号を描画する。また、右開きでない場合、ステップS2803で左開きが設定されているか判定し、左開きであればステップS2806において製本左開き用にページ番号を描画する。また左開きでない場合には上開きであるから、ステップS2804で製本上開き用にページ番号を描画する。ただし、表紙がインサートされる場合には、インサートされる表紙に対してはページ番号は描画しない。
【0141】
図30は左開きの場合のページ番号描画例を示す。この場合には左から右へと、ページの進行に従ってページ番号も振られている。図34(A)は右開きの場合のページ番号描画例を示す。この場合には右から左へと、ページの進行に従ってページ番号が振られている。図34(B)は上開きの場合のページ番号描画例を示す。この場合には、各論理ページに対応づけてページ番号を付けるのはスペース的に難しいので、2ページずつまとめて、ページの進行に従ってページ番号が振られている。
【0142】
(製本印刷用論理ページ描画)
図27,図28でページテンプレートおよびページ番号が描画されると、図29において論理ページの内容が描画される。
【0143】
図29においては、ステップS2901でレイアウト設定を取得すると、ステップS2902で製本後の開き方が右開きに設定されているか判定し、右開きであればステップS2905で製本右開き用に論理ページを描画する。また、右開きでない場合、ステップS2903で左開きが設定されているか判定し、左開きであればステップS2906において製本左開き用に論理ページを描画する。また左開きでない場合には上開きであるから、ステップS2904で製本上開き用に論理ページを描画する。
【0144】
製本後に論理ページが指定通り配置されるように、製本印刷時のシートへの論理ページの割付け方は、前述した(図22の説明において述べた)とおり、フェイスアップ/ダウンの指定や製本単位の指定によって変わる。しかしながら、プレビュー画面上では、それらの指定に関係なく、論理ページの順序で、すなわち、製本後にページを繰っていく順序で各論理ページが表示される。ただし、製本単位の指定は、プレビュー画面上で理解できるように表示される。また、表紙インサートの場合には、インサートされる表紙には論理ページは描画されないが、挿入される表紙であることを示すために、ページ枠を示すテンプレートは表示される。これたについては後述する。
【0145】
図30は左開きの場合の論理ページ描画例を示す。この場合には左から右へと、ページを繰る順序で論理ページが進行する。また、図34(A)は左開きの例であり、最左端を表紙として、右に進行するように論理ページが配置される。図34(B)は上開きの例である。プレビュー画面では、各印刷されるシートは横方向に並べられるために、全体としては上から下への配置はしていないものの、各シートに限れば、上から下へと論理ページが順次配置される。すなわち、左上から右下へとジグサグ上に配置される。
【0146】
このようにプレビュー表示することで、利用者は製本時のページ配置を確認しやすくなる。すなわち、片面や両面といった通常のレイアウトでは物理ページのプレビューを表示する意味があるが、製本印刷時には、論理ページは物理ページ上に順を追って配置される分けではないので、物理をプレビューしても出力結果が想像しづらい。このため、製本印刷が指定された場合には、見開きの状態を表示する。また、通常のレイアウトでは総ページ数(総用紙枚数)を表示するが、製本印刷時には、総論理ページ数を表示する。
【0147】
また、右開き時には、右から左へ、左開き時には左から右へ、上開き時には上から下へ論理ページを並べてプレビュー表示することで、製本印刷の完成形が理解しやすい。
【0148】
(製本単位の指定)
製本単位の指定に関わらず、プレビュー画面における論理ページの順序は見開きの順序であることは説明した。しかしながら、製本単位の指定によって論理ページの描画において利用されるテンプレートは異なる場合がある。
【0149】
図31は、全部で8論理ページの文書に対して、印刷された全用紙をまとめて2つ折りにして製本する、全ページ単位の設定が指定された場合のプレビュー画像の例である。画面3101の設定画面で全ページ単位が指定された場合、プレビュー画面3102にように、表紙(第1ページ)および裏表紙(第8ページ)以外はすべて見開きで表示される。
【0150】
図32は、全部で8論理ページの文書に対して、製本単位を1枚とするN枚印刷(N=1)が指定された場合のプレビュー画像の例である。画面3201の設定画面でN枚印刷が指定された場合、プレビュー画面3202にように、N枚単位で表紙と裏表紙がどのページかわかるように表示される。図32の例では、第1ページから第4ページまでが製本単位となる1枚のシートであり、第5ページから第8ページが次の製本単位となる1枚のシートである。このように、製本単位が指定されると、製本単位ごとに分割されてプレビュー画面が表示される。なお、図33は製本単位として3枚を指定する画面の例である。
【0151】
この結果、印刷出力前に、分割された製本という出力結果を予想しづらい印刷結果を画面上で確認できる。
【0152】
(表紙インサート時の論理ページ描画)
上述のように製本印刷時の論理ページは描画されるが、インサータを利用し、表紙をインサートする場合には図29のステップS2904〜S2906における処理においてそのことが考慮される。
【0153】
図35,36は表紙インサート時のプレビュー画面の例である。論理ページ描画時に、表紙インサート指定がされていると判定されると、挿入される表紙の裏表を白紙のページとして、その次のページから第1論理ページを描画し、引き続き論理ページ順に描画した後、最後に挿入される表紙の裏表が白紙のページとして挿入される。
【0154】
図35の表示窓3501では、左開きが指定されており、その最初の2ページは挿入される表紙であるので、白紙であり、しかもページ番号も付けられない。また図35においてはカーソルが表紙上にある。この場合にはツールチップによってそれがインサートされる表紙であることが「製本表紙」と表示される。図36の表示窓3601では、左開きが指定されており、カーソルが表紙裏面にある。この場合にはツールチップによって、それがインサートされる表紙の裏面であることが「製本表紙(裏)」と表示される。
【0155】
図36の表示窓3602においては、裏表紙の部分がプレビュー画面として表示されている。挿入される表紙は2つ折りにすることで裏表紙にもなるので、裏表紙も白紙のページを表示する。この部分にもページ番号は付けられない。
【0156】
図36の表示窓3603は上開きかつ表紙挿入が指定された場合のプレビュー画面である。この場合にも左開きと同様(右開きも同様)、インサートされる表紙として白紙のページが表示され、それに続いて第1論理ページから描画される。
【0157】
このように、製本印刷のプレビュー時、インサータから表紙が挿入される設定になっている場合には、表紙のついた形でプレビューを行う。なお、この設定はデバイスのオプション装着状況、インサータの指定と連動する。
【0158】
これによって、インサータから表紙を挿入する場合にも、実際の出力結果がプレビュー上で確認できる。
【0159】
以上説明したように、本実施形態の印刷制御方法および装置によれば、ホスト上でスプールされたジョブをプレビューする際、製本印刷が指定されている場合には見開きの状態をプレビュー表示する。このため、製本印刷が指定された場合には、製本後の印刷結果を確認することができる。
【0160】
また、製本単位の指定に応じて、見開きで表示する単位を変えて表示することで、プレビュー画面において、分割された製本という出力結果を予想しづらい印刷結果を確認できる。
【0161】
また、製本印刷の「左開き、右開き」あるいは「上開き」の指定に合わせて、見開きの順序でプレビュー表示することで、製本印刷の完成形が理解しやすい。
【0162】
また、製本印刷のプレビュー時、インサータから表紙が挿入される設定になっている場合には、表紙のついた形でプレビュー表示することで、インサータから表紙を挿入する場合にも、実際の出力結果がプレビュー上で確認できる。
【0163】
また、デバイスで中差しが差し込まれる設定になっている場合には、プレビュー上でも中差しがなされることを反映した表示を行う。これにより、中差しされること、中差しがどのようになされるのか、がプレビューで確認できる。
【0164】
【他の実施の形態】
なお、本発明は、複数の機器(例えばホストコンピュータ、インタフェイス機器、リーダ、プリンタなど)から構成されるシステムに適用しても、一つの機器からなる装置(複写機、プリンタ、ファクシミリ装置など)に適用してもよい。
【0165】
また、本発明の目的は、前述した実施形態の機能を実現する、図19乃至図25および図27乃至図29の手順を実現するプログラムコードを記憶した記憶媒体を、システムあるいは装置のコンピュータ(またはCPUやMPU)が記憶媒体に格納されたプログラムコードを読出し実行することによっても達成される。
【0166】
この場合、記憶媒体から読み出されたプログラムコード自体が前述した実施形態の機能を実現することになり、そのプログラムコードを記憶した記憶媒体は本発明を構成することになる。
【0167】
プログラムコードを供給するための記憶媒体としては、例えば、フロッピーディスク、ハードディスク、光ディスク、光磁気ディスク、CD−ROM、CD−R、磁気テープ、不揮発性のメモリカード、ROMなどを用いることができる。
【0168】
また、コンピュータが読み出したプログラムコードを実行することにより、前述した実施形態の機能が実現されるだけでなく、そのプログラムコードの指示に基づき、コンピュータ上で稼動しているOS(オペレーティングシステム)などが実際の処理の一部または全部を行い、その処理によって前述した実施形態の機能が実現される場合も含まれる。
【0169】
更に、記憶媒体から読出されたプログラムコードが、コンピュータに挿入された機能拡張ボードやコンピュータに接続された機能拡張ユニットに備わるメモリに書き込まれた後、そのプログラムコードの指示に基づき、その機能拡張ボードや機能拡張ユニットに備わるCPUなどが実際の処理の一部または全部を行い、その処理によって前述した実施形態の機能が実現される場合も含まれる。
【0170】
【発明の効果】
以上のように、本発明によれば、中差しが設定されている場合には、プレビュー上でも中差しがなされることを反映した表示を行う。これにより、中差しされること、中差しがどのようになされるのかがプレビューで確認できるという効果がある。
【図面の簡単な説明】
【図1】本発明の一実施例を示す印刷制御装置の構成を説明するブロック図である。
【図2】プリンタが接続されたホストコンピュータの典型的なプリントシステムの構成を示すブロック図である。
【図3】アプリケーションからの印刷命令をプリンタ制御コマンドに変換する前に、一旦中間コードスプールするプリントシステムの構成を示すブロック図である。
【図4】本発明におけるプリンタについて説明した図である。
【図5】スプーラ302における処理を示したフローチャートである。
【図6】スプールファイルマネージャ304における印刷制御について示したフローチャートである。
【図7】デスプーラ305における処理を示したフローチャートである。
【図8】印刷設定画面の一例である。
【図9】印刷スプール設定画面の一例である。
【図10】スプールファイルマネージャ304からデスプーラ305に対して物理ページの印刷要求を行う際に渡すデータ形式の一例を示した図である。
【図11】スプールファイルマネージャ304からデスプーラ305に対して物理ページの印刷要求を行う際に渡すデータ形式の一例を示した図である。
【図12】スプールファイルマネージャ304からデスプーラ305に対して物理ページの印刷要求を行う際に渡すデータ形式の一例を示した図である。
【図13】スプールファイルマネージャ304からデスプーラ305に対して物理ページの印刷要求を行う際に渡すデータ形式の一例を示した図である。
【図14】スプールファイルマネージャ304からデスプーラ305に対して物理ページの印刷要求を行う際に渡すデータ形式の一例を示した図である。
【図15】設定変更エディタ307における設定変更処理について示したフローチャートである。
【図16】スプールファイルマネージャ304でスプールされている印刷ジョブ一覧を表示する画面の一例である。
【図17】プレビューア306の画面の一例である。
【図18】設定変更エディタ307の画面の一例である。
【図19】アプリケーションプログラム等で作成したデータをストア指定をして印刷させた場合のフローチャートである。
【図20】図19のステップS1903の詳細を示すフロー図である。
【図21】ジョブリストからジョブが選択された状態で編集ボタンや結合ボタンが操作された際の処理手順のフローチャートである。
【図22】ジョブリストからジョブが選択された状態で編集ボタンや結合ボタンが操作された際にプレビュー画面を表示する手順のフローチャートである。
【図23】図22のステップS2203の詳細を示すフロー図である。
【図24】図22のステップS2204の詳細を示すフロー図である。
【図25】図22のステップS2205の詳細を示すフロー図である。
【図26】ジョブリストの表示例を示す図である。
【図27】製本印刷時のページテンプレート取得手順を示すフローチャートである。
【図28】製本印刷時のページ番号描画手順を示すフローチャートである。
【図29】製本印刷時の論理ページ描画手順を示すフローチャートである。
【図30】左開きの場合のプレビュー画面の例を示す図である。
【図31】全ページ単位の設定が指定された場合のプレビュー画像の例の図である。
【図32】N枚印刷の設定が指定された場合のプレビュー画像の例の図である。
【図33】製本単位として3枚を指定する画面の例の図である。
【図34】右開きの場合(A)および上開きの場合(B)のプレビュー画面の例を示す図である。
【図35】表紙インサート時のプレビュー画面の例の図である。
【図36】表紙インサート時のプレビュー画面の例の図である。
【図37】中差しを指定する画面の例を示す図である。
【図38】中差し用のページテンプレートの例を示す図である。
【符号の説明】
1 CPU
2 RAM
3 ROM
4 システムバス
12 CPU
13 ROM
19 RAM
3000 ホストコンピュータ
1500 プリンタ[0001]
BACKGROUND OF THE INVENTION
The present invention relates to a print control method, apparatus, and medium, and more particularly, to a print control method, apparatus, and medium in a system including an information processing unit such as a personal computer and a printer.
[0002]
[Prior art]
Conventionally, when printing data such as a document or an image edited by an application program for document editing or image editing, the image to be printed is displayed on the screen in a layout to be printed before actually printing on paper. A print preview function that displays and presents to a user is known.
[0003]
The user can re-edit until an ideal layout is realized by checking an image to be printed using the print preview function.
[0004]
[Problems to be solved by the invention]
However, the print preview function provided by the application program cannot display an image reflecting various printing conditions that can be set by the printer driver as a preview image. For example, even if the binding margin of paper is specified by the printer driver, the print preview function by the application program cannot reflect them on the preview image and display them. For this reason, the layout in the preview image and the layout in the actually printed image are different, and the meaning of the print preview is lost.
[0005]
The present invention has been made in view of the above-described conventional example, and can display a preview that accurately reflects print settings such as a layout, particularly a print preview that reflects the layout after bookbinding when center insertion is specified. An object of the present invention is to provide a printing control method and apparatus.
[0006]
[Means for Solving the Problems]
In order to achieve the above object, the present invention comprises the following arrangement. That is, when printing the stored print data, it is possible to specify a middle insert for inserting an insert sheet supplied separately between printed sheets. In the print controller A printing control method comprising: A print setting input process for inputting print settings including a middle setting via the print setting screen, and a storage for temporarily storing the input print data together with the print settings input via the print setting input process A preview display step for displaying a preview image of an image object of each page of the print data in a display area based on the print settings stored in the storage step, and a print input by the print setting input means A determination step of determining whether or not the intermediate setting is made in the setting, and the determination step Insert Setting is Has been It was judged Case In addition, the preview display step includes On each page preview On the image for An image with an image of the sheet to be inserted In the display area indicate.
[0007]
More preferably, The preview display step includes Of each page preview On the image for As an image with the image of the sheet to be inserted inserted, for each page, with each page superimposed on the insertion sheet, preview the image In the display area indicate.
[0008]
More preferably, The preview display step includes Attached insert paper image By the pointer Pointing Was In such a case, a message indicating that the image is a medium insertion sheet is displayed on the preview screen.
[0011]
DETAILED DESCRIPTION OF THE INVENTION
Hereinafter, examples suitable for applying the present invention will be described.
[0012]
<Configuration of printer control system>
FIG. 1 is a block diagram illustrating the configuration of a printer control system according to an embodiment of the present invention. As long as the function of the present invention is executed, a system in which processing is performed by being connected via a network such as a LAN or WAN, whether it is a single device or a system composed of a plurality of devices. Even so, the present invention can be applied.
[0013]
In the figure, the
[0014]
A keyboard controller (KBC) 5 controls key input from a
[0015]
The
[0016]
The
[0017]
The
[0018]
The
[0019]
FIG. 2 is a configuration diagram of typical print processing in a host computer to which a printing apparatus such as a printer is directly connected or connected via a network. The
[0020]
The
[0021]
In addition to the printing system comprising the printer and host computer shown in FIG. 2, the printing system of this embodiment has a configuration in which print data from an application is temporarily spooled with intermediate code data as shown in FIG.
[0022]
<Printing-related software module in this embodiment>
FIG. 3 is an extension of the system shown in FIG. 2 and has a configuration in which a spool file 303 including an intermediate code is temporarily generated when a print command is sent from the
[0023]
For these purposes, the system of FIG. 2 has been extended to spool with intermediate code data as shown in FIG. In order to process print data, settings are made from a window provided by the
[0024]
Details of FIG. 3 will be described below. As shown in the figure, in this expanded processing method, the
[0025]
The
[0026]
When the
[0027]
The
[0028]
If the print command (DDI function) received by the
[0029]
The
[0030]
Further, FIG. 3 shows an example in which a
[0031]
In order to perform print preview, print setting change, and combination of a plurality of jobs, the user first designates “Store” in the pull-
[0032]
Thus, the contents set in the printer driver properties are stored as a setting file in a structure provided by the OS (called DEVMODE in the Windows OS). The structure includes, for example, a setting for whether to store in the
[0033]
When a preview of a single job or a combined job is designated on the spool file manager window screen (FIG. 16), the
[0034]
(Previewer)
The
[0035]
The
[0036]
By performing the preview process as described above, a large preview of the print processing settings included in the spool file 303 is displayed on the screen by the
[0037]
If the user performs printing in accordance with the contents displayed by the
[0038]
(Setting change editor)
Next, setting change using the setting
[0039]
As a realization method, it is possible to set a job designated as “Store” in FIG. The
[0040]
The setting
[0041]
This setting
[0042]
Here, it is possible to change or modify the contents of the processing settings included in the job setting file stored in the spool file 303. At this time, items that can be set in the
[0043]
The change item changed here is authenticated in accordance with the authentication request on the setting
[0044]
If the user performs printing according to the setting change contents as in the confirmation by the
[0045]
In the spool file manager window screen (FIG. 16), a plurality of print jobs can be combined and designated to be printed as one print job. This is also premised on a job for which “store” is specified as the output destination in the printer driver properties shown in FIG.
[0046]
When the user combines print jobs, first, the
[0047]
Here, when a plurality of jobs are selected and “join” is specified, the setting
[0048]
The setting
[0049]
Here, each job can be displayed with the processing settings before combining, or can be displayed after being changed and corrected to a unified processing setting as a combined job. At this time, items that can be set in the
[0050]
As described above, the combined job and the changed change item are authenticated in accordance with the authentication request on the setting
[0051]
If the user performs printing according to the setting change contents as in the confirmation by the
[0052]
<Configuration of laser beam printer>
FIG. 4 is a cross-sectional view of a color laser printer having a double-sided printing function, which is an example of the
[0053]
This printer forms an electrostatic latent image by scanning the
[0054]
The
[0055]
The developing unit includes three
[0056]
The black developing
[0057]
The sleep 21BS of the black developing
[0058]
The three
[0059]
At the time of color image formation, the developing
[0060]
The
[0061]
The
[0062]
As shown by a solid line in FIG. 4, the
[0063]
The fixing
[0064]
The
[0065]
The cleaning unit cleans the toner remaining on the
[0066]
The transfer material (recording paper) 2 to be printed is taken out from the
[0067]
The recording sheet guided to the duplex unit is once sent to the lower part of the tray 1 (conveying path indicated by a two-dot chain line) by the conveying roller 40 and then conveyed in the reverse direction, and is sent to the duplex tray 39. On the double-sided tray 39, the front and back sides of the sheet placed on the
[0068]
<Storage processing of intermediate data for printing>
FIG. 5 is a flowchart showing the process of the page unit storage step in the generation of the spool file 303 in the
[0069]
First, in
[0070]
In
[0071]
On the other hand, if it is determined in
[0072]
In
[0073]
If it is determined in
[0074]
Next, in step 510, in order to store the print request in the spool file 303, the
[0075]
<Generate spool file>
FIG. 6 is a flowchart showing details of the control in the
[0076]
In
[0077]
In
[0078]
Regarding the calculation of the physical page, for example, when the processing setting is such that four logical pages are arranged in one physical page, the first physical page can be printed when the fourth logical page is spooled, and the first physical page is printed. It becomes a page. Subsequently, the second physical page can be printed when the eighth logical page is spooled.
[0079]
Even if the total number of logical pages is not a multiple of the number of logical pages allocated to one physical page, the logical page to be allocated to one physical page can be determined by the spool end notification in
[0080]
In
[0081]
On the other hand, if the progress notification is not a print end notification of one logical page from the
[0082]
If it is determined in
[0083]
<Output spool file>
FIG. 7 is a flowchart showing details of the print data generation process in the
[0084]
In response to a print request from the
[0085]
In the generation of print data, first, in
[0086]
The above is the flow of print processing using the
[0087]
Here, in print processing using the
[0088]
<Configuration of job output setting file>
FIG. 10 shows an example of a job output setting file that stores information constituting the printable physical page generated by the
[0089]
FIG. 11 is an example of job setting information illustrated in the
[0090]
FIG. 12 shows an example of physical page information shown in the field 1004 of FIG. The
[0091]
FIG. 13 shows an example of physical
[0092]
FIG. 14 shows an example of logical page information indicated by 1204. A
[0093]
The job output setting file is configured as described above. The job setting file is almost the same as the print format (single side, double side, bookbinding printing), print layout (Nup, poster printing), additional information (watermark, date, user name addition), number of copies, and paper size information. Are arranged as a job, and each physical page is composed of a logical page arrangement order, front or back of double-sided printing, color mode, and the like.
[0094]
Further, FIG. 3 shows an example in which a
[0095]
<Setting change processing procedure>
FIG. 15 is a flowchart showing details of the job setting change processing process in the setting
[0096]
First, in
[0097]
FIG. 3 further illustrates an extended system that combines a plurality of print jobs and prints them as a single print job. The extension for despooling and previewing a combined job will be described.
[0098]
Normally, the intermediate format spool file 303 is created for each job. In the case of a single job, since the intermediate code of each logical page in the processing target job file is read in order and processed, the logical page ID in the
<Preview display during store processing>
Next, a procedure for displaying a print preview image based on a print job stored as intermediate data and a job output setting file as described above will be described. When printing from the application program, the user designates the print job store process as shown in FIG. 9 to create a print job defined by the intermediate code and the job output setting file according to the procedure shown in FIG. be able to. As a result, a list of currently stored print jobs is displayed as shown in FIG. The user specifies a desired print job from the print job list, edits the print job, combines it, adds the print job to the already combined job, changes the order of the print jobs within the combined job, etc. Can be operated.
[0099]
At this time, if a print job is specified from the list and an operation such as editing or combining is specified from a button or menu, a print preview screen for the entire job as shown in FIG. 18 is displayed. Note that this print preview screen is different from what is displayed on a page basis, such as the preview screen prepared by a normal application, etc., and the connection of pages across a single or combined print job, etc. You can also preview the relationship between pages.
[0100]
FIG. 19 shows a procedure when data created by an application program or the like is printed by specifying a store. When “Store” is selected from the
[0101]
In step S1902, the print job converted into intermediate data and held in step S1901 is added to the already stored print job list in step S1902. However, in the present embodiment, the stored print job is held only during execution of the program for managing the stored print job (the
[0102]
When a new print job is added to the stored print job list, the job list is displayed in step S1903 as shown in FIG. Note that a print job held as intermediate data is called a job, and a job selected for combining or editing is called a target job.
[0103]
<Display job list>
FIG. 20 is a flowchart showing details of step S1903 in FIG. Note that the procedure in FIG. 20 is executed whenever a change is made in the state to be displayed, such as when a job is selected from the job list, and the job list display is updated.
[0104]
First, in step S2001, it is determined whether a plurality of jobs are selected. If not, it is determined whether there is a job selected in step S2002. If there is a selected job, that job is set as the job of interest, and the edit button is enabled. The edit button is a
[0105]
On the other hand, if there is no selected job, the last selected job is set as the job of interest in step S2004. If there is no job selected last, that is, when the job list is displayed first, the first job in the job list is set as the job of interest.
[0106]
When the job of interest is determined, in step S2005, a job that cannot be combined with the job of interest is searched from all the held jobs, and the fact that it cannot be combined with the job of interest and the reason why it cannot be combined are set in a predetermined memory area or the like. To do. Note that the job that cannot be combined with the job of interest is a job that differs from the job of interest in, for example, any of the designated resolution, the number of bits per pixel, or the graphic mode.
[0107]
Finally, in step S2006, a job list is displayed. At this time, for a job for which it is not possible to combine in step S2005 and the reason is set, a symbol indicating that it cannot be combined with the job of interest and the reason are displayed in the column displaying the job. FIG. 26 shows this state. The
[0108]
On the other hand, if a plurality of jobs are selected, it is determined whether or not the jobs selected in step S2007 can be combined. If the jobs can be combined, the combination button (
[0109]
If all the selected jobs cannot be combined, it is set in step S2009 that all the held jobs cannot be combined. In step S2006, a symbol or comment indicating that is displayed for the job set in step S2009 that cannot be combined.
[0110]
In this way, the job list is displayed. As described above, since the procedure in FIG. 20 is re-executed every time a job is selected from the job list, the availability of combination, the editing operation or the combination operation is used depending on the selected job. Can be presented to the person.
[0111]
<Edit / Join operation>
When a job is selected from the displayed job list and an edit button (when there is a single selection job) or a combination button (when there are a plurality of selection jobs) is operated, the procedure of FIG. 21 is performed. . If a job that cannot be combined is selected, the combining operation cannot be performed.
[0112]
First, in step S2101, it is determined whether the operation is a join operation. If it is a join operation, the selected job output setting file is temporarily joined in step S2102. Since this operation has not been finalized, a temporary job output file is created and used. When combining jobs, the settings of each job are not used as they are, but some settings are changed and unified.
[0113]
As a method of unification, the setting is changed to a predetermined setting, or another job is matched with the top job or cleared. For example, the designation of the printing method of the jobs to be combined is unified to single-sided printing except when they are all double-sided printing. The binding margin, staple designation, forward / reverse order, face-up / down, inserter use, etc. are matched to the first job. The number of copies and binding specifications are cleared.
[0114]
Then, using the job output setting file combined in step S2102 or the job output setting file of the job selected as the editing target, a preview display is executed in step S2103, and a target job list is displayed in step S2104. To do. On the preview screen, thumbnail images of all pages included in the job to be edited or combined are displayed according to the layout. In the target job list, the name, the number of pages, and the page layout of the job to be edited or combined are displayed as a list. In this list display, in the case of a join operation, the job order can be changed to a desired order, and the desired job can be deleted from the target job group. When the target job is operated in this way, the procedure of FIG. 21 is re-executed, and the preview screen and the target job list are displayed again.
[0115]
It is also possible to change the print settings of the target job. Items that can be changed are items that can be changed by editing the job output setting file. Items that need to be manipulated for intermediate data are not manipulated in this embodiment. However, all items can be reset if the processing time and necessary resources are not taken into consideration. Items that can be reset in the system of the present embodiment include a printing method (single side / double side / bookbinding), the number of copies, and the presence or absence of staples.
[0116]
<Print preview display of the target job>
FIG. 22 is a flowchart showing a procedure for displaying a job preview screen as shown in FIG. 18 when the user instructs a desired operation such as job editing or combination on the print job list display screen shown in FIG. This corresponds to the details of step S2103 in FIG.
[0117]
In FIG. 22, first, in step S2201, the layout setting of each target job is acquired. The layout setting items include items such as printing method, page layout, page frame, finishing, paper feed switching, and the like. These pieces of information are acquired from the job output setting file shown in FIGS.
[0118]
Here, the layout setting items will be briefly described. Examples of items to be set include the following.
(1) Printing method: One side / both sides / bookbinding is designated. One side and both sides are well known. Bookbinding is a method of printing a book so that the printed paper is folded in two and bound together. When bookbinding printing is designated, as a unit to be folded in half, a method in which one part is folded in half, a method for designating a predetermined number of sheets, folding in half every predetermined number of sheets, and then superposing and binding them Can be specified. This unit that is folded in half is called a bookbinding unit.
[0119]
In the case of bookbinding printing, for example, bookbinding is performed by overlapping two output sheets and folding them in half, so that it is not possible to print in the order of logical pages created by the application. In the bound state, the pages are arranged in the order of logical pages by repeating pages from the right to the left (specified separately), so that the logical pages are output in advance, that is, which physical page and how Decide whether to place logical pages. The order of logical pages also differs depending on whether paper discharge is face up or face down.
[0120]
Bookbinding printing corresponds to double-sided 2-up printing if only the format is considered without considering the order of pages, and therefore, 4 logical pages are printed on one sheet. Therefore, the required number S is given by S = number of logical pages / 4 (rounded up to the nearest decimal). For example, if the paper discharge method is face-up and the bookbinding unit is S sheets, the (4 × (P− 1) + 2 × Q−1) logical page and (4 × (P−1) + 4 × S−2 × (Q−1)) logical page, and (4 × (P−1) +2) on the back side XQ) logical pages and (4 * (P-1) + 4 * S-2 * Q-1) logical pages are arranged. In the case of face up, the back surface and the front surface may be switched.
(2) Bookbinding opening direction: indicates the direction of double-page spread, and can be specified as upward opening, right opening, and left opening.
(3) Binding unit: As described above, a unit to be folded in half.
(4) Page layout: A layout called N-up printing that fits N logical pages on one side of a sheet, or a layout called poster printing that divides one logical page into a plurality of sheets can be designated.
(5) Finishing: Processing after printing can be specified. For example, a sheet supplied separately from a printed sheet can be inserted as a cover by an external device called an inserter.
(6) Paper feed switching: Designates the paper feed method. For example, when a designation called center insertion is performed, printing is performed on a sheet supplied from one sheet feeding port using two sheet feeding ports, and a sheet fed from the other sheet feeding port is printed on a sheet to be printed. Insert between and discharge. In other words, sheets are used alternately from the two paper feed ports.
[0121]
The items that can be specified as the layout are as described above.
[0122]
Next, logical page information is acquired in step S2202. A logical page is a page in data created by an application program or the like. When N-up printing is designated, a plurality of logical pages are printed on one physical page, that is, one side of one sheet. It will be. This logical page information is as shown in FIG.
[0123]
In step S2203, a page template is drawn based on the information acquired in steps S2201 and S2202. The page template is a framework of each physical page corresponding to the layout, and a template corresponding to the designated paper size, single-sided / double-sided / bookbinding designation, portrait / landscape layout, etc. is drawn. However, this is not the case because the combined state is displayed as a preview when poster printing is designated.
[0124]
In step S2204, a page number assigned to each page to be previewed is drawn. Here, pages are added in the order of logical pages or physical pages according to the layout. As a result, the user can see an accurate page number corresponding to the layout on the print preview screen.
[0125]
In step S2205, a logical page is drawn corresponding to each page template. Here, the job output setting file shown in FIGS. 10 to 14 is referred to, and a logical page is drawn on one physical page according to the settings registered in the job output setting file. The intermediate data of the logical page to be drawn is acquired with reference to the logical page information shown in FIG.
[0126]
Finally, in step S2206, the total number of pages or the required number of pages is drawn. The total number of pages is the number of logical pages, and the required number of sheets is the number of sheets to be output.
[0127]
(Page template drawing)
FIG. 23 is a flowchart showing details of step S2203 in FIG. In step S2301, the layout setting is acquired (because the layout is acquired in step S2201 in FIG. 22), and the printing method is determined in steps S2302 and S2303. If it is bookbinding printing, a page template for bookbinding printing is acquired in step S2304, and if it is double-sided printing, a page template for double-sided printing is acquired in step S2309.
[0128]
If it is single-sided printing, it is determined in step S2306 whether it is middle-line printing. Middle-insertion printing is a printing method in which a separately supplied sheet is inserted between output printed sheets, and is used, for example, when printing a transparent document for an overhead projector. If it is medium printing, a page template for medium printing is acquired in step S2207, and if it is not medium printing, a page template for single-sided printing is acquired in step S2308.
[0129]
Finally, the page template is drawn according to the page template data acquired in step S2305.
[0130]
(Page number drawing)
FIG. 24 is a flowchart showing details of step S2204 in FIG. In step S2401, the layout setting is acquired (because the layout is acquired in step S2201 in FIG. 22), and the printing method is determined in steps S2402 and S2403. If it is bookbinding printing, the page number is drawn for bookbinding printing in step S2404, and if it is double-sided printing, the page number is drawn for double-sided printing in step S2406. If it is single-sided printing, a page number for single-sided printing is drawn in step S2405.
[0131]
(Logical page drawing)
FIG. 25 is a flowchart showing details of step S2205 of FIG. In step S2501, the layout setting is acquired (because the layout is acquired in step S2201 in FIG. 22), and the printing method is determined in steps S2502 and S2503. If it is bookbinding printing, a logical page is drawn for bookbinding printing in step S2504, and if it is double-sided printing, a logical page is drawn for double-sided printing in step S2506. If it is single-sided printing, a logical page for single-sided printing is drawn in step S2505. In the logical page drawing, the logical page is drawn in accordance with the job output setting file and the logical page information, so that the processing is not performed according to the printing method.
<Details of preview display>
As described above, the print preview screen is displayed in accordance with the layout designation. Details will be described below.
[0132]
(Preview when middle insert is specified)
When single-side printing is designated as the printing method, it is possible to designate medium insertion with a printing apparatus having a plurality of paper feed ports. An example of a screen for designating the middle insertion is shown in FIG. In FIG. 37, the check box “Enable Cover Insertion Unit” is checked, so that a middle insertion flag or the like is set, and middle insertion is executed with reference to this flag during printing and print preview.
[0133]
When drawing a page template, a page template for medium insertion is acquired in step S2307 of FIG. An example of this template is shown in FIG. As described above, when the middle insertion is designated, a page template showing a state in which two sheets overlap each other is used, and a logical page is drawn on the upper side.
[0134]
In this way, it is possible to confirm that the insertion is made and the result of the insertion on the preview screen. Although not shown, as in FIG. 35, when an image showing the inserted paper is pointed by the pointer, a character string indicating that the image is the intermediate paper, for example, a character string such as “intermediate paper” Is displayed.
[0135]
<Preview display during booklet printing>
Next, details of the preview display method when bookbinding printing is designated as the printing method will be described.
[0136]
27, 28, and 29 are flowcharts showing the page template acquisition, page number drawing, and logical page drawing procedures during booklet printing, respectively. These correspond to step S2304 in FIG. 23, step S2404 in FIG. 24, and step S2504 in FIG.
[0137]
(Acquisition of page template for bookbinding printing)
In FIG. 27, when the layout setting is acquired in step S2701, it is determined in step S2702 whether the opening method after bookbinding is set to top-opening. To do. FIG. 34B shows an example of a preview screen drawn using the page template for opening up. The first page, second page, and third page are displayed in order from the left. At the time of top-bound bookbinding print preview, the book looks landscape, so the front cover (first page) and back cover (eighth page) are landscape templates. Since the middle is an upward spread, a template that can be displayed in a state of being opened up and down around a horizontal stitch is used as in
[0138]
If the page is not opened upward, that is, if it is opened left and right, a page template for left and right opening is acquired in step S2703. An example of this is shown in FIG. In this case, since the spread is in the left-right direction, a template that can be spread and displayed around the vertical stitch as in the
[0139]
The template acquired in this way is drawn in step S2305 in FIG. As will be described later, when a cover insert is designated, the cover is fed from the inserter and is not a printing target, but is displayed as a cover on the preview screen. For this purpose, a cover template to be inserted is also drawn.
[0140]
(Page number drawing for bookbinding printing)
In FIG. 28, when the layout setting is acquired in step S2801, it is determined in step S2802 whether the opening method after bookbinding is set to right opening. If it is right opening, the page number for bookbinding right opening is drawn in step S2805. To do. If it is not right-open, it is determined whether left-open is set in step S2803. If left-open, page numbers are drawn for bookbinding left-open in step S2806. If it is not left-opening, it is upper-opening, so a page number is drawn for bookbinding upper-opening in step S2804. However, when a cover is inserted, no page number is drawn for the inserted cover.
[0141]
FIG. 30 shows a page number drawing example in the case of left opening. In this case, page numbers are also assigned from the left to the right according to the progress of the page. FIG. 34A shows a page number drawing example in the case of right opening. In this case, page numbers are assigned from right to left according to the progress of the page. FIG. 34B shows a page number drawing example in the case of upward opening. In this case, since it is difficult in terms of space to assign a page number in association with each logical page, page numbers are assigned in accordance with the progress of the page by putting two pages together.
[0142]
(Logical page drawing for bookbinding printing)
When the page template and the page number are drawn in FIGS. 27 and 28, the contents of the logical page are drawn in FIG.
[0143]
In FIG. 29, when the layout setting is acquired in step S2901, it is determined in step S2902 whether the opening method after bookbinding is set to right opening. If it is right opening, a logical page is drawn for bookbinding right opening in step S2905. To do. If it is not right open, it is determined in step S2903 whether left open is set. If left open, a logical page is drawn for bookbinding left open in step S2906. If it is not left-opening, it is upper-opening, so that a logical page is drawn for bookbinding upper-opening in step S2904.
[0144]
As described above (described in the explanation of FIG. 22), the logical page is allocated to the sheet at the time of bookbinding printing so that the logical pages are arranged as specified after bookbinding. It depends on the specification. However, on the preview screen, the logical pages are displayed in the order of logical pages, that is, in the order in which the pages are repeated after bookbinding, regardless of their designation. However, the binding unit designation is displayed so that it can be understood on the preview screen. In the case of a cover insert, a logical page is not drawn on the inserted cover, but a template indicating a page frame is displayed to indicate that the cover is to be inserted. This will be described later.
[0145]
FIG. 30 shows an example of logical page drawing in the case of left opening. In this case, the logical page advances from the left to the right in the order of repeating the pages. FIG. 34A is an example of left opening, and logical pages are arranged so as to proceed to the right with the leftmost edge as the cover. FIG. 34B shows an example of upward opening. On the preview screen, the printed sheets are arranged in the horizontal direction, so the overall layout is not from top to bottom, but for each sheet, logical pages are arranged sequentially from top to bottom. The That is, they are arranged on the jigsag from the upper left to the lower right.
[0146]
By displaying the preview in this way, the user can easily confirm the page layout at the time of bookbinding. In other words, it is meaningful to display a physical page preview in a normal layout such as single-sided or double-sided, but at the time of bookbinding printing, logical pages are not divided in order on physical pages. The output result is hard to imagine. For this reason, when bookbinding printing is designated, the spread state is displayed. Further, the total number of pages (total number of sheets) is displayed in the normal layout, but the total number of logical pages is displayed during bookbinding printing.
[0147]
In addition, it is easy to understand the completed form of bookbinding printing by displaying the logical pages side by side from the right when opening right, from left to right when opening left, and from top to bottom when opening up.
[0148]
(Specify the binding unit)
It has been explained that the order of logical pages in the preview screen is the spread order regardless of the binding unit designation. However, the template used for drawing a logical page may differ depending on the designation of the bookbinding unit.
[0149]
FIG. 31 shows an example of a preview image in the case where setting for all pages is specified, in which all printed sheets are folded in half for a document with a total of 8 logical pages and bound. When all page units are specified on the setting screen of the
[0150]
FIG. 32 shows an example of a preview image when N-sheet printing (N = 1) with a bookbinding unit of 1 is designated for a document with a total of 8 logical pages. When N-sheet printing is specified on the setting screen of the
[0151]
As a result, it is possible to confirm on the screen a print result that is difficult to predict an output result of divided bookbinding before print output.
[0152]
(Logical page drawing when inserting cover)
As described above, a logical page at the time of bookbinding printing is drawn. However, when an inserter is inserted using an inserter, this is taken into consideration in the processing in steps S2904 to S2906 in FIG.
[0153]
35 and 36 show examples of preview screens when a cover sheet is inserted. If it is determined at the time of logical page drawing that the cover insert is specified, the first logical page is drawn from the next page with the back and front of the inserted cover as a blank page, and then drawn in the logical page order. The back and front of the cover sheet inserted last is inserted as a blank page.
[0154]
In the
[0155]
In the
[0156]
A
[0157]
In this way, when bookbinding printing is previewed, if the cover is set to be inserted from the inserter, the preview is performed with the cover attached. This setting is linked to the option installation status of the device and the specification of the inserter.
[0158]
As a result, even when a cover is inserted from the inserter, the actual output result can be confirmed on the preview.
[0159]
As described above, according to the printing control method and apparatus of the present embodiment, when bookbinding printing is designated when previewing a spooled job on the host, the spread state is displayed as a preview. For this reason, when bookbinding printing is designated, the printing result after bookbinding can be confirmed.
[0160]
In addition, by displaying the page by changing the unit to be displayed in the spread according to the designation of the bookbinding unit, it is possible to confirm the print result on the preview screen that is difficult to predict the output result of divided bookbinding.
[0161]
Also, by displaying a preview in the order of spread according to the designation of “left open, right open” or “upper open” for bookbinding printing, it is easy to understand the completed form of bookbinding printing.
[0162]
Also, if the cover is set to be inserted from the inserter during booklet printing preview, the actual output result can be displayed even when the cover is inserted from the inserter by displaying the preview with the cover attached. Can be confirmed on the preview.
[0163]
In addition, when the device is set to insert the middle insert, a display reflecting that the middle insert is made on the preview is also performed. As a result, it is possible to confirm in the preview that the insertion is performed and how the insertion is performed.
[0164]
[Other embodiments]
Note that the present invention can be applied to a system composed of a plurality of devices (for example, a host computer, an interface device, a reader, a printer, etc.), or a device (copier, printer, facsimile device, etc.) composed of a single device. You may apply to.
[0165]
In addition, an object of the present invention is to store a storage medium storing program codes for realizing the procedures of FIGS. 19 to 25 and FIGS. This can also be achieved by reading and executing the program code stored in the storage medium by the CPU or MPU.
[0166]
In this case, the program code itself read from the storage medium realizes the functions of the above-described embodiment, and the storage medium storing the program code constitutes the present invention.
[0167]
As a storage medium for supplying the program code, for example, a floppy disk, a hard disk, an optical disk, a magneto-optical disk, a CD-ROM, a CD-R, a magnetic tape, a nonvolatile memory card, a ROM, or the like can be used.
[0168]
Further, by executing the program code read by the computer, not only the functions of the above-described embodiments are realized, but also an OS (operating system) operating on the computer based on the instruction of the program code. A case where part or all of the actual processing is performed and the functions of the above-described embodiments are realized by the processing is also included.
[0169]
Further, after the program code read from the storage medium is written in a memory provided in a function expansion board inserted into the computer or a function expansion unit connected to the computer, the function expansion board is based on the instruction of the program code. Also included is a case where the CPU or the like provided in the function expansion unit performs part or all of the actual processing, and the functions of the above-described embodiments are realized by the processing.
[0170]
【The invention's effect】
As described above, according to the present invention, when the middle insertion is set, a display reflecting that the middle insertion is made on the preview is performed. Thereby, there is an effect that it is possible to confirm in the preview that the insertion is performed and how the insertion is performed.
[Brief description of the drawings]
FIG. 1 is a block diagram illustrating a configuration of a print control apparatus according to an embodiment of the present invention.
FIG. 2 is a block diagram illustrating a configuration of a typical print system of a host computer to which a printer is connected.
FIG. 3 is a block diagram illustrating a configuration of a printing system that temporarily spools an intermediate code before converting a print command from an application into a printer control command.
FIG. 4 is a diagram illustrating a printer according to the present invention.
FIG. 5 is a flowchart showing processing in the
FIG. 6 is a flowchart showing print control in the spool file manager.
FIG. 7 is a flowchart showing processing in the
FIG. 8 is an example of a print setting screen.
FIG. 9 is an example of a print spool setting screen.
FIG. 10 is a diagram illustrating an example of a data format that is passed when the
FIG. 11 is a diagram illustrating an example of a data format that is passed when the
FIG. 12 is a diagram illustrating an example of a data format that is passed when the
FIG. 13 is a diagram illustrating an example of a data format that is passed when the
FIG. 14 is a diagram illustrating an example of a data format that is passed when the
15 is a flowchart showing setting change processing in a setting
FIG. 16 is an example of a screen that displays a list of print jobs spooled by the spool file manager.
FIG. 17 is an example of a screen of the
18 is an example of a screen of a setting
FIG. 19 is a flowchart in a case where data created by an application program or the like is printed by specifying a store.
FIG. 20 is a flowchart showing details of step S1903 in FIG.
FIG. 21 is a flowchart of a processing procedure when an edit button or a combination button is operated with a job selected from a job list.
FIG. 22 is a flowchart of a procedure for displaying a preview screen when an edit button or a combination button is operated with a job selected from a job list.
FIG. 23 is a flowchart showing details of step S2203 in FIG.
24 is a flowchart showing details of step S2204 in FIG.
FIG. 25 is a flowchart showing details of step S2205 in FIG.
FIG. 26 is a diagram illustrating a display example of a job list.
FIG. 27 is a flowchart illustrating a page template acquisition procedure during bookbinding printing.
FIG. 28 is a flowchart illustrating a page number drawing procedure during bookbinding printing.
FIG. 29 is a flowchart illustrating a logical page drawing procedure during bookbinding printing.
FIG. 30 is a diagram illustrating an example of a preview screen in the case of left opening.
FIG. 31 is a diagram illustrating an example of a preview image when setting for all pages is specified.
FIG. 32 is a diagram illustrating an example of a preview image when setting for printing N sheets is designated.
FIG. 33 is a diagram illustrating an example of a screen for designating three sheets as a bookbinding unit.
FIG. 34 is a diagram showing an example of a preview screen in the case of right opening (A) and in the case of upward opening (B).
FIG. 35 is a diagram illustrating an example of a preview screen when a cover sheet is inserted.
FIG. 36 is a diagram illustrating an example of a preview screen when a cover sheet is inserted.
FIG. 37 is a diagram illustrating an example of a screen for designating insertion.
FIG. 38 is a diagram illustrating an example of a page template for medium insertion.
[Explanation of symbols]
1 CPU
2 RAM
3 ROM
4 System bus
12 CPU
13 ROM
19 RAM
3000 Host computer
1500 printer
Claims (9)
印刷設定画面を介して、中差し設定を含む印刷設定を入力する印刷設定入力工程と、
入力された印刷データを、前記印刷設定入力工程を介して入力された印刷設定と共に一時的に格納する格納工程と、
前記格納工程で格納されている印刷設定に基づいて、前記印刷データの各ページの画像オブジェクトのプレビュー画像を表示領域に表示するプレビュー表示工程と、
前記印刷設定入力工程により入力された印刷設定に中差し設定がなされているか判断する判断工程を備え、
前記判断工程により中差し設定がなされていると判断された場合に、前記プレビュー表示工程は、各ページのプレビュー画像に対して中差しされるシートの画像を付加した画像を表示領域に表示することを特徴とする印刷制御方法。A print control method in a print control apparatus capable of designating a middle insert for inserting an insert sheet separately supplied between printed sheets when printing stored print data,
A print setting input step for inputting print settings including the intermediate setting via the print setting screen;
A storage step of temporarily storing the input print data together with the print settings input through the print setting input step;
A preview display step of displaying a preview image of an image object of each page of the print data in a display area based on the print setting stored in the storage step;
A determination step of determining whether or not a middle setting is made in the print setting input by the print setting input step ;
When it is determined in the determination step that the middle setting has been made, the preview display step displays an image in which a sheet image to be inserted is added to the preview image of each page in the display area. A printing control method characterized by the above.
印刷設定画面を介して、中差し設定を含む印刷設定を入力する印刷設定入力手段と、
入力された印刷データを、前記印刷設定入力手段を介して入力された印刷設定と共に一時的に格納する格納手段と、
前記格納手段で格納されている印刷設定に基づいて、前記印刷データの各ページの画像オブジェクトのプレビュー画像を表示領域に表示するプレビュー表示手段と、
前記印刷設定入力手段により入力された印刷設定に中差し設定がなされているか判断する判断手段を備え、
前記判断手段により中差し設定がなされていると判断された場合に、前記プレビュー表示手段は、各ページのプレビュー画像に対して中差しされるシートの画像を付加した画像を表示領域に表示することを特徴とする印刷制御装置。When printing stored print data, a printing control apparatus capable of designating a middle insert for inserting an insert sheet separately supplied between printed sheets,
A print setting input means for inputting print settings including an intermediate setting via the print setting screen;
Storage means for temporarily storing the input print data together with the print settings input via the print setting input means;
Preview display means for displaying a preview image of an image object of each page of the print data in a display area based on the print settings stored in the storage means;
A determination unit that determines whether or not a middle setting is made in the print setting input by the print setting input unit;
If it is determined that the medium feed setting is such by the determining means, said preview display means displays the image to which the image of the sheet to be medium-insert for the preview image of each page in the display area A printing control apparatus characterized by that.
印刷設定画面を介して、印刷済みのシートの間に別途供給される挿入シートを挿入する中差し設定を含む印刷設定を入力する印刷設定入力手段と、
入力された印刷データを、前記印刷設定入力手段を介して入力された印刷設定と共に一 時的に格納する格納手段と、
前記格納手段で格納されている印刷設定に基づいて、前記印刷データの各ページの画像オブジェクトのプレビュー画像を表示領域に表示するプレビュー表示手段と、
前記印刷設定入力手段により入力された印刷設定に中差し設定がなされているか判断する判断手段として機能させ、
前記判断手段により中差し設定がなされていると判断された場合に、前記プレビュー表示手段は、各ページのプレビュー画像に対して中差しされるシートの画像を付加した画像を表示領域に表示させるためのプログラムを記録したコンピュータ可読記録媒体。 The computer,
Print setting input means for inputting print settings including an intermediate setting for inserting an insert sheet separately supplied between printed sheets via the print setting screen;
Storage means for storing temporarily along with the input print data, input via the print setting input unit print settings,
Preview display means for displaying a preview image of an image object of each page of the print data in a display area based on the print settings stored in the storage means;
Function as a determination unit that determines whether or not the middle setting is made in the print setting input by the print setting input unit;
If it is determined that the medium feed setting is such by the determining means, said preview display means displays the image to which the image of the sheet to be medium-insert for the preview image of each page in the display area A computer-readable recording medium on which a program for recording is recorded .
Priority Applications (1)
| Application Number | Priority Date | Filing Date | Title |
|---|---|---|---|
| JP31312399A JP4006150B2 (en) | 1999-11-02 | 1999-11-02 | Printing control method and apparatus |
Applications Claiming Priority (1)
| Application Number | Priority Date | Filing Date | Title |
|---|---|---|---|
| JP31312399A JP4006150B2 (en) | 1999-11-02 | 1999-11-02 | Printing control method and apparatus |
Publications (3)
| Publication Number | Publication Date |
|---|---|
| JP2001134410A JP2001134410A (en) | 2001-05-18 |
| JP4006150B2 true JP4006150B2 (en) | 2007-11-14 |
| JP2001134410A5 JP2001134410A5 (en) | 2009-01-08 |
Family
ID=18037401
Family Applications (1)
| Application Number | Title | Priority Date | Filing Date |
|---|---|---|---|
| JP31312399A Expired - Fee Related JP4006150B2 (en) | 1999-11-02 | 1999-11-02 | Printing control method and apparatus |
Country Status (1)
| Country | Link |
|---|---|
| JP (1) | JP4006150B2 (en) |
Families Citing this family (2)
| Publication number | Priority date | Publication date | Assignee | Title |
|---|---|---|---|---|
| US7355741B2 (en) * | 2001-12-11 | 2008-04-08 | Oki Data Corporation | Data processing apparatus for condensed printing |
| JP2010136398A (en) * | 2009-12-25 | 2010-06-17 | Fuji Xerox Co Ltd | Document processing apparatus |
-
1999
- 1999-11-02 JP JP31312399A patent/JP4006150B2/en not_active Expired - Fee Related
Also Published As
| Publication number | Publication date |
|---|---|
| JP2001134410A (en) | 2001-05-18 |
Similar Documents
| Publication | Publication Date | Title |
|---|---|---|
| JP3634695B2 (en) | Printing control method and apparatus | |
| JP3937666B2 (en) | Printing control method and apparatus | |
| JP4328426B2 (en) | Printing control method and apparatus | |
| JP3619087B2 (en) | Information processing apparatus, information processing method, and storage medium storing computer-readable program | |
| JP4298146B2 (en) | Information processing apparatus and method for generating print data | |
| EP1098266A2 (en) | Print control method and apparatus | |
| JP4785303B2 (en) | Print control apparatus, print control method, and program | |
| JP3679660B2 (en) | Information processing apparatus, information processing method, and storage medium storing computer-readable program | |
| JP3733288B2 (en) | Information processing apparatus, print control method, and storage medium | |
| US7307757B2 (en) | Print control method and apparatus | |
| JP2004164105A (en) | Printing control program | |
| JP2002333971A (en) | Information processor and its printing control method and storage medium | |
| JP3631068B2 (en) | Information processing apparatus, information processing method, and storage medium storing computer-readable program | |
| JP3962513B2 (en) | Preview image display method, information processing apparatus, and storage medium storing program | |
| JP4266462B2 (en) | Information processing apparatus and control method thereof | |
| JP3673684B2 (en) | Information processing apparatus, information processing method, and storage medium storing computer-readable program | |
| JP4612917B2 (en) | Control method, information processing apparatus, and computer-readable recording medium | |
| JP3890172B2 (en) | PREVIEW IMAGE DISPLAY METHOD, PRINT CONTROL DEVICE, AND RECORDING MEDIUM CONTAINING PROGRAM | |
| JP4006150B2 (en) | Printing control method and apparatus | |
| JP4612909B2 (en) | Control method, information processing apparatus, and computer-readable recording medium | |
| JP2001134560A (en) | Method and device for print control | |
| JP2010211829A (en) | Information processing device, information processing method, and computer-readable recording medium | |
| JP5014481B2 (en) | Print control apparatus, print control method, and program | |
| JP2001130115A (en) | Method and device for controlling print |
Legal Events
| Date | Code | Title | Description |
|---|---|---|---|
| A521 | Written amendment |
Free format text: JAPANESE INTERMEDIATE CODE: A523 Effective date: 20050613 |
|
| A621 | Written request for application examination |
Free format text: JAPANESE INTERMEDIATE CODE: A621 Effective date: 20050613 |
|
| RD01 | Notification of change of attorney |
Free format text: JAPANESE INTERMEDIATE CODE: A7426 Effective date: 20050613 |
|
| RD03 | Notification of appointment of power of attorney |
Free format text: JAPANESE INTERMEDIATE CODE: A7423 Effective date: 20050613 |
|
| A521 | Written amendment |
Free format text: JAPANESE INTERMEDIATE CODE: A523 Effective date: 20070703 |
|
| TRDD | Decision of grant or rejection written | ||
| A01 | Written decision to grant a patent or to grant a registration (utility model) |
Free format text: JAPANESE INTERMEDIATE CODE: A01 Effective date: 20070810 |
|
| A61 | First payment of annual fees (during grant procedure) |
Free format text: JAPANESE INTERMEDIATE CODE: A61 Effective date: 20070827 |
|
| R150 | Certificate of patent or registration of utility model |
Free format text: JAPANESE INTERMEDIATE CODE: R150 |
|
| FPAY | Renewal fee payment (event date is renewal date of database) |
Free format text: PAYMENT UNTIL: 20100831 Year of fee payment: 3 |
|
| FPAY | Renewal fee payment (event date is renewal date of database) |
Free format text: PAYMENT UNTIL: 20110831 Year of fee payment: 4 |
|
| FPAY | Renewal fee payment (event date is renewal date of database) |
Free format text: PAYMENT UNTIL: 20120831 Year of fee payment: 5 |
|
| FPAY | Renewal fee payment (event date is renewal date of database) |
Free format text: PAYMENT UNTIL: 20120831 Year of fee payment: 5 |
|
| FPAY | Renewal fee payment (event date is renewal date of database) |
Free format text: PAYMENT UNTIL: 20130831 Year of fee payment: 6 |
|
| LAPS | Cancellation because of no payment of annual fees |