EP2184965A1 - Camera module insertion machine with gripper - Google Patents
Camera module insertion machine with gripper Download PDFInfo
- Publication number
- EP2184965A1 EP2184965A1 EP08168584A EP08168584A EP2184965A1 EP 2184965 A1 EP2184965 A1 EP 2184965A1 EP 08168584 A EP08168584 A EP 08168584A EP 08168584 A EP08168584 A EP 08168584A EP 2184965 A1 EP2184965 A1 EP 2184965A1
- Authority
- EP
- European Patent Office
- Prior art keywords
- electronic component
- gripper head
- extension
- socket
- gripper
- Prior art date
- Legal status (The legal status is an assumption and is not a legal conclusion. Google has not performed a legal analysis and makes no representation as to the accuracy of the status listed.)
- Granted
Links
- 238000003780 insertion Methods 0.000 title claims abstract description 51
- 230000037431 insertion Effects 0.000 title claims abstract description 51
- 230000002093 peripheral effect Effects 0.000 claims abstract description 38
- 238000000034 method Methods 0.000 claims abstract description 11
- 230000007246 mechanism Effects 0.000 claims description 15
- MTLMVEWEYZFYTH-UHFFFAOYSA-N 1,3,5-trichloro-2-phenylbenzene Chemical compound ClC1=CC(Cl)=CC(Cl)=C1C1=CC=CC=C1 MTLMVEWEYZFYTH-UHFFFAOYSA-N 0.000 description 19
- 238000004519 manufacturing process Methods 0.000 description 3
- 230000008569 process Effects 0.000 description 3
- JHBVPKZLIBDTJR-UHFFFAOYSA-N 1,2-dichloro-4-(3-chlorophenyl)benzene Chemical compound ClC1=CC=CC(C=2C=C(Cl)C(Cl)=CC=2)=C1 JHBVPKZLIBDTJR-UHFFFAOYSA-N 0.000 description 2
- 230000004888 barrier function Effects 0.000 description 1
- 230000008878 coupling Effects 0.000 description 1
- 238000010168 coupling process Methods 0.000 description 1
- 238000005859 coupling reaction Methods 0.000 description 1
- 238000005516 engineering process Methods 0.000 description 1
Images





Classifications
-
- H—ELECTRICITY
- H05—ELECTRIC TECHNIQUES NOT OTHERWISE PROVIDED FOR
- H05K—PRINTED CIRCUITS; CASINGS OR CONSTRUCTIONAL DETAILS OF ELECTRIC APPARATUS; MANUFACTURE OF ASSEMBLAGES OF ELECTRICAL COMPONENTS
- H05K13/00—Apparatus or processes specially adapted for manufacturing or adjusting assemblages of electric components
- H05K13/04—Mounting of components, e.g. of leadless components
- H05K13/0404—Pick-and-place heads or apparatus, e.g. with jaws
- H05K13/0413—Pick-and-place heads or apparatus, e.g. with jaws with orientation of the component while holding it; Drive mechanisms for gripping tools, e.g. lifting, lowering or turning of gripping tools
-
- H—ELECTRICITY
- H05—ELECTRIC TECHNIQUES NOT OTHERWISE PROVIDED FOR
- H05K—PRINTED CIRCUITS; CASINGS OR CONSTRUCTIONAL DETAILS OF ELECTRIC APPARATUS; MANUFACTURE OF ASSEMBLAGES OF ELECTRICAL COMPONENTS
- H05K13/00—Apparatus or processes specially adapted for manufacturing or adjusting assemblages of electric components
- H05K13/04—Mounting of components, e.g. of leadless components
- H05K13/0404—Pick-and-place heads or apparatus, e.g. with jaws
- H05K13/0408—Incorporating a pick-up tool
Definitions
- the technology described in this patent document relates generally to the field of manufacturing and more particularly to the field of manufacturing mobile devices.
- Sensitive components such as camera units require special handling to prevent them from being damaged, and it has proven difficult to use automated systems effectively for inserting such components into sockets in electronic devices.
- Manual assembly is an alternative for handling such components.
- manual assembly also has problems. Human error, such as failure to correctly orient or fully secure the component, is a common issue with manual assembly.
- manual assembly typically costs more than automated systems.
- a system comprises an electronic component comprising sides and a top face, the top face having a top-face peripheral area and a top-face central area; a gripper having a gripper head, the gripper head being movable to an open and closed position; the gripper head having an extension configured to contact opposing sides of the electronic component when the gripper head is in the closed position, and a surface configured to contact the top-face peripheral area of the electronic component when the gripper head is in the closed position; a socket having a top peripheral surface; and an insertion depth guide associated with the gripper head, the insertion depth guide having a bottom surface configured to contact the top peripheral surface of the socket.
- An apparatus for seating an electronic component within a socket comprises: a gripper support structure comprising a first linear slide mechanism for movement on a z-axis, and a second linear slide mechanism for movement on an x-axis; a gripper head coupled to the support structure, the gripper head comprising a first extension and a second extension, the first extension having a first lip extending toward the second extension and the second extension having a second lip extending toward the first extension; the first and second extensions being movable to an open and closed position; and an insertion depth guide associated with the gripper head.
- a method for placing an electronic component comprises the acts of: operating a gripper head to an open position, the gripper head comprising a first extension and a second extension, the first extension having a first lip extending toward the second extension and the second extension having a second lip extending toward the first extension; moving the gripper head on a z-axis to at least partially surround the electronic component with the first extension and the second extension; operating the gripper head to a closed position, thereby grasping the electronic component between the first extension and second extension and beneath the first and second lips; optionally moving the gripper head in a reverse direction on the z-axis; moving the gripper head on an x-axis to locate the electronic component over a socket; moving the gripper head on the z-axis to place the electronic component into the socket; and controlling the insertion depth of the electronic component into the socket by an insertion depth guide.
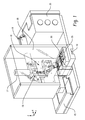
- Fig. 1 shows a general overview of an example gripper apparatus assembly system.
- a gripper assembly 10 is secured to a gripper support structure 15.
- An air cylinder 17 is also mounted on the support structure 15 and is coupled to the gripper assembly 10. These components are enclosed in a machine guard 20.
- An electrical enclosure 25 houses a power source and computer controller (not shown) that provides power and computer control to the gripper assembly 10 through an electrical coupling.
- the gripper assembly 10 is pneumatically operated with a built in centering device. Beneath the gripper assembly 10 is a printed circuit board (PCB) 30 that is nestled in a PCB nest 35. In other examples, another part to be assembled may be used in place of the PCB 30.
- PCB printed circuit board
- the PCB nest 35 and PCB 30 travel along a rail 40 in and out from under the gripper assembly 10. Each PCB 30 stops at a pre-determined location underneath the gripper assembly 10 and then moves out after an electronic component is installed.
- a tape feeder 45 is situated to the side of the gripper assembly 10 (along the x-axis) and an opening is provided in the side and bottom of the machine guard 20 to allow the gripper assembly 10 to move along the x-axis and locate above the tape feeder 45.
- a corresponding opening is located in the top of the tape feeder 45.
- Electronic components are provided on a moving "tape" for the gripper assembly 10 to pick up and assemble into the PCB 30. In this example the "tape" moves alongside with the PCB nest 35 along the y-axis, providing an electronic component for each PCB that comes underneath the gripper assembly 10.
- Fig. 2 shows a closer view of the example assembly system with the machine guard 20 removed from the view for clarity.
- the gripper assembly 10 is mounted on the support structure 15 so that the gripper assembly 10 can move relative to the support structure 15 on the z-axis.
- the air cylinder 17 is computer controlled and provides the force to move the gripper assembly 10 in the z-axis, although it is appreciated that other similar mechanisms may be suitable for enabling movement of the assembly 10.
- the support structure 15 is mounted on a rail 100 through a sliding x-axis mounting 101. This linear slide mechanism allows the support structure 15 and gripper assembly 10 to travel on the x-axis. Movement along the x-axis is powered by a computer-controlled air cylinder 19 ( FIG. 1 ), although it is recognized that alternative mechanisms may be appropriate for providing movement of the assembly 10.
- An L-shaped angled mounting plate 102 extends in the x and z plane and a bottom ledge 103 extends in the x and y plane.
- the L-shaped angled mounting plate 102 is secured to a sliding z-axis mounting 105 and, at the bottom ledge 103, is coupled to the gripper assembly 10 by a spring 110.
- the sliding z-axis mounting 105 is, in turn, coupled to a rail 106 on the support structure 15, forming a linear slide mechanism.
- the spring 110 provides force control to dampen the z-axis force provided from the air cylinder 17.
- the spring 110 is a coil spring; however, in other examples different types of springs may be used, or other types of biasing mechanisms may also be used. Furthermore, more than one spring or biasing mechanism may optionally be used, which may provide greater stability.
- the spring 110 is attached to a two-part carriage 115, which is part of the gripper head 140, and which includes a first part 120 and a second part 125 that are attached by a sliding rod 130.
- the first part 120 and the second part 125 are slidable on a single-axis linear slide mechanism.
- the second part 125 is slidably mounted on the rod 130 along the x-axis and is movable in relation to the first part 120
- the first part 120 is slidably mounted on the rod 130 along the x-axis and is movable in relation to the second part 125.
- the gripper head 140 When the first part 120 and second part 125 are moved apart, the gripper head 140 is in an open position ( FIG.7 ), and when the first part 120 and second part 125 are moved together the gripper head 140 is in a closed position.
- the first part 120 and second part 125 are independently movable on the x-axis, and the other part is fixed. The movement is powered by the computer-controlled air cylinder (not shown).
- a gripper head 140 is attached to the first part 120 and second part 125 of the two-part carriage 115.
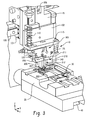
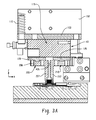
- Figs. 3 and 3A show a closer, more detailed view of the gripper assembly 10 and gripper head 140.
- a first extension 205 has an extension in the x-axis 206 and also has an extension along the z-axis 207 to make an L-shape.
- the x-axis extension 206 is connected to the first part 120, and the z-axis extension 207 terminates the bottom end of the gripper assembly 10 and is configured to contact an electronic component 220.
- a second extension 210 has an extension in the x-axis 211 and also has an extension along the z-axis 212 to make an L-shape.
- the x-axis extension 211 is connected to the second part 125, and the z-axis extension 212 terminates the bottom end of the gripper assembly 10 and is configured to contact the electronic component 220.
- Fig. 4 , Fig. 4A , Fig. 4B and Fig. 5 show a closer, more detailed view of how the gripper head 140 interacts with the electronic component 220 and PCB 30.
- An electronic component 220 has first and second sides 305, 310 opposite each other, and third and fourth sides 312, 314 opposite each other and perpendicular to the first and second sides 305, 310.
- a top face 315 of the electronic component has a top-face peripheral area 320 (shaded area Fig. 4A ) and a top-face central area 325.
- Four corner areas 328 are included as part of the top peripheral face 320.
- the electronic component 220 also has a key 330 on the first side 305.
- the bottom face of the electronic component 220 has electrical connections.
- the electronic component 220 is a camera unit.
- the camera unit is a pressure sensitive electronic component because the lens disposed on the top face central area 325 cannot withstand the typical pressure used in vacuum-based manufacturing assembly equipment or other machinery or labor that mechanically or manually applies force on the center of the component.
- Other pressure sensitive electronic components may include, but are not limited to, certain microphones, receivers or speakers.
- a socket 350 is electrically and physically connected to the PCB 30 and includes walls 355 circumscribing a socket floor 360 (See Fig. 4B ).
- the socket floor 360 contains several electrical contacts 365 that are electrically coupled to the PCB 30.
- the socket walls 355 include a first socket wall 370 and a second socket wall 375.
- a key-hole section 380 is cut-out of the first socket wall 370 and is open to the top of the socket 350. The key-hole section 380 allows entry of the key 330 in the electronic component 220 to aid in proper alignment.
- the socket walls 355 have a top peripheral face 385 circumscribing the top of the socket 350.
- the first extension 205 and second extension 210 of the gripper head 140 extend down and partially surround the electronic component 220.
- the gripper head 140 is shown in the closed position, gripping the electronic component 220.
- the first extension 205 and second extension 210 are spaced apart to a distance greater than the x-axis width of the electronic component 220.
- the first extension 205 and second extension 210 are mirror images of each other; however, in other examples their particular shapes may differ.
- the first extension 205 has four sides.
- the first side 405 extends in the y and z planes.
- two corner extensions 410 border a notch 412 cut out of the first side 405.
- the notch 412 is open to the bottom of the gripper head 140, and enables the key 330 on the electronic component 220 to extend between the corner extensions 410 when the gripper head 140 is in the closed position.
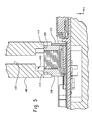
- Interior surfaces 414 ( Fig. 5 ) of the corner extensions 410 contact the first side 305 (or in the case of the second extension, the second side 310) of the electronic component 220.
- the corner extensions 410 have a thickness that extends across the x-axis width of the top peripheral face 385 of the socket 350.
- the interior surfaces 414 of the corner extensions 410 grip the electronic component 220 when the gripper head 140 is in the closed position by pushing against the first and second sides 305, 310 of the electronic component 220.
- This interior surface 414 may optionally be provided with a high-friction surface to enhance the grip of the gripping head 140.
- the interior surface 414 may also optionally be provided with a soft or cushioned surface to cushion the force of the grip.
- a second side 420 and a third side (not shown) of the first extension 205 run perpendicular to the first side 405 in the x and z planes.
- the second side 420 and third side extend down the z-axis, they recede in unison away from the center of the gripper head 140 along the x-axis in a stair-stepped manner.
- the same recessed steps are formed in both sides, thus only the second side is described in detail, with the understanding that the third side has the same form.
- a fourth side 435 (See Fig. 3A ), which is opposite the first side 405, extends across the entire width of the gripper head 140 and connects with the third side.
- the gripper head 140 has a recess 440 ( Fig. 5 ) bounded by the interiors of the first side 405, second side 420, and third side, which provides a clearance so the central area 325 of the electronic component 220 is not contacted by the gripper head 140.
- a lip 445 is formed on the bottom side thereof.
- This lip 445 is an extension that has a thickness in the y and x plane such that when the gripper head 140 is in the closed position it will be situated over the top peripheral face 320 of the electronic component 220.
- the lip 445 of the first extension 205 may be considered to extend toward the lip 445 of the second extension 210.
- the lip 445 contacts the electronic component 220 at a corner area 390 of the top peripheral face 385 where the electronic component 220 is less susceptible to damage.
- the top peripheral face 385 and the corner area 390 of the top peripheral face 385 of pressure sensitive camera units are better able to withstand pressure than the central area 325 where the lens is disposed.
- the y-axis thickness of the second side 420 is reduced so that a thin wall is formed that contacts or nearly contacts (e.g. within 3 mm) the third and fourth sides 312, 314 of the electronic component 220.
- the third recessed step 450 extends along the x-axis to the edge of the first side 305 of the electronic component 220. After the third recessed step 450, the second side 420 merges into the x-axis thickness of the corner extensions 410 of the first side 405, which extend below the third recessed step 450.
- a bottom surface 455 of the four corner extensions 410 of the gripper head 140 contacts the top peripheral surface 385 of the socket 350.
- the bottom surface 455 contacts the front and back areas of the first socket wall 370 and the second socket wall 375.
- the bottom surface 455 of the corner extensions 410 functions as an insertion depth guide by acting as a stopper against the top peripheral surface 385 of the socket 350. This controls the depth of insertion of the electronic component 220 into the socket 350 and prevents excessive force on the electronic component 220 and the floor 360 of the socket 350.
- the distance between the lip 445 and the bottom surface 455 of the corner extensions 410 should be the same as the distance between top peripheral surface 320 of the electronic component 220 and the top peripheral surface 385 of the socket 350 when the electronic component 220 is securely seated in the socket 350.
- the depth insertion guide feature also ensures a correct orientation on the z-axis by making the top peripheral surface 320 of the electronic component 220 and the top peripheral surface 385 of the socket 350 level.
- the depth insertion guide is an independent piece that is separate from the gripper head 140.
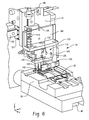
- Fig. 6 shows the same apparatus described above and shown in Figs. 1-5 , except an example control block insertion depth guide 500 is added.
- the control block insertion depth guide 500 functions as the insertion depth guide instead of the bottom surface 455 of the four corner extensions 410 of the gripper head 140.
- the separate control block configuration protects the socket 350 from excessive force and functions to ensure that the socket 350 and electronic component 220 are correctly aligned.
- the example control block insertion depth guide 500 comprises a control block 510 and an insertion height control rod 520.
- the example control block 510 is separately mounted and does not move in the x-axis or y-axis, even when the gripper head 140 is sliding on the x-axis to retrieve an electronic component 220 from the tape feeder 45.
- the control block 510 is mounted so that it can slide to an up and a down position along the z-axis.
- the control block 510 is biased by a spring (not shown) such that the control block 510 will rise to the up position when no other force is applied to it.
- the bottom of the control block 510 is raised above the PCB 35 to allow for clearance of the PCB 35 when the electronic component 220 is inserted (See Fig. 7 ).
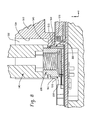
- the control block 510 is pressed down so that a bottom surface 515 of a ledge 545 on the control block 510 contacts the top peripheral surface 385 of the socket 350, thereby stopping the downward motion of the control block 510.
- Other types of range-limiting stoppers can be utilized alternatively or in conjunction with the above.
- a fixed surface mounted underneath the control block 510 may be configured to limit the range of the downward motion of the control block 510.
- the example insertion height control rod 520 is secured to the bottom ledge 103 of the L-shaped angled mounting plate 102. Thus, the insertion height control rod 520 travels along with the gripper head 140 as it moves in the x- and z-axes.
- the bottom surface 522 of the insertion height control rod 520 is configured to contact the top surface 512 of the control block 510 when the gripper head 140 moves down along the z-axis.
- the insertion height control rod 520 controls the downward (z-axis) range of the gripper head 140 and control block 510.
- the control block 510 has a well 530 defined by first, second, and third walls 532, 534, 536, respectively.
- the well 530 is open to the direction where the electronic component 220 is stored on the tape feeder 45.
- the control block 510 is positioned so that the z-axis extensions 207, 212 of the gripper head 140 will fit into the well 530 when the gripper head 140 is in position over the socket 350 of the PCB 30.
- the second wall 534 is recessed enough to allow the gripper head 140 to be in the open position when it is in the well 530.
- a bottom 540 of the well 530 is open, but is circumscribed by a ledge 545 that runs along the first, second, and third walls 532, 534, 536, respectively.
- the ledge 545 is tapered so that it is wider at the bottom than at the top, providing a centering feature that directs the gripper head 140, the electronic component 220, or both into the precisely correct position in the socket 350.
- a bottom surface 570 of the control block 510 also provides another centering feature. Underneath the ledge 545, first, second, and third under-ledge walls 562, 564, 566 taper outwardly to the bottom surface 570 of the control block 510. The under-ledge walls 562, 564, 566 extend below the socket 350 when the control block 510 is in the down position and function to direct the control block 510 into the precisely correct position over the socket 350.
- the control block 510 therefore serves to center both the gripper head 140 (with electronic component 220) and the socket 350 into mutual alignment.
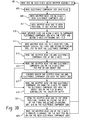
- Fig. 10 is a flow chart of an example method for placing an electronic component 220 into a socket 350 disposed on a PCB 30.
- a PCB 30 is moved into place under a gripper assembly 10 (601).
- the PCB 30 may be situated in a PCB nest 35 and brought under the gripper assembly 10 by traveling along a rail 40 in and out from under the gripper assembly.
- the electronic component 220 is moved into a position proximate to the gripper assembly 10 (603).
- the electronic component 220 is placed directly across from the socket 350 on the x-axis.
- the gripper head 140 moves along the x-axis to a location directly above the electronic component 220 (605). If the gripper head 140 is not open already, the gripper head 140 is moved to the open position (607), thereby causing the first and second extensions 205, 210 on the gripper head 140, and also the first and second z-axis extensions 207, 212, to be spaced apart to a distance greater than the width of the electronic component 220.
- the gripper head 140 is then moved down on the z-axis so that the portion of the z-axis extensions 207, 212 that extends below the lip 445 of the gripper head 140 surround portions of at least two opposing sides of the socket 350 (609).
- the gripper head 140 is then moved to the closed position, thereby causing the first and second z-axis extensions 207, 212 to grip the electronic component 220 underneath the lip 445 of the gripper head 140 (611).
- the lip 445 may contact the top peripheral face 320 of the electronic component 220 or it may be slightly above the top peripheral face 320 of the electronic component 220, e.g. 0.01 mm to 5 mm above the top peripheral face 320, such as .5 mm to 4 mm, or 1 mm to 3 mm.
- the gripper head 140 is then moved or operated to a closed position, thereby grasping the electronic component 220 between the first z-axis extension 207 and second z-axis extension 212 and beneath the first and second lips 445 (611).
- the gripper head 140 and electronic component 220 can (1) move back up along the z-axis (613) (in a reverse direction from the previous z-axis movement) and then move along the x-axis to a location above the socket 350 on the PCB 30 (615); or (2) move directly along the x-axis to a location above the socket 350 on the PCB 30 (615). Either option may be selected so long as the electronic component 220 and the gripper head 140 are able to clear the top peripheral face 385 of the socket walls 355 as the electronic component 220 and the gripper head 140 are moved over the socket 350.
- option (2) may be selected if the top peripheral face 385 of the socket walls 355 is situated lower on the z-axis than the surface on which the electronic component 220 was originally situated, and if there are no barriers that would hinder direct movement along the x-axis from the original location of the electronic component 220.
- the computer controlled air cylinder 19 is programmed to move the gripper head 140 and electronic component 220 in alignment with the socket 350 on the x-axis (615).
- the y-axis alignment is controlled in step 601 by the placement of the PCB 30 underneath the gripper assembly 10. Stoppers or location locking mechanisms as known by those of skill in the art may be used to aid in achieving correct alignment. In one example, this alignment, in conjunction with the depth insertion guide function of the corner extensions 410 of the gripper head 140, is sufficient to allow the electronic component 220 to be placed securely into the socket 350.
- An optional additional step (617) allows for finer centering of the gripper head 140, electronic component 220 and socket 350.
- the control block 510 serves to center both the gripper head 140 (with electronic component 220) and the socket 350 into mutual alignment, as described above.
- the gripper head 140 moves down the z-axis to place the electronic component 220 into the socket 350 (619).
- the fine centering of step 617 takes place as the electronic component 220 is inserted into the socket 350.
- the electronic component 220 encounters some resistance from the socket walls 355, the electrical connections 365 in the socket floor 360, or the socket floor 360 itself. This resistance will tend to push the electronic component 220 up so that it squarely abuts the lips 445 of the gripper head 140.
- the lips 445 of the gripper head 140 are configured to make the electronic component 220 level in the x-y plane, so that it will be correctly oriented in the socket 350.
- the lips 445 of the gripper head 140 pushes against the top-face peripheral area 320 of the electronic component 220 to overcome the resistance as it is fully inserted into the socket 350. This ensures that the electronic component 220 is pushed into the socket 350 securely and in the correct orientation while avoiding pressure sensitive areas that may be present at the central area 325 of the electronic component 220.
- the example insertion depth guides discussed above also aid in providing correct orientation as they press against the top peripheral face 385 of the socket 350.
- the insertion depth is controlled to prevent excessive pressure on the electronic component 220, socket 350, and PCB 30.
- the example insertion depth guides discussed above may be used for this purpose, i.e. the bottom surface 455 of the corner extensions 410 or the control block insertion depth guide 500.
- the gripper head 140 is opened to the open position, thereby releasing the grip of the first and second extensions 205, 210 on the electronic component 220 (621).
Landscapes
- Engineering & Computer Science (AREA)
- Manufacturing & Machinery (AREA)
- Microelectronics & Electronic Packaging (AREA)
- Supply And Installment Of Electrical Components (AREA)
- Auxiliary Devices For And Details Of Packaging Control (AREA)
Abstract
Description
- The technology described in this patent document relates generally to the field of manufacturing and more particularly to the field of manufacturing mobile devices.
- Electronic devices are typically assembled with automated systems or in combination with manual labor. Sensitive components such as camera units require special handling to prevent them from being damaged, and it has proven difficult to use automated systems effectively for inserting such components into sockets in electronic devices. Manual assembly is an alternative for handling such components. However, manual assembly also has problems. Human error, such as failure to correctly orient or fully secure the component, is a common issue with manual assembly. Furthermore, manual assembly typically costs more than automated systems.
- An example assembly system, gripper apparatus, and method are presented herein. These examples provide a solution for orientation control, force control, insertion depth control, and positioning of the contact points to avoid pressure sensitive areas on components.
- A system comprises an electronic component comprising sides and a top face, the top face having a top-face peripheral area and a top-face central area; a gripper having a gripper head, the gripper head being movable to an open and closed position; the gripper head having an extension configured to contact opposing sides of the electronic component when the gripper head is in the closed position, and a surface configured to contact the top-face peripheral area of the electronic component when the gripper head is in the closed position; a socket having a top peripheral surface; and an insertion depth guide associated with the gripper head, the insertion depth guide having a bottom surface configured to contact the top peripheral surface of the socket.
- An apparatus for seating an electronic component within a socket is provided herein, the apparatus comprises: a gripper support structure comprising a first linear slide mechanism for movement on a z-axis, and a second linear slide mechanism for movement on an x-axis; a gripper head coupled to the support structure, the gripper head comprising a first extension and a second extension, the first extension having a first lip extending toward the second extension and the second extension having a second lip extending toward the first extension; the first and second extensions being movable to an open and closed position; and an insertion depth guide associated with the gripper head.
- A method for placing an electronic component comprises the acts of: operating a gripper head to an open position, the gripper head comprising a first extension and a second extension, the first extension having a first lip extending toward the second extension and the second extension having a second lip extending toward the first extension; moving the gripper head on a z-axis to at least partially surround the electronic component with the first extension and the second extension; operating the gripper head to a closed position, thereby grasping the electronic component between the first extension and second extension and beneath the first and second lips; optionally moving the gripper head in a reverse direction on the z-axis; moving the gripper head on an x-axis to locate the electronic component over a socket; moving the gripper head on the z-axis to place the electronic component into the socket; and controlling the insertion depth of the electronic component into the socket by an insertion depth guide.
-
-
Fig. 1 shows a perspective view of an example assembly mechanism that includes an example gripper apparatus; -
Fig. 2 is a magnified, perspective view of an example gripper apparatus and an example assembly track; -
Fig. 3 is a second, magnified, perspective view of an example gripper apparatus and an example assembly track; -
Fig. 3A shows a cross-sectional view of an example gripper apparatus and an example assembly track; -
Fig. 4 shows a third, magnified, perspective view of an example gripper apparatus and an example assembly track; -
Fig. 4A shows a perspective view of an example electronic component; -
Fig. 4B shows a top-down cross-sectional view of example gripper corner extensions and an example socket; -
Fig. 5 shows a cross-sectional view of an example gripper apparatus and an example assembly track; -
Fig. 6 shows a perspective view of an assembly mechanism including an example gripper apparatus, an example control block and insertion height control rod, and an example assembly track; -
Fig. 7 shows a magnified perspective view of an example gripper apparatus including an example control block and insertion height control rod, and an example assembly track; -
Fig. 8 shows a cross-sectional view of an example gripper apparatus with an example control block and insertion height control rod, and an example assembly track; -
Fig. 9 shows a top-down cross-sectional view of an example control block and an example socket; and -
Fig. 10 is an example flow-chart of an assembly process using an example assembly mechanism. -
Fig. 1 shows a general overview of an example gripper apparatus assembly system. Agripper assembly 10 is secured to agripper support structure 15. Anair cylinder 17 is also mounted on thesupport structure 15 and is coupled to thegripper assembly 10. These components are enclosed in amachine guard 20. Anelectrical enclosure 25 houses a power source and computer controller (not shown) that provides power and computer control to thegripper assembly 10 through an electrical coupling. Thegripper assembly 10 is pneumatically operated with a built in centering device. Beneath thegripper assembly 10 is a printed circuit board (PCB) 30 that is nestled in aPCB nest 35. In other examples, another part to be assembled may be used in place of the PCB 30. The PCB nest 35 and PCB 30 travel along arail 40 in and out from under thegripper assembly 10. EachPCB 30 stops at a pre-determined location underneath thegripper assembly 10 and then moves out after an electronic component is installed. Atape feeder 45 is situated to the side of the gripper assembly 10 (along the x-axis) and an opening is provided in the side and bottom of themachine guard 20 to allow thegripper assembly 10 to move along the x-axis and locate above thetape feeder 45. A corresponding opening is located in the top of thetape feeder 45. Electronic components are provided on a moving "tape" for thegripper assembly 10 to pick up and assemble into thePCB 30. In this example the "tape" moves alongside with thePCB nest 35 along the y-axis, providing an electronic component for each PCB that comes underneath thegripper assembly 10. -
Fig. 2 shows a closer view of the example assembly system with themachine guard 20 removed from the view for clarity. Thegripper assembly 10 is mounted on thesupport structure 15 so that thegripper assembly 10 can move relative to thesupport structure 15 on the z-axis. Theair cylinder 17 is computer controlled and provides the force to move thegripper assembly 10 in the z-axis, although it is appreciated that other similar mechanisms may be suitable for enabling movement of theassembly 10. Thesupport structure 15 is mounted on arail 100 through a slidingx-axis mounting 101. This linear slide mechanism allows thesupport structure 15 andgripper assembly 10 to travel on the x-axis. Movement along the x-axis is powered by a computer-controlled air cylinder 19 (FIG. 1 ), although it is recognized that alternative mechanisms may be appropriate for providing movement of theassembly 10. - An L-shaped
angled mounting plate 102 extends in the x and z plane and abottom ledge 103 extends in the x and y plane. The L-shapedangled mounting plate 102 is secured to a sliding z-axis mounting 105 and, at thebottom ledge 103, is coupled to thegripper assembly 10 by aspring 110. The sliding z-axis mounting 105 is, in turn, coupled to arail 106 on thesupport structure 15, forming a linear slide mechanism. Thespring 110 provides force control to dampen the z-axis force provided from theair cylinder 17. In this example, thespring 110 is a coil spring; however, in other examples different types of springs may be used, or other types of biasing mechanisms may also be used. Furthermore, more than one spring or biasing mechanism may optionally be used, which may provide greater stability. - The
spring 110 is attached to a two-part carriage 115, which is part of thegripper head 140, and which includes afirst part 120 and asecond part 125 that are attached by asliding rod 130. In this example, thefirst part 120 and thesecond part 125 are slidable on a single-axis linear slide mechanism. Specifically, thesecond part 125 is slidably mounted on therod 130 along the x-axis and is movable in relation to thefirst part 120, and thefirst part 120 is slidably mounted on therod 130 along the x-axis and is movable in relation to thesecond part 125. When thefirst part 120 andsecond part 125 are moved apart, thegripper head 140 is in an open position (FIG.7 ), and when thefirst part 120 andsecond part 125 are moved together thegripper head 140 is in a closed position. In other examples, only one of thefirst part 120 andsecond part 125 are independently movable on the x-axis, and the other part is fixed. The movement is powered by the computer-controlled air cylinder (not shown). - A
gripper head 140 is attached to thefirst part 120 andsecond part 125 of the two-part carriage 115.Figs. 3 and3A show a closer, more detailed view of thegripper assembly 10 andgripper head 140. Afirst extension 205 has an extension in thex-axis 206 and also has an extension along the z-axis 207 to make an L-shape. Thex-axis extension 206 is connected to thefirst part 120, and the z-axis extension 207 terminates the bottom end of thegripper assembly 10 and is configured to contact anelectronic component 220. Similarly, asecond extension 210 has an extension in thex-axis 211 and also has an extension along the z-axis 212 to make an L-shape. Thex-axis extension 211 is connected to thesecond part 125, and the z-axis extension 212 terminates the bottom end of thegripper assembly 10 and is configured to contact theelectronic component 220. -
Fig. 4 ,Fig. 4A ,Fig. 4B andFig. 5 show a closer, more detailed view of how thegripper head 140 interacts with theelectronic component 220 andPCB 30. - An
electronic component 220 has first andsecond sides fourth sides second sides top face 315 of the electronic component has a top-face peripheral area 320 (shaded areaFig. 4A ) and a top-facecentral area 325. Four corner areas 328 (cross-hatched shaded areas inFig. 4A ) are included as part of the topperipheral face 320. Theelectronic component 220 also has a key 330 on thefirst side 305. The bottom face of theelectronic component 220 has electrical connections. In this example, theelectronic component 220 is a camera unit. The camera unit is a pressure sensitive electronic component because the lens disposed on the top facecentral area 325 cannot withstand the typical pressure used in vacuum-based manufacturing assembly equipment or other machinery or labor that mechanically or manually applies force on the center of the component. Other pressure sensitive electronic components may include, but are not limited to, certain microphones, receivers or speakers. - A
socket 350 is electrically and physically connected to thePCB 30 and includeswalls 355 circumscribing a socket floor 360 (SeeFig. 4B ). Thesocket floor 360 contains severalelectrical contacts 365 that are electrically coupled to thePCB 30. Thesocket walls 355 include afirst socket wall 370 and asecond socket wall 375. A key-hole section 380 is cut-out of thefirst socket wall 370 and is open to the top of thesocket 350. The key-hole section 380 allows entry of the key 330 in theelectronic component 220 to aid in proper alignment. Thesocket walls 355 have a topperipheral face 385 circumscribing the top of thesocket 350. - In the example shown in
Fig. 4 , thefirst extension 205 andsecond extension 210 of thegripper head 140 extend down and partially surround theelectronic component 220. Thegripper head 140 is shown in the closed position, gripping theelectronic component 220. In the open position, thefirst extension 205 andsecond extension 210 are spaced apart to a distance greater than the x-axis width of theelectronic component 220. In this example, thefirst extension 205 andsecond extension 210 are mirror images of each other; however, in other examples their particular shapes may differ. - Because the first and
second extensions first extension 205, but applies to bothextensions first extension 205 has four sides. Thefirst side 405 extends in the y and z planes. At the bottom end of thefirst side 405, twocorner extensions 410 border anotch 412 cut out of thefirst side 405. Thenotch 412 is open to the bottom of thegripper head 140, and enables the key 330 on theelectronic component 220 to extend between thecorner extensions 410 when thegripper head 140 is in the closed position. - Interior surfaces 414 (
Fig. 5 ) of thecorner extensions 410 contact the first side 305 (or in the case of the second extension, the second side 310) of theelectronic component 220. Thecorner extensions 410 have a thickness that extends across the x-axis width of the topperipheral face 385 of thesocket 350. The interior surfaces 414 of thecorner extensions 410 grip theelectronic component 220 when thegripper head 140 is in the closed position by pushing against the first andsecond sides electronic component 220. Thisinterior surface 414 may optionally be provided with a high-friction surface to enhance the grip of thegripping head 140. Theinterior surface 414 may also optionally be provided with a soft or cushioned surface to cushion the force of the grip. - A
second side 420 and a third side (not shown) of thefirst extension 205 run perpendicular to thefirst side 405 in the x and z planes. In the present example, as thesecond side 420 and third side extend down the z-axis, they recede in unison away from the center of thegripper head 140 along the x-axis in a stair-stepped manner. The same recessed steps are formed in both sides, thus only the second side is described in detail, with the understanding that the third side has the same form. - Prior to a first recessed
step 430, a fourth side 435 (SeeFig. 3A ), which is opposite thefirst side 405, extends across the entire width of thegripper head 140 and connects with the third side. - At the first recessed
step 430, thegripper head 140 has a recess 440 (Fig. 5 ) bounded by the interiors of thefirst side 405,second side 420, and third side, which provides a clearance so thecentral area 325 of theelectronic component 220 is not contacted by thegripper head 140. - At a second recessed
step 444, alip 445 is formed on the bottom side thereof. Thislip 445 is an extension that has a thickness in the y and x plane such that when thegripper head 140 is in the closed position it will be situated over the topperipheral face 320 of theelectronic component 220. Thelip 445 of thefirst extension 205 may be considered to extend toward thelip 445 of thesecond extension 210. Specifically, thelip 445 contacts theelectronic component 220 at a corner area 390 of the topperipheral face 385 where theelectronic component 220 is less susceptible to damage. For example, the topperipheral face 385 and the corner area 390 of the topperipheral face 385 of pressure sensitive camera units are better able to withstand pressure than thecentral area 325 where the lens is disposed. - As the
second side 420 extends down the z-axis from the second 444 to a third recessedstep 450, the y-axis thickness of thesecond side 420 is reduced so that a thin wall is formed that contacts or nearly contacts (e.g. within 3 mm) the third andfourth sides electronic component 220. - The third recessed
step 450 extends along the x-axis to the edge of thefirst side 305 of theelectronic component 220. After the third recessedstep 450, thesecond side 420 merges into the x-axis thickness of thecorner extensions 410 of thefirst side 405, which extend below the third recessedstep 450. - In this example, a
bottom surface 455 of the fourcorner extensions 410 of the gripper head 140 (on both the first andsecond extensions 205, 210) contacts the topperipheral surface 385 of thesocket 350. Specifically, thebottom surface 455 contacts the front and back areas of thefirst socket wall 370 and thesecond socket wall 375. In this example, thebottom surface 455 of thecorner extensions 410 functions as an insertion depth guide by acting as a stopper against the topperipheral surface 385 of thesocket 350. This controls the depth of insertion of theelectronic component 220 into thesocket 350 and prevents excessive force on theelectronic component 220 and thefloor 360 of thesocket 350. In this example, the distance between thelip 445 and thebottom surface 455 of thecorner extensions 410 should be the same as the distance between topperipheral surface 320 of theelectronic component 220 and the topperipheral surface 385 of thesocket 350 when theelectronic component 220 is securely seated in thesocket 350. The depth insertion guide feature also ensures a correct orientation on the z-axis by making the topperipheral surface 320 of theelectronic component 220 and the topperipheral surface 385 of thesocket 350 level. - In another example, shown in
Figs. 6-9 , the depth insertion guide is an independent piece that is separate from thegripper head 140.Fig. 6 shows the same apparatus described above and shown inFigs. 1-5 , except an example control blockinsertion depth guide 500 is added. In this example, the control blockinsertion depth guide 500 functions as the insertion depth guide instead of thebottom surface 455 of the fourcorner extensions 410 of thegripper head 140. The separate control block configuration protects thesocket 350 from excessive force and functions to ensure that thesocket 350 andelectronic component 220 are correctly aligned. - The example control block
insertion depth guide 500 comprises acontrol block 510 and an insertionheight control rod 520. Theexample control block 510 is separately mounted and does not move in the x-axis or y-axis, even when thegripper head 140 is sliding on the x-axis to retrieve anelectronic component 220 from thetape feeder 45. Thecontrol block 510, however, is mounted so that it can slide to an up and a down position along the z-axis. - The
control block 510 is biased by a spring (not shown) such that thecontrol block 510 will rise to the up position when no other force is applied to it. In the up position, the bottom of thecontrol block 510 is raised above thePCB 35 to allow for clearance of thePCB 35 when theelectronic component 220 is inserted (SeeFig. 7 ). In the down position (SeeFigs. 6 and8 ) thecontrol block 510 is pressed down so that abottom surface 515 of aledge 545 on the control block 510 contacts the topperipheral surface 385 of thesocket 350, thereby stopping the downward motion of thecontrol block 510. Other types of range-limiting stoppers can be utilized alternatively or in conjunction with the above. For example, a fixed surface mounted underneath thecontrol block 510 may be configured to limit the range of the downward motion of thecontrol block 510. - The example insertion
height control rod 520 is secured to thebottom ledge 103 of the L-shaped angled mountingplate 102. Thus, the insertionheight control rod 520 travels along with thegripper head 140 as it moves in the x- and z-axes. Thebottom surface 522 of the insertionheight control rod 520 is configured to contact the top surface 512 of thecontrol block 510 when thegripper head 140 moves down along the z-axis. Thus, the insertionheight control rod 520 controls the downward (z-axis) range of thegripper head 140 andcontrol block 510. - The
control block 510 has a well 530 defined by first, second, andthird walls electronic component 220 is stored on thetape feeder 45. Thecontrol block 510 is positioned so that the z-axis extensions gripper head 140 will fit into the well 530 when thegripper head 140 is in position over thesocket 350 of thePCB 30. Thesecond wall 534 is recessed enough to allow thegripper head 140 to be in the open position when it is in thewell 530. A bottom 540 of the well 530 is open, but is circumscribed by aledge 545 that runs along the first, second, andthird walls ledge 545 is tapered so that it is wider at the bottom than at the top, providing a centering feature that directs thegripper head 140, theelectronic component 220, or both into the precisely correct position in thesocket 350. - A
bottom surface 570 of thecontrol block 510 also provides another centering feature. Underneath theledge 545, first, second, and third under-ledge walls bottom surface 570 of thecontrol block 510. The under-ledge walls socket 350 when thecontrol block 510 is in the down position and function to direct thecontrol block 510 into the precisely correct position over thesocket 350. Thecontrol block 510, therefore serves to center both the gripper head 140 (with electronic component 220) and thesocket 350 into mutual alignment. -
Fig. 10 is a flow chart of an example method for placing anelectronic component 220 into asocket 350 disposed on aPCB 30. First, aPCB 30 is moved into place under a gripper assembly 10 (601). ThePCB 30 may be situated in aPCB nest 35 and brought under thegripper assembly 10 by traveling along arail 40 in and out from under the gripper assembly. Concurrently, or before or after step 610, theelectronic component 220 is moved into a position proximate to the gripper assembly 10 (603). In one example, theelectronic component 220 is placed directly across from thesocket 350 on the x-axis. - Once the
PCB 30 andelectronic component 220 are in place, thegripper head 140, powered, in this example, by a computer-controlledair cylinder 19, moves along the x-axis to a location directly above the electronic component 220 (605). If thegripper head 140 is not open already, thegripper head 140 is moved to the open position (607), thereby causing the first andsecond extensions gripper head 140, and also the first and second z-axis extensions electronic component 220. - The
gripper head 140 is then moved down on the z-axis so that the portion of the z-axis extensions lip 445 of thegripper head 140 surround portions of at least two opposing sides of the socket 350 (609). Thegripper head 140 is then moved to the closed position, thereby causing the first and second z-axis extensions electronic component 220 underneath thelip 445 of the gripper head 140 (611). At this point, thelip 445 may contact the topperipheral face 320 of theelectronic component 220 or it may be slightly above the topperipheral face 320 of theelectronic component 220, e.g. 0.01 mm to 5 mm above the topperipheral face 320, such as .5 mm to 4 mm, or 1 mm to 3 mm. - The
gripper head 140 is then moved or operated to a closed position, thereby grasping theelectronic component 220 between the first z-axis extension 207 and second z-axis extension 212 and beneath the first and second lips 445 (611). - At this point, depending on where the
PCB 30 andelectronic component 220 originally were located on the z-axis in relation to each other, thegripper head 140 andelectronic component 220 can (1) move back up along the z-axis (613) (in a reverse direction from the previous z-axis movement) and then move along the x-axis to a location above thesocket 350 on the PCB 30 (615); or (2) move directly along the x-axis to a location above thesocket 350 on the PCB 30 (615). Either option may be selected so long as theelectronic component 220 and thegripper head 140 are able to clear the topperipheral face 385 of thesocket walls 355 as theelectronic component 220 and thegripper head 140 are moved over thesocket 350. For example, option (2) may be selected if the topperipheral face 385 of thesocket walls 355 is situated lower on the z-axis than the surface on which theelectronic component 220 was originally situated, and if there are no barriers that would hinder direct movement along the x-axis from the original location of theelectronic component 220. - The computer controlled
air cylinder 19 is programmed to move thegripper head 140 andelectronic component 220 in alignment with thesocket 350 on the x-axis (615). The y-axis alignment is controlled instep 601 by the placement of thePCB 30 underneath thegripper assembly 10. Stoppers or location locking mechanisms as known by those of skill in the art may be used to aid in achieving correct alignment. In one example, this alignment, in conjunction with the depth insertion guide function of thecorner extensions 410 of thegripper head 140, is sufficient to allow theelectronic component 220 to be placed securely into thesocket 350. - An optional additional step (617) allows for finer centering of the
gripper head 140,electronic component 220 andsocket 350. In an example that uses thecontrol block 510 and insertion height control rod, thecontrol block 510 serves to center both the gripper head 140 (with electronic component 220) and thesocket 350 into mutual alignment, as described above. - After moving the
gripper head 140 andelectronic component 220 over thesocket 350, thegripper head 140 moves down the z-axis to place theelectronic component 220 into the socket 350 (619). The fine centering ofstep 617 takes place as theelectronic component 220 is inserted into thesocket 350. As theelectronic component 220 is inserted, it encounters some resistance from thesocket walls 355, theelectrical connections 365 in thesocket floor 360, or thesocket floor 360 itself. This resistance will tend to push theelectronic component 220 up so that it squarely abuts thelips 445 of thegripper head 140. Thelips 445 of thegripper head 140 are configured to make theelectronic component 220 level in the x-y plane, so that it will be correctly oriented in thesocket 350. Thelips 445 of thegripper head 140 pushes against the top-faceperipheral area 320 of theelectronic component 220 to overcome the resistance as it is fully inserted into thesocket 350. This ensures that theelectronic component 220 is pushed into thesocket 350 securely and in the correct orientation while avoiding pressure sensitive areas that may be present at thecentral area 325 of theelectronic component 220. The example insertion depth guides discussed above also aid in providing correct orientation as they press against the topperipheral face 385 of thesocket 350. - The insertion depth is controlled to prevent excessive pressure on the
electronic component 220,socket 350, andPCB 30. For example, the example insertion depth guides discussed above may be used for this purpose, i.e. thebottom surface 455 of thecorner extensions 410 or the control blockinsertion depth guide 500. - After the
electronic component 220 is securely inserted into thesocket 350, thegripper head 140 is opened to the open position, thereby releasing the grip of the first andsecond extensions - At this point another PCB may be moved into place under the gripper assembly 10 (601) and the process can start again. Optionally, to provide greater clearance for the
next PCB 30 or the next electronic component the gripper may be moved back up the z-axis (623) before the process begins again atstep 601. - While various features of the claimed camera module insertion machine with gripper are presented above, it should be understood that the features may be used singly or in any combination thereof. Therefore, the claimed machine is not to be limited to only the specific examples depicted herein. The scope of the disclosure is accordingly defined as set forth in the appended claims.
Claims (16)
- A system comprising:an electronic component comprising sides and a top face, the top face having a top-face peripheral area and a top-face central area;a gripper having a gripper head, the gripper head being movable to an open and closed position; the gripper head having an extension configured to contact opposing sides of the electronic component when the gripper head is in the closed position, and a surface configured to contact the top-face peripheral area of the electronic component when the gripper head is in the closed position;a socket having a top peripheral surface;an insertion depth guide associated with the gripper head, the insertion depth guide having a bottom surface configured to contact the top peripheral surface of the socket.
- The system of claim 1, wherein the pressure sensitive electronic component is selected from the group consisting of: a camera unit, a speaker, a receiver, and a microphone.
- The system of claims 1 or 2, wherein a bottom surface of the gripper head is the insertion depth guide, whereby the insertion depth guide acts as a stopper against the top peripheral surface of the socket to control the insertion depth of the electronic component.
- The system of claim 1 or 2, wherein the insertion depth guide comprises an insertion height control rod coupled to the gripper, the insertion height control rod being configured to (1) contact a separately mounted control block, movable only in the z-axis, and (2) to move the control block from an up position to a down position, wherein a bottom surface of the control block is the bottom surface that contacts the top peripheral surface of the socket.
- The system of claim 1, 2, or 4, wherein the control block comprises three-sides encompassing a well with a ledge circumscribing a bottom of the well, wherein the ledge comprises tapered sides, the tapered sides of the ledge being configured to direct the electronic component, the gripper head, or both into alignment with the socket.
- The system of claim 1, 2, 4, or 5, wherein the control block comprises three-sides encompassing a well with a ledge circumscribing a bottom of the well, and beneath the ledge, tapered under-ledge walls to align the socket with the gripper head, the electronic component, or both.
- An apparatus for seating an electronic component within a socket, the apparatus comprising:a gripper support structure comprising a first linear slide mechanism for movement on a z-axis, and a second linear slide mechanism for movement on an x-axis; a gripper head coupled to the support structure, the gripper head comprising a first extension and a second extension, the first extension having a first lip extending toward the second extension and the second extension having a second lip extending toward the first extension;the first and second extensions being movable to an open and closed position;an insertion depth guide associated with the gripper head.
- The apparatus of claim 7 wherein, in the closed position, the extensions are configured to grip and retain the component under the lip.
- The apparatus of claim 7 or 8, wherein a bottom surface of the gripper head is the insertion depth guide, whereby the insertion depth guide acts as a stopper to limit the insertion depth of the electronic component.
- The apparatus of claim 7 or 8, wherein the insertion depth guide comprises an insertion height control rod coupled to the gripper support structure, the insertion height control rod being configured to (1) contact a separately mounted control block and (2) to move the control block from an up position to a down position, wherein the control block acts as a stopper to limit the insertion depth of the electronic component.
- The apparatus of claim 7, 8, or 10, wherein the control block comprises three-sides encompassing a well with a ledge circumscribing a bottom of the well, wherein the ledge comprises tapered sides, the tapered sides of the ledge being configured to align the gripper head.
- The apparatus of claim 7, 8, 10, or 11 wherein the control block comprises three-sides encompassing a well with a ledge circumscribing a bottom of the well, and beneath the ledge, tapered under-ledge walls.
- A method for placing an electronic component comprising the acts of: operating a gripper head to an open position, the gripper head comprising a first extension and a second extension, the first extension having a first lip extending toward the second extension and the second extension having a second lip extending toward the second extension;
moving the gripper head on a z-axis to at least partially surround the electronic component with the first extension and the second extension;
operating the gripper head to a closed position, thereby grasping the electronic component between the first extension and second extension and beneath the first and second lips;
optionally moving the gripper head in a reverse direction on the z-axis;
moving the gripper head on an x-axis to locate the electronic component over a socket;
moving the gripper head on the z-axis to place the electronic component into the socket; and
controlling the insertion depth of the electronic component into the socket by an insertion depth guide. - The method of claim 13, wherein a bottom surface of the first and second lips contacts a top-face peripheral area of the electronic component.
- The method of claim 13 or 14, further comprising controlling the insertion depth of the electronic component by contacting a control block with an insertion height control rod, thereby pushing the control block down along the z-axis to a down position, and contacting a bottom surface of the control block with a top peripheral surface of the socket.
- The method of claim 13, 14, or 15, further comprising centering the electronic component, wherein the control block comprises three-sides encompassing a well with a ledge circumscribing a bottom of the well, wherein the ledge comprises tapered sides, and beneath the ledge, tapered under-ledge walls
the tapered sides of the ledge and tapered under-ledge walls directing the electronic component, the gripper head, or both into mutual alignment with the socket.
Priority Applications (5)
| Application Number | Priority Date | Filing Date | Title |
|---|---|---|---|
| DE602008005468T DE602008005468D1 (en) | 2008-11-07 | 2008-11-07 | Camera module insertion machine with gripper |
| AT08168584T ATE501629T1 (en) | 2008-11-07 | 2008-11-07 | CAMERA MODULE INSERT MACHINE WITH GRIPPER |
| EP08168584A EP2184965B1 (en) | 2008-11-07 | 2008-11-07 | Camera module insertion machine with gripper |
| CA2683543A CA2683543C (en) | 2008-11-07 | 2009-10-27 | Camera module insertion machine with gripper |
| MX2009011955A MX2009011955A (en) | 2008-11-07 | 2009-11-04 | Camera module insertion machine with gripper. |
Applications Claiming Priority (1)
| Application Number | Priority Date | Filing Date | Title |
|---|---|---|---|
| EP08168584A EP2184965B1 (en) | 2008-11-07 | 2008-11-07 | Camera module insertion machine with gripper |
Publications (2)
| Publication Number | Publication Date |
|---|---|
| EP2184965A1 true EP2184965A1 (en) | 2010-05-12 |
| EP2184965B1 EP2184965B1 (en) | 2011-03-09 |
Family
ID=40280699
Family Applications (1)
| Application Number | Title | Priority Date | Filing Date |
|---|---|---|---|
| EP08168584A Active EP2184965B1 (en) | 2008-11-07 | 2008-11-07 | Camera module insertion machine with gripper |
Country Status (5)
| Country | Link |
|---|---|
| EP (1) | EP2184965B1 (en) |
| AT (1) | ATE501629T1 (en) |
| CA (1) | CA2683543C (en) |
| DE (1) | DE602008005468D1 (en) |
| MX (1) | MX2009011955A (en) |
Cited By (2)
| Publication number | Priority date | Publication date | Assignee | Title |
|---|---|---|---|---|
| TWI664884B (en) * | 2017-04-13 | 2019-07-01 | 南韓商泰克元有限公司 | Electro device gripper |
| CN113258412A (en) * | 2021-05-18 | 2021-08-13 | 江苏力德尔电子信息技术有限公司 | Automatic plugging mechanism |
Families Citing this family (1)
| Publication number | Priority date | Publication date | Assignee | Title |
|---|---|---|---|---|
| CN111230438B (en) * | 2020-01-18 | 2021-04-30 | 重庆科技学院 | A large valve loading and unloading device |
Citations (3)
| Publication number | Priority date | Publication date | Assignee | Title |
|---|---|---|---|---|
| US4161064A (en) | 1977-08-18 | 1979-07-17 | Usm Corporation | Machines for board mounting and socket mounting components |
| US4420878A (en) | 1982-02-23 | 1983-12-20 | Universal Instruments Corporation | Insertion head for dip and dip socket components |
| US5306166A (en) * | 1992-12-14 | 1994-04-26 | Wyse Technology, Inc. | Chip storage insertion guide |
-
2008
- 2008-11-07 AT AT08168584T patent/ATE501629T1/en not_active IP Right Cessation
- 2008-11-07 DE DE602008005468T patent/DE602008005468D1/en active Active
- 2008-11-07 EP EP08168584A patent/EP2184965B1/en active Active
-
2009
- 2009-10-27 CA CA2683543A patent/CA2683543C/en not_active Expired - Fee Related
- 2009-11-04 MX MX2009011955A patent/MX2009011955A/en not_active Application Discontinuation
Patent Citations (3)
| Publication number | Priority date | Publication date | Assignee | Title |
|---|---|---|---|---|
| US4161064A (en) | 1977-08-18 | 1979-07-17 | Usm Corporation | Machines for board mounting and socket mounting components |
| US4420878A (en) | 1982-02-23 | 1983-12-20 | Universal Instruments Corporation | Insertion head for dip and dip socket components |
| US5306166A (en) * | 1992-12-14 | 1994-04-26 | Wyse Technology, Inc. | Chip storage insertion guide |
Cited By (3)
| Publication number | Priority date | Publication date | Assignee | Title |
|---|---|---|---|---|
| TWI664884B (en) * | 2017-04-13 | 2019-07-01 | 南韓商泰克元有限公司 | Electro device gripper |
| CN113258412A (en) * | 2021-05-18 | 2021-08-13 | 江苏力德尔电子信息技术有限公司 | Automatic plugging mechanism |
| CN113258412B (en) * | 2021-05-18 | 2023-03-07 | 江苏力德尔电子信息技术有限公司 | Automatic plugging mechanism |
Also Published As
| Publication number | Publication date |
|---|---|
| CA2683543A1 (en) | 2010-05-07 |
| ATE501629T1 (en) | 2011-03-15 |
| MX2009011955A (en) | 2010-05-24 |
| CA2683543C (en) | 2013-09-10 |
| DE602008005468D1 (en) | 2011-04-21 |
| EP2184965B1 (en) | 2011-03-09 |
Similar Documents
| Publication | Publication Date | Title |
|---|---|---|
| US7870662B2 (en) | Terminal insertion apparatus | |
| US20200396874A1 (en) | Work system and feeder carriage transfer method | |
| US7895734B2 (en) | Camera module insertion machine with gripper | |
| JP7796360B2 (en) | Parts feeder | |
| CA2683543C (en) | Camera module insertion machine with gripper | |
| JP2013098521A (en) | Tray feeder, pallet for tray set and tray set method | |
| CN105009706A (en) | Component mounting device, and component mounting method | |
| JP2000091794A (en) | Electronic component mounting equipment | |
| JP2021034599A (en) | Component supply device | |
| JP3057622B2 (en) | Magazine transport device | |
| HK1143272A (en) | Camera module insertion machine with gripper | |
| JP4840820B2 (en) | Tray holding device | |
| JP2002151889A (en) | Electronic component mounting equipment | |
| JPH06170674A (en) | Work positioning pin | |
| JP3408638B2 (en) | Electronic component transfer equipment | |
| JP2000124679A (en) | Automatic electronic component-mounting device | |
| JP2005108959A (en) | Electronic component mounting device | |
| JP2014160181A (en) | Optical system assembly device | |
| KR101717682B1 (en) | Robot for installing flexible bo and method controlling the same | |
| JP2001111296A (en) | Clamping mechanism of board support pin and mounting method of board support pin in electronic component mounting apparatus | |
| JP3613170B2 (en) | Substrate underlay device and underlay method | |
| CN103209578A (en) | Board processing apparatus | |
| CN116329905B (en) | An assembly mechanism | |
| KR101883479B1 (en) | Component mounting apparatus | |
| US12179340B2 (en) | Work head and work machine |
Legal Events
| Date | Code | Title | Description |
|---|---|---|---|
| PUAI | Public reference made under article 153(3) epc to a published international application that has entered the european phase |
Free format text: ORIGINAL CODE: 0009012 |
|
| 17P | Request for examination filed |
Effective date: 20081107 |
|
| AK | Designated contracting states |
Kind code of ref document: A1 Designated state(s): AT BE BG CH CY CZ DE DK EE ES FI FR GB GR HR HU IE IS IT LI LT LU LV MC MT NL NO PL PT RO SE SI SK TR |
|
| AX | Request for extension of the european patent |
Extension state: AL BA MK RS |
|
| GRAP | Despatch of communication of intention to grant a patent |
Free format text: ORIGINAL CODE: EPIDOSNIGR1 |
|
| REG | Reference to a national code |
Ref country code: HK Ref legal event code: DE Ref document number: 1143272 Country of ref document: HK |
|
| AKX | Designation fees paid |
Designated state(s): AT BE BG CH CY CZ DE DK EE ES FI FR GB GR HR HU IE IS IT LI LT LU LV MC MT NL NO PL PT RO SE SI SK TR |
|
| AXX | Extension fees paid |
Extension state: RS Payment date: 20081107 Extension state: MK Payment date: 20081107 Extension state: AL Payment date: 20081107 Extension state: BA Payment date: 20081107 |
|
| GRAS | Grant fee paid |
Free format text: ORIGINAL CODE: EPIDOSNIGR3 |
|
| GRAA | (expected) grant |
Free format text: ORIGINAL CODE: 0009210 |
|
| AK | Designated contracting states |
Kind code of ref document: B1 Designated state(s): AT BE BG CH CY CZ DE DK EE ES FI FR GB GR HR HU IE IS IT LI LT LU LV MC MT NL NO PL PT RO SE SI SK TR |
|
| AX | Request for extension of the european patent |
Extension state: AL BA MK RS |
|
| REG | Reference to a national code |
Ref country code: GB Ref legal event code: FG4D |
|
| REG | Reference to a national code |
Ref country code: CH Ref legal event code: EP |
|
| REG | Reference to a national code |
Ref country code: IE Ref legal event code: FG4D |
|
| REF | Corresponds to: |
Ref document number: 602008005468 Country of ref document: DE Date of ref document: 20110421 Kind code of ref document: P |
|
| REG | Reference to a national code |
Ref country code: DE Ref legal event code: R096 Ref document number: 602008005468 Country of ref document: DE Effective date: 20110421 |
|
| REG | Reference to a national code |
Ref country code: NL Ref legal event code: VDEP Effective date: 20110309 |
|
| PG25 | Lapsed in a contracting state [announced via postgrant information from national office to epo] |
Ref country code: ES Free format text: LAPSE BECAUSE OF FAILURE TO SUBMIT A TRANSLATION OF THE DESCRIPTION OR TO PAY THE FEE WITHIN THE PRESCRIBED TIME-LIMIT Effective date: 20110620 Ref country code: SE Free format text: LAPSE BECAUSE OF FAILURE TO SUBMIT A TRANSLATION OF THE DESCRIPTION OR TO PAY THE FEE WITHIN THE PRESCRIBED TIME-LIMIT Effective date: 20110309 Ref country code: LT Free format text: LAPSE BECAUSE OF FAILURE TO SUBMIT A TRANSLATION OF THE DESCRIPTION OR TO PAY THE FEE WITHIN THE PRESCRIBED TIME-LIMIT Effective date: 20110309 Ref country code: NO Free format text: LAPSE BECAUSE OF FAILURE TO SUBMIT A TRANSLATION OF THE DESCRIPTION OR TO PAY THE FEE WITHIN THE PRESCRIBED TIME-LIMIT Effective date: 20110609 Ref country code: LV Free format text: LAPSE BECAUSE OF FAILURE TO SUBMIT A TRANSLATION OF THE DESCRIPTION OR TO PAY THE FEE WITHIN THE PRESCRIBED TIME-LIMIT Effective date: 20110309 Ref country code: GR Free format text: LAPSE BECAUSE OF FAILURE TO SUBMIT A TRANSLATION OF THE DESCRIPTION OR TO PAY THE FEE WITHIN THE PRESCRIBED TIME-LIMIT Effective date: 20110610 Ref country code: HR Free format text: LAPSE BECAUSE OF FAILURE TO SUBMIT A TRANSLATION OF THE DESCRIPTION OR TO PAY THE FEE WITHIN THE PRESCRIBED TIME-LIMIT Effective date: 20110309 |
|
| LTIE | Lt: invalidation of european patent or patent extension |
Effective date: 20110309 |
|
| PG25 | Lapsed in a contracting state [announced via postgrant information from national office to epo] |
Ref country code: NL Free format text: LAPSE BECAUSE OF FAILURE TO SUBMIT A TRANSLATION OF THE DESCRIPTION OR TO PAY THE FEE WITHIN THE PRESCRIBED TIME-LIMIT Effective date: 20110309 Ref country code: AT Free format text: LAPSE BECAUSE OF FAILURE TO SUBMIT A TRANSLATION OF THE DESCRIPTION OR TO PAY THE FEE WITHIN THE PRESCRIBED TIME-LIMIT Effective date: 20110309 Ref country code: BG Free format text: LAPSE BECAUSE OF FAILURE TO SUBMIT A TRANSLATION OF THE DESCRIPTION OR TO PAY THE FEE WITHIN THE PRESCRIBED TIME-LIMIT Effective date: 20110609 Ref country code: CY Free format text: LAPSE BECAUSE OF FAILURE TO SUBMIT A TRANSLATION OF THE DESCRIPTION OR TO PAY THE FEE WITHIN THE PRESCRIBED TIME-LIMIT Effective date: 20110309 Ref country code: FI Free format text: LAPSE BECAUSE OF FAILURE TO SUBMIT A TRANSLATION OF THE DESCRIPTION OR TO PAY THE FEE WITHIN THE PRESCRIBED TIME-LIMIT Effective date: 20110309 Ref country code: SI Free format text: LAPSE BECAUSE OF FAILURE TO SUBMIT A TRANSLATION OF THE DESCRIPTION OR TO PAY THE FEE WITHIN THE PRESCRIBED TIME-LIMIT Effective date: 20110309 |
|
| PG25 | Lapsed in a contracting state [announced via postgrant information from national office to epo] |
Ref country code: BE Free format text: LAPSE BECAUSE OF FAILURE TO SUBMIT A TRANSLATION OF THE DESCRIPTION OR TO PAY THE FEE WITHIN THE PRESCRIBED TIME-LIMIT Effective date: 20110309 |
|
| PG25 | Lapsed in a contracting state [announced via postgrant information from national office to epo] |
Ref country code: EE Free format text: LAPSE BECAUSE OF FAILURE TO SUBMIT A TRANSLATION OF THE DESCRIPTION OR TO PAY THE FEE WITHIN THE PRESCRIBED TIME-LIMIT Effective date: 20110309 Ref country code: PT Free format text: LAPSE BECAUSE OF FAILURE TO SUBMIT A TRANSLATION OF THE DESCRIPTION OR TO PAY THE FEE WITHIN THE PRESCRIBED TIME-LIMIT Effective date: 20110711 |
|
| PG25 | Lapsed in a contracting state [announced via postgrant information from national office to epo] |
Ref country code: SK Free format text: LAPSE BECAUSE OF FAILURE TO SUBMIT A TRANSLATION OF THE DESCRIPTION OR TO PAY THE FEE WITHIN THE PRESCRIBED TIME-LIMIT Effective date: 20110309 Ref country code: IS Free format text: LAPSE BECAUSE OF FAILURE TO SUBMIT A TRANSLATION OF THE DESCRIPTION OR TO PAY THE FEE WITHIN THE PRESCRIBED TIME-LIMIT Effective date: 20110709 Ref country code: RO Free format text: LAPSE BECAUSE OF FAILURE TO SUBMIT A TRANSLATION OF THE DESCRIPTION OR TO PAY THE FEE WITHIN THE PRESCRIBED TIME-LIMIT Effective date: 20110309 Ref country code: CZ Free format text: LAPSE BECAUSE OF FAILURE TO SUBMIT A TRANSLATION OF THE DESCRIPTION OR TO PAY THE FEE WITHIN THE PRESCRIBED TIME-LIMIT Effective date: 20110309 |
|
| PLBE | No opposition filed within time limit |
Free format text: ORIGINAL CODE: 0009261 |
|
| STAA | Information on the status of an ep patent application or granted ep patent |
Free format text: STATUS: NO OPPOSITION FILED WITHIN TIME LIMIT |
|
| 26N | No opposition filed |
Effective date: 20111212 |
|
| PG25 | Lapsed in a contracting state [announced via postgrant information from national office to epo] |
Ref country code: PL Free format text: LAPSE BECAUSE OF FAILURE TO SUBMIT A TRANSLATION OF THE DESCRIPTION OR TO PAY THE FEE WITHIN THE PRESCRIBED TIME-LIMIT Effective date: 20110309 Ref country code: DK Free format text: LAPSE BECAUSE OF FAILURE TO SUBMIT A TRANSLATION OF THE DESCRIPTION OR TO PAY THE FEE WITHIN THE PRESCRIBED TIME-LIMIT Effective date: 20110309 |
|
| REG | Reference to a national code |
Ref country code: DE Ref legal event code: R097 Ref document number: 602008005468 Country of ref document: DE Effective date: 20111212 |
|
| PG25 | Lapsed in a contracting state [announced via postgrant information from national office to epo] |
Ref country code: IT Free format text: LAPSE BECAUSE OF FAILURE TO SUBMIT A TRANSLATION OF THE DESCRIPTION OR TO PAY THE FEE WITHIN THE PRESCRIBED TIME-LIMIT Effective date: 20110309 |
|
| PG25 | Lapsed in a contracting state [announced via postgrant information from national office to epo] |
Ref country code: MC Free format text: LAPSE BECAUSE OF NON-PAYMENT OF DUE FEES Effective date: 20111130 |
|
| REG | Reference to a national code |
Ref country code: FR Ref legal event code: ST Effective date: 20120731 |
|
| REG | Reference to a national code |
Ref country code: IE Ref legal event code: MM4A |
|
| REG | Reference to a national code |
Ref country code: DE Ref legal event code: R119 Ref document number: 602008005468 Country of ref document: DE Effective date: 20120601 |
|
| PG25 | Lapsed in a contracting state [announced via postgrant information from national office to epo] |
Ref country code: IE Free format text: LAPSE BECAUSE OF NON-PAYMENT OF DUE FEES Effective date: 20111107 |
|
| PG25 | Lapsed in a contracting state [announced via postgrant information from national office to epo] |
Ref country code: FR Free format text: LAPSE BECAUSE OF NON-PAYMENT OF DUE FEES Effective date: 20111130 |
|
| PG25 | Lapsed in a contracting state [announced via postgrant information from national office to epo] |
Ref country code: MT Free format text: LAPSE BECAUSE OF FAILURE TO SUBMIT A TRANSLATION OF THE DESCRIPTION OR TO PAY THE FEE WITHIN THE PRESCRIBED TIME-LIMIT Effective date: 20110309 |
|
| PG25 | Lapsed in a contracting state [announced via postgrant information from national office to epo] |
Ref country code: LU Free format text: LAPSE BECAUSE OF NON-PAYMENT OF DUE FEES Effective date: 20111107 |
|
| PG25 | Lapsed in a contracting state [announced via postgrant information from national office to epo] |
Ref country code: DE Free format text: LAPSE BECAUSE OF NON-PAYMENT OF DUE FEES Effective date: 20120601 |
|
| REG | Reference to a national code |
Ref country code: CH Ref legal event code: PL |
|
| PG25 | Lapsed in a contracting state [announced via postgrant information from national office to epo] |
Ref country code: CH Free format text: LAPSE BECAUSE OF NON-PAYMENT OF DUE FEES Effective date: 20121130 Ref country code: LI Free format text: LAPSE BECAUSE OF NON-PAYMENT OF DUE FEES Effective date: 20121130 |
|
| PG25 | Lapsed in a contracting state [announced via postgrant information from national office to epo] |
Ref country code: TR Free format text: LAPSE BECAUSE OF FAILURE TO SUBMIT A TRANSLATION OF THE DESCRIPTION OR TO PAY THE FEE WITHIN THE PRESCRIBED TIME-LIMIT Effective date: 20110309 |
|
| PG25 | Lapsed in a contracting state [announced via postgrant information from national office to epo] |
Ref country code: HU Free format text: LAPSE BECAUSE OF FAILURE TO SUBMIT A TRANSLATION OF THE DESCRIPTION OR TO PAY THE FEE WITHIN THE PRESCRIBED TIME-LIMIT Effective date: 20110309 |
|
| PGFP | Annual fee paid to national office [announced via postgrant information from national office to epo] |
Ref country code: GB Payment date: 20141127 Year of fee payment: 7 |
|
| GBPC | Gb: european patent ceased through non-payment of renewal fee |
Effective date: 20151107 |
|
| PG25 | Lapsed in a contracting state [announced via postgrant information from national office to epo] |
Ref country code: GB Free format text: LAPSE BECAUSE OF NON-PAYMENT OF DUE FEES Effective date: 20151107 |
|
| REG | Reference to a national code |
Ref country code: HK Ref legal event code: WD Ref document number: 1143272 Country of ref document: HK |