JP3671401B2 - Measuring instrument and prototype drawing method - Google Patents
Measuring instrument and prototype drawing method Download PDFInfo
- Publication number
- JP3671401B2 JP3671401B2 JP2002383175A JP2002383175A JP3671401B2 JP 3671401 B2 JP3671401 B2 JP 3671401B2 JP 2002383175 A JP2002383175 A JP 2002383175A JP 2002383175 A JP2002383175 A JP 2002383175A JP 3671401 B2 JP3671401 B2 JP 3671401B2
- Authority
- JP
- Japan
- Prior art keywords
- lines
- line
- shoulder
- point
- dart
- Prior art date
- Legal status (The legal status is an assumption and is not a legal conclusion. Google has not performed a legal analysis and makes no representation as to the accuracy of the status listed.)
- Expired - Fee Related
Links
Images


Description
【0001】
【発明の属する技術分野】
本発明は、衣服を作るときに使用する型紙を作図するための体の各所の寸法を計る計測器と、型紙の製造方法に関するものである。
【0002】
【従来の技術】
従来の衣服の製図においては、メジャーの計測値のみで作図したウエストラインより上の上半身の身頃原型を元に製図を展開するのが主流であり、元型がヒップラインまでのものでも、前身頃のすそ線またはヒップラインが床上がり平行の直線でないものが多い。
【0003】
また、袖の製図は、原型がなく、デサインごとに白紙に作図されることが多い
【0004】
【発明が解決しようとする課題】
従来のメジャーの計測では、製図に必要なネッライン、肩線、肩ダーツ、胸ダーツ2後ろ身頃のウエストの細まりのダーツ、袖と身頃の関係、腕の下がり方など計測できない部分があり、体型などを製図に表現するためのデーターが不足気味であった。
【0005】
また、原型からの製図展開も上半身のみでは、腰まわりの状態が分からず、その都度ガイドラインやダーツ量を設定するのは手間がかかる。
【0006】
また、腰まである原型であっても前身頃すそ線が床上がり平行の直線になってないものがあり、タイトシルエットの基本的なデサインで胸ダーツを上半身で処理できるにもかかわらず、水平なすそ線に布の横地の目が通らない事態が生じていた。
【0007】
また、原型から衣服に製図展開する際、胸ダーツや肩ダーツは体から離れるほど分散させ逃がし、布の厚み分や重なり分を縫い目や前端に加える必要がある。
【0008】
また、腕の下がり方も人それぞれ異なるので各人の原型が目安として必要であるし、袖と身頃の関係も不明確な点が多い。
【0009】
【課題を解決するための手段】
上記の問題点を解決するために、本発明では衣服の製図に必要で、メジャーでは計測できなかった体の丸い部分を体に添う柔軟なプラスチック製(ポリプロピレン)の計測器で計測し、データ不足を補う。
【0010】
また、本発明の原型は上半身からヒップライン(HL))までの体に適度にフィットさせたものとし、HLを床上がり平行の直線に設定し、床上がり水平のバストライン(BL)を製図上で胸の大きさや姿勢や体型によって後ろ、脇、前で計測設定し、その線を基準に計測器とメジャーでの計測値で作図するので腰回りの製図展開もし易いし、衣服の丈だしはHLを基準に平行に出せるので、すそ線に横地の目を通せる。また胸ダーツ肩ダーツもデサインや衣服により分散の量を加減し、必要に応じて移動ができる。布の厚み分や重なり分も、前中心、後ろ中心、脇線、肩線などで適度に加えれば良いので展開し易い。
【0011】
本発明では、計測器で身頃と腕の関係と腕の下がり方を把握した上で、各人の袖のタイト原型を作図しておき、各デザインの展開の目安にすることができるので作図し易い。
【0012】
【発明の実施の形態】
衣服用原型とこの原型を元にした衣服用型紙を作成する本発明の方法と実施例を婦人服で以下詳述する。細かく採寸するが、慣れるとサイズの近い事前にシーチングで作ったものを着て補正して完成することができるが、ここでは基本を説明するために計測器とメジャーなどで採寸して作図する方法をとる。
【0013】
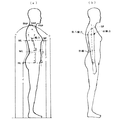
…計測の準備…
本発明の各計測器とメジャー、錘付きメジャー(マーカー)、柔軟な曲線用定規(50cm)、ポイントシール(又は消えるチャコペンシル)を用意する。採寸前にブラジャーとガードルを着けた人体(又は人台)に2.5cm幅のシーティングで作ったベルトをウエスト(W)のおさまりの良い位置に巻いておく。次の各ポイントの図1の(a)(b)の○印に示す位置にポイントシールを付ける(チャコペンシルで印付けしてもよい)。両足を付け自然に立った姿勢でマーカーで床上がりを見ながら、乳頭点(BP)、BPと同じ高さ(BL)の前中心(FC)、脇、脇線上、背中、後中心(BC)と、殿部後突点、同じ高さ(HL)のBC、脇線上、BPの直下点とFCに、後中心ネックポイント(BNP)、前中心ネックポイント(FNP)、サイドネックポィント(SNP)、肩先点(SP)、ウエストライン(ウエストベルト上べり)のBC、脇線上、FCに、前腋点、後腋点、脇点(脇の腕の付け根より1cm下の点)に、腕は自然に下ろして脇正面から見て腋点部(前後の腕と胴体の分岐点)の腕幅の中心点、肘部幅の中心点、手首部幅の中心点。
【0014】
…体型確認のための計測…
本実施例の型紙作成法では、まず、体型を確認するために、図1に示した測定箇所ア〜エを錘付きメジャーでで計測し、▲1▼▲2▼▲3▼のHLからBLまでの寸法値を柔軟な曲線用プラスティック定規(メジャーでもよい)で適度に体に添わせて計測する。その際、両足を付けて自然に立った姿勢で計測する。ウエストライン(WL)はベルトの上べりとする。
ア 乳頭点高…BPまでの高さは、バストライン(BL)の高さとなる。
イ 殿部後突位高…殿部後突点までの高さは、ヒップライン(HL)の高さとなる。
ウ 前肩丈…床から垂直にBPを通ってSNPまでの長さ
エ 後肩丈…床から垂直に臀部後突部を通って肩甲上部後突部を通ってSNPまでの長さ
▲1▼ 肩甲上部後突点直下BLからHLの垂直点に曲線用定規(メジャーでもよい)を体に添わせ、ウエスト部分は、少し離して(浮かして)計る。BLからWLの数値もチェックしておく。
▲2▼ 真脇でBLからHLの垂直点に曲線用定規(メジャーでもよい)を体に添わせ、ウエスト部分は、少し離して(浮かして)計る。BLからWLの数値もチェックしておく。(上半身は体に添って脇点に向けて後ろに少し傾斜する)
▲3▼ 前BPからHLの垂直点に曲線用定規(メジャーでもよい)を体に添わせ、バストの下とウエスト部で少し離して(浮かして)計る。BLからWLの数値をチェックしておく。
▲1▼▲2▼▲3▼の数値は、体型によって、mm単位〜1cmの差が出る。図2にその実例を表記する。体にフィットしないストレートシルエット(又はフレアなど)の衣服だと▲1▼▲2▼▲3▼は、どんな体型でも同数値にする。この数値はアの数値ー(マイナス)イの数値でもある。また、ウとエの差でも体型を知ることが出来るし、ウとエの差は、BLからサイドネックポイントの前後差でもあり、胸の大きさや姿勢など体型を知ることができる。
【0015】
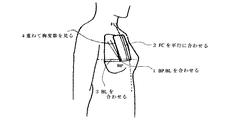
…胸ダーツ度数の計測…
人体の胸の大きさは、ブラジャーにAカップ〜Fカップがあるように様々である。その胸の大きさを製図の胸ダーツに表現することが必要であるが、その胸ダーツの度数計測器の作り方を図3に、使用方法を図4に示す。
胸ダーツ度数計測器の作り方(図3)…薄手で透明の柔軟性のあるプラスティック製(ポリプロピレン)の板を図3の寸法にA面B面2枚用意し、BL線をひく。A面のFC部分に5mm間隔にBLに垂直に数本の線を入れ、BPからの寸法を記入しておくと乳頭間の寸法も分かる。BP上垂直にa線を入れる。B面にBPを基点にBLに垂直に基準線を引き度数目盛を入れて、BP点を軸にA面B面重ねて回転するように留金で留める。
胸ダーツ度数の計り方(図4)…胸ダーツ度数計BP点を人体(人台)のBPにあて、A面のBL線を人体(人台)のBLに当てる。FC線を人体(人台)のFCに平行に当てる。A面を手で押さえ、固定させておいて、B面のBL線を人体(人台)のBLに合わせると線aの重なり部分が胸度数である。(原型作図の際はゆとりとして1〜2度マイナスする)
【0016】
…ネック、肩線、肩ダーツの計測…
人体のネックの幅は前後差がある。また、肩線の傾斜や肩ダーツの量も人それぞれである。計測器の作り方を図5に、計測の仕方を図6に示す。
ネック、肩線、肩ダーツ計測器の作り方(図5)…薄手で透明の柔軟性のあるプラスチック板に図のように標準サイズの線を前身頃側1枚後ろ側身頃側2枚に入れ、外側を図の寸法に切り取りSNP点と肩ダーツ止まりの点を重ねて動く(回転する)ように留金で留める。
計測の仕方(図6)…図のように計測器のSNPを体のSNPに固定し、FCを体のFCに平行に合わせる。前のパネルを固定してBCを体のBCに平行に合わせ、肩に自然に添うように肩ダーツを重ね、肩線を重ね特大のゼムクリップで肩先部を留める。チャコペンシルでネックライン、FC、BC、肩線、SPを計測器に印す。外してトレーシングペーパーに写しておく。(直後に製図するならそのまま使用)
【0017】
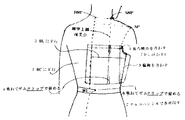
…後ろウエストへの細まりダーツ量の計測…
後ろは肥満大でも骨格上ウエスト部は肩甲骨や臀部よりは通常くびれている。ウエストにかけての細まりのダーツは、通常背中心寄りのダーツより脇寄りのダーツの量が多くなる。
後ろウエスト細まりダーツ計測器の作り方(図7)…薄手で透明の柔軟性のあるプラスチック板3枚に図のように標準サイズの線(WLより3cm位上から)と目盛を入れ、外側を図の寸法に切り取り、ダーツの止まり点を重ねて動く(回転する)ように留金で留める。
計測の仕方(図8)…計測器の後ろ腋点を体に合わせBCとBLを体のBL、BCに平行に合わせ、背中心寄りのダーツを体に添わせて重ねて留め、脇線が脇点からの垂直線より外に出ないようにして脇のBLを平行(少し傾斜することもある)に合わせ、後ろ腋点部を少し浮かせて(ゆとり)脇寄りのダーツを重ねてとってゼムクリップで留めておいて、チャコペンシルで脇線、BL、BCを印し、各ダーツの重なり分量を控えておく。(骨格上脇寄りのダーツが多い)
【0018】
…身頃と袖の関係と腕の計測…
腕の肩への付き方、腕の下がり方(袖の振り)、腕の状態は、人それぞれである。この計測器で測ると、身頃の袖下の袖ぐりと袖の袖下ぐり(身頃の脇線との関係)、袖山線、身頃の肩先(SP)との関係が分かる。また、袖の袖山線と肘ぐせ、身頃の腋点幅、袖の腋点幅も分かる。
身頃と袖の関係と腕の計測器の作り方(図9)…薄手で透明の柔軟性のあるプラスチック板4枚に図のように標準サイズの線を入れ、外側を図のように切り取り、前と後の腋点と脇点は重ねて動く(回転する)ように留金で留める。後ろ腋点には、長さ68cmで5mm幅のメジャーの右端を袖山線とし、上を15cm、下を53cmで横に移動出来るように取り付けた長さ25cmのメジャーを取り付けておく。
計測の仕方(図10)…腕は自然に下げて、計測器の脇点を体に合わせて脇線を前後ろ合わせてウエスト部をゼムクリップで留め、肩で合わせて肩先とSNP側をゼムクリップで留める。後ろ腋点から25cmのメジャーを前腋点に腕を包むように伸ばしセロハンテープで留めておく。65cmのメジャーの右端が腕幅の中心になるように移動させて、53cmの方を肘の中心部に伸ばし袖山線とし、手首まで直線で延長させて、手首幅中心との差(肘ぐせ)と袖丈と肘丈を見る。上部15cmのメジャーも袖山線に延長させて長さと身頃SPとの差を見る。再度脇点が体の脇点と合っているか確かめて脇線を印して、BL部と肘少し上の腕幅をチャコペンシルで脇身頃パネルに印しておく。体から外してトレーシングペーパーに前後の腋点、腋点下袖ぐり、脇線、肘部の腕幅を写し、腋点の腕幅中心と肘部の腕幅中心とを直線で繋ぎ袖山線とし、その線に直角に脇点を通る袖幅線を引き、腋点の袖幅は中心点(袖山線上C点)から両側に採寸値を印しておく(通常後ろが1cm位前より多い)。SP(肩先)の位置も目安として印しておく。袖丈、肘丈、肘ぐせの数値は控えておく。
【0019】
…身頃フィット原型と袖タイト原型作図のための計測箇所の説明…
本実施の型紙作成法では、身頃原型と袖タイト原型作図のために図11(a)(b)(c)に示した測定箇所オ〜ホの寸法値をメジャーで計測して用いる。ウエストライン(WL)はベルトの上べりとする。
(BL囲)…BPを通る水平な周径。
オ BL囲の脇線より後側半身プラス1cm(ゆとり)。…肩甲骨突出分は後で作図の際ダーツ分として加える。
カ BL囲の脇線より前側半身プラス1cm(ゆとり)。
(背幅)…右後ろ腋点から左後ろ腋点までの長さ。
キ 背幅の半分プラス1cm(腕を前に出す分とゆとり)。
(胸幅)…右前腋点から左前腋点までの長さ。
ク 胸幅の半分プラス0.5cm(ゆとり)。
ケ 肩幅…SNPからSPまで。
コ 後ろ肩先点(SP)間隔の長さの半分。
サ BCのBLからBNPまで(肩甲骨の突出分を含める)
シ 後ろSNPから直下BLまでの長さ。
ス 後腋点からSPまでの長さ。
(乳頭間隔)…左右乳頭点間の距離(ゆとり0.3cm)。
セ 乳頭間隔の半分。
ソ FCのBLからFNP(乳房突出分を含める)。
タ BPからSNPの長さ。
チ BPからSPの長さ。
ツ 前腋点からSPの長さ。
テ 脇線BLから脇点(腕の付け根より1cm下)。
(ウエスト囲)…ベルトのおさまっている周径。
ト ウエスト周の前右脇から左脇までの長さの半分プラス1cm(ゆとり)。
ナ ウエスト周の後右脇から左脇までの長さの半分プラス1cm以上(ゆとり)。
(HL周)…殿部後突点を通る水平な周径(腹部の膨らみ分含む。)
ニ HLの右脇点から左脇点までの腹部の膨らみ分も入れた前寸法の半分プラス1cm(ゆとり)。
ヌ HLの右脇点から左脇点までの後寸法の半分プラス1cm(ゆとり)。
(MHL周)…腹部前突点を通る水平な周径。
ネ ミドルヒップ(MH)の前寸法の半分プラス0.5cm以上(ゆとり)。
ノ MHの後寸法プラス0.5cm以上(ゆとり)。
ハ 腋点幅…後ろ腋点から前腋点までの幅(物指しを脇に挟んで計る)プラス1cm(ゆとり)。
ヒ 上腕周り…腕の付け根周りの長さプラス2.5cm以上(ゆとり)。
フ 肘周り…肘の周りの長さプラス2cm以上(肘を曲げるのに必要なゆとりは後で作図の際に2cm位とる)。
ヘ 手首周り…手首の周りの長さプラス1cm以上(ゆとり)。
ホ 手回り…親指付け根部分の手の周りの長さプラス1cm以上(袖口に手を通せる長さ)。
【0020】
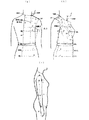
…身頃フィット原型の作り方…
以下、1〜13において、身頃フィット原型を作成する手順について説明する。前記の▲1▼〜▲3▼とア〜ハの数値と計測器のデータを用いて、胸度数16度の標準体で図12に示すように作図する。(HL〜BLの寸法は図2標準体胸度数16°使用)
1 左端縦に背中心(BC)の線を引き、その線に直角にHL囲(BL囲が大きければBL囲)の半分プラス5cmの長さを横一直線にとり、縦に直角にFCの線を引き、HL囲の後ろヌと、前ニを印しておく。
2 BLをまず背中心から肩甲骨直下部までHLから▲1▼の寸法で線を引き、脇部は▲2▼の寸法をHLから印し、BPからFCに▲3▼の寸法をHLからとりBLを引いておく。(くせのない標準体型ではBLがHLに平行にBCからFCまで一直線になる)WLの位置を計測値から印しておく。
3 BL上にBCから後ろBL囲オの寸法にダーツ分(肩甲骨突出分約2.5cm)を加えて印し、FCから前BL囲カの寸法を印し、脇BLより上テの寸法(腕付け根より1cm下)を前後共脇点として印しておく。
4 背幅キと計測器から後腋点を印し(BLから約6cmの高さを目安に)後ろ袖下ぐりの線を描いておく。
5 後ろ身頃ウエストダーツ線を計測器の量より少な目にHLより2〜3cm上まで引く。脇よりのダーツは腋点より1cm内側直下(ダーツ中心線)に図のようにとる。W部はどのダーツもウエストに添うように2cm直下の線を引く。
6 後ろ脇線をウエストで脇点直下より1.5cm以上入らないようにウエスト囲ナの寸法になるように引き、HLの印に向けてML囲ノの寸法に腰の丸みを付けて線を描く。
7 BPセを印し、直下1.5cmからウエストダーツを図のように線を引く。(胸の大きさやウエストの細まり具合によって量は異なる)脇寄りのダーツは人によって無くてもよい。
8 前身頃脇線をウエストで脇点直下より2.5cm以上入らないように、前ウエスト囲トの寸法になるようにダーツ量を調整して引き、HLの印に向けてML囲ネの寸法に腰の丸みを付けて線を描く。
9 背中心サの寸法をBLより上にとりBNPを印し、シの寸法をSNPの高さに印し、コの肩先点間も肩ダーツ分を計測器を見て1cm前後加えて印し、スの寸法を後ろ腋点からとってSPの高さを印して、ネック肩計測器から写しとったトレーシングペーパーの線と合わせて、ネック幅をとり、ネックライン、肩線、肩ダーツ線を肩幅ケを確認して線を引き、SPから腋点に向けて袖ぐり線を引く。SPから7cmの位置に袖との合印を付けておく。
10 後ろ脇線を延長し腋点幅を確認し、前の脇線を延長して腋点幅が前後合わせてハになるように前腋点を後ろ腋点より1cm位高く設定し、前袖下ぐり線を描く。
11 前腋点からBPに線を引き、計測した胸ダーツ度数マイナス2度(ゆとり)を胸ダーツとして同じ長さの線を引き、前胸幅クをFCからとり、ダーツ位置を調整する。
12 前中心ソの寸法をBLより上にとりFNPを印し、タの寸法をBPよりSNPの高さを印し、ツの寸法を前腋点からとってSPの高さを印してBP〜SP寸法チを印し、ネック肩計測器から写しとった線と合わせて、ネック幅をとり、ネックライン、肩線を引き、肩幅ケのSPから袖ぐり線を描き、袖との合印をSPから6cmの位置に印しておく。
13 胸ダーツ、肩ダーツの補助線をダーツ移動やゆとりとして逃がすために図のようにに衿ぐり、肩先袖ぐに引き、仕上げる。
【0021】
…反身体の後ろ身頃原型の作図…
反身体の原型は後ろのBLからHLの寸法が2mm〜5mm程長くなるのでその長くなった分、通常脇線に向けてBLが下がることになる。その原型の例を図13に示す。図2の反身体の例では後ろBLからHLは標準より0.5cm長い。また脇寄りのダーツが多くなる。
【0022】
…胸の大きい人の前身ごろの原型の作図…
胸が大きい場合は前のBPからHLがmm〜1cm位長くなるので、その分脇のBLがBPから脇線BLに向けて下がる。下がった度数分の胸ダーツ分が減る。その原型の例を図14に示す。図2の胸度数21度のBLからHLの数値は標準より0.5cm長いのでBLがBPから脇線のBLに向けて下がる。下がる分の1.5度とゆとりの2度を胸ダーツの度数からマイナスした残りを胸度数とする。ここでは21度から3.5度差し引いて17.5度とする。胸が大きい分前BL囲半身でプラス2cm、胸幅半身でプラス1cm、BP〜SNPプラス0.5cm、BP〜SPプラス0.5cm標準より長くなる。BP下のダーツ量も多くなる。
【0023】
…袖タイト原型の作り方…
以下、1〜13において、袖タイト原型を作成する手順について説明する。前記のハ〜ホの数値と計測器のデータを用いて、図15に示すように作図する。
1 トレーシングペーパーにうつした計測器のデータの袖山線、袖幅線、腋点下袖ぐり線、袖幅線平行(又は前高)に腋点の袖幅(C点からの寸法は後ろの方が1cm位長い)、腕幅(肘部少し上)、脇線、脇点を製図用紙に写し、袖丈肘丈を袖幅線に平行、袖山線に直角に引いておく。SPも目安として印す。
2 袖山線の肘位置から袖口に肘ぐせ線を引き、その線に直角に袖口線を引く。
3 腋点の袖幅に前1cm以上、後ろは前に腕を出せるよう1.5cm以上のゆとりを入れて印し、図のように、前後共身頃と袖の腋点間の半分の点と肘回りフの4分の1の長さを袖山線から両側にとった点、袖口は手回りホの4分の1を肘ぐせ線から両側にとった点に前のみガイドラインを引き、後ろ側は肘線上1cm外と繋いで、袖口4分の1の点へ繋ぎ、袖の側面ガイドラインを示す。
4 前後共3で設定した袖の腋点から袖幅線に向けて身頃の袖ぐり腋点から脇点までの直線寸法と同寸の直線を引いてから袖ぐり下線を描く。設定した袖幅が上腕回りにどれ位ゆとりがあるか見ておく(前1.5cm、後ろ2cm以上必要)。
5 袖の前後腋点から袖山点に向けて直線を引き、2cm前後ふくらませて袖山曲線を描く。図のようにいせ分を入れて、身頃との合印を付けておく(SPはいせ分によってずれることもある)。
6 前袖下線を4のゆとりを見て、図のように上腕回りに前で1.5cm以上ゆとりが入るよう設定した前袖幅点から前肘幅点(前肘線上同寸)に腕に添うようにカーブ線を描き、前袖口幅点(肘ぐせ線から同寸)に向けて直線を引き、前袖口線も図のように引く。
7 後ろ袖下線を図のように上腕回りに後ろで1.5cm以上のゆとり(腕を前に出すため)が入るように設定した後ろ袖幅点から後ろ肘幅点(後ろ肘線上同寸…2cm肘を曲げるためのゆとりが後ろに入れる)に直線を引き、袖口まで直線で延長させておく。
8 後ろ袖口線を袖下線からホの寸法の4分の1を印し引き、余りを肘ダーツとして線を引く。
【0024】
…フィット原型の補正…
体にフィットしたより正確な原型を作るために,原型の試着補正は不可欠である。1〜9の手順で実施する。
1 縦横地の目線の入ったシーチィングは蒸気アイロンで地の目を整える。
2 原型のHLを平行に出してひざ丈にし、前はワにし、後ろ開きにして、押さえ躾で縫い合わせる。袖山はぐし縫いをしておく。(通常右袖のみ)
3 ウエストに2.5cm幅の黒いウエストベルトをおさまりの良い位置に巻く
4 人体(又は人台)に着せ、後ろ中心をピンで止める。
5 BL、HLの位置をマーカーで確認し、合ってない場合は肩線で調整し、もう一度床上がりをマーカーで見てチャコペンシルで印す。
6 原型は体にフィットしたものであるが、小さすぎてはいけないので、つれジワのないように補正する。
7 WLは下に付けた黒のウエストベルトの上べりを印す。
8 袖は前後腋点をピンで止め、袖山線を合い印とSPを調整しながら合わせて止める。
9 腋点下袖ぐりと脇点脇線が身頃と袖が合っているか確認する
【0025】
…フィット原型の仕上げ…
補正した原型を製図用紙に写し、補助線とBL、WL、HLのサイズ、胸ダーツ度数等を入れておくと衣服の製図展開に使い易い。
【0026】
…ブラウスへの製図展開例…
図16のようなフィット型のブラウスのダーツの分散移動を図17に、完成図を図18に、袖の製図を図19に示す。ここでは,胸度数16°の図12の原型を使用して作図する。布は綿ブロード。
1 図のように、胸ダーツと肩ダーツをゆとりとして適量に分散し、その上で胸ダーツを移動する。
2 1の線を目安に脇線に後ろ0.5cm、前0.5cmのゆとりを加え、すそ線はHLに平行に上げる。
3 袖は図19の(a)のように垂直に下がった腕のタイト袖を図19の(b)ように製図する。脇点と脇線が前寄りになる。計測ではSPが袖山線と一致する。腋点幅の袖のゆとりは前1.2cm、後ろ1.8cmにする。その結果袖幅も広くなる。
【0027】
…上衣の製図展開例…
図20のようなパネル切り替えの上衣のダーツの分散を図21に、完成図を図22に示す。ここでは、後ろ身頃は図12の標準原型を、前身頃は胸度数21度の図14の原型を使用する。2枚袖の製図を図23に示す。(図15の袖タイト原型を使用して展開する)布は中肉とし、肩パッドの厚さは0.5cmとする。
1 図21のように上衣が体から離れる分を衿ぐり、肩先、袖ぐりにダーツ分から分散してにがす。
2図22に示すように脇点を前後共1.5cm下げ、脇点で前1.3cm後ろ1.8cmのゆとり分と布厚み分を出し、胸幅0.3cm背幅0.8cm出して肩先も適度に出して袖ぐり線を引く(腋点幅が広くなり過ぎないようにチェックする。上衣はヌード寸法+2cmまで)。ウエストとヒップにも原型線を元にゆとりを入れて脇線を引く。布の厚み分として背中心に0.3cm、前中心は重ね減り分も加えて0.5cm、肩線はネックポイントで0.3cm、肩先でパットの厚み分0.5cmを加えて0.8cm高くする。1の線とウエストダーツ線を目安に切り替え線を描く。
3図23に示すように袖タイト原型の袖山線、袖幅線、肘線、肘ぐせ線、袖口線(袖丈)身頃の脇線、SPとガイドラインを写しておく。
4 袖幅線は、身頃脇点が1.5cm下がったので、腕を上げるゆとり分0.5cmを差し引いて1cm下げる。その線と脇線の交点を脇点とし、脇点と脇線を上衣身頃の脇点脇線に合わせて前後の身頃腋点から下の袖ぐりを写す(脇線の位置が原型と変化していないのを確認の上)。
5 腋点の袖幅にゆとりを前1.3cm後2.3cm加えて印し、腋点から半分の位置に印す。肘線では原型のガイドラインより前で0.5cm(袖下まで1cm)後ろで0.7cm(袖下まで1.4cm)ゆとりとして出し、袖口は原型より前で0.5cm、後ろで0.5cmゆとりとして出し(袖口は2cm広くなる)各点を繋ぎ2枚袖のガイドラインとし、この線を元に前後の切り替え線を描く。肘より上は腕に添うように前後ろ共カーブ線描く。
6 袖山は肩パッド分と布厚み分0.8cm高くして5の腋点幅の点から袖山線を描き身頃袖ぐりとの合印を付ける。SPは前身ごろの袖ぐりが胸ダーツのにがしで長くなるので少し後ろにずれる。
【0028】
【効果】
上述したように本発明の計測器は製図に必要で従来計測出来なかった部分を計測出来るので、各人に合うフィット原型を作ることが出来る。
【0029】
また本発明の原型作図法と展開方法は適度にフィットした、着易くシルエットの美しい衣服の型紙を製造することが出来る。
【0030】
また、タイトシルエットの衣服は胸ダーツを上半身で処理すると、すそ線に横地の目を通せるので、チェック等はもちろん無地の布でも仕上がりがよい。
【0031】
また、本発明のフィット原型と袖タイト原型は、注文服の各人の体型に対応した原型として、また既製服の元型としても、ブラウス、ベスト、ワンピース、ジャケット、コート等の製図に活用することが出来る。
【図面の簡単な説明】
【図1】 体型確認のためのポイントの位置と計測箇所。(a)は身頃。(b)は腕。
【図2】 フィットシルエットの体型別BLからHLの数値。
【図3】 胸ダーツ度数計測器の図面
【図4】 胸ダーツ度数計測器の使用方法。
【図5】 ネック、肩線、肩ダーツ計測器の図面。
【図6】 ネック、肩線、肩ダーツ計測器の使用方法。
【図7】 後ろウエストダーツ計測器の図面。
【図8】 後ろウエストダーツ計測器の使用方法。
【図9】 身頃と袖の関係と腕の計測器の図面。
【図10】 身頃と袖の関係と腕の計測器の使用方法。
【図11】 身頃フィット原型と袖タイト原型作図のための計測箇所。(a)は後ろ身頃。(b)は前身頃。(c)は袖。
【図12】 身頃フィット原型の作図順と完成図。
【図13】 反身体の後ろ身頃フィット原型の完成図。
【図14】 胸ダーツ度数21度の前身頃フィット原型の完成図。
【図15】 袖タイト原型の作図順と完成図。
【図16】 ブラウスのデザイン画。
【図17】 ブラウスの身頃原型展開図。
【図18】 ブラウスの身頃完成製図。
【図19】 腕が垂直に下がったブラウスのタイト袖の製図。(a)は腕が垂直に下がった時の袖山線等の様子。(b)はタイト袖の製図。
【図20】 上衣のデザイン画。
【図21】 上衣の身頃原型展開図。
【図22】 上衣の身頃完成製図。
【図23】 上衣の2枚袖の製図。[0001]
BACKGROUND OF THE INVENTION
The present invention relates to a measuring instrument for measuring dimensions of various parts of a body for drawing a pattern used for making clothes and a method for manufacturing the pattern.
[0002]
[Prior art]
In the conventional drawing of clothes, it was drawn only with the measured value of the measure.Above the waistlineThe mainstream is to develop drawings based on the upper body's body prototype.Hip lineEven the ones up to the bottom lineOr the hip line is a straight line parallel to the floorThere are many things that are not.
[0003]
In addition, the drafting of the sleeve has no prototype and is often drawn on a blank sheet for each design.
[0004]
[Problems to be solved by the invention]
In conventional major measurement, net line, shoulder line, shoulder dart, chest dart required for drawing2Narrow darts on the back waist, sleeve-to-body relationship, armsFallingThere are parts that cannot be measuredSuchThere was a lack of data to express the in drawing.
[0005]
In addition, when drawing from the original model, only the upper body does not know the state of the waistline, and setting the guidelines and dart amount each time is troublesome.
[0006]
There is also a waistoriginalEven if it is a type, there is something that the skirt line of the front body does not become a straight line parallel to the floor,BasicDespite being able to handle chest darts in the upper body with the design,HorizontalThere was a situation where the fabric side could not be seen through the hem line.
[0007]
In addition, when drawing from a prototype to clothing, the chest darts and shoulder darts must be dispersed and escaped away from the body, and the thickness and overlap of the cloth must be added to the seams and front edge.
[0008]
Also, armFallingSince each person is different, each person's prototype is necessary as a guide, and the relationship between the sleeve and the body is unclear.
[0009]
[Means for Solving the Problems]
In order to solve the above problems, the present inventionOf clothesIt is necessary for drafting, and measures the round part of the body that could not be measured by the measure with a flexible plastic (polypropylene) measuring instrument attached to the body to compensate for the lack of data.
[0010]
In addition, the prototype of the present invention is applied to the body from the upper body to the hip line (HL).moderatelyHL is set to a straight line parallel to the floor,Draw a horizontal bust line (BL) on the floorBreast size and postureAnd body shapeBy back, aside, in frontmeasurementSince it is set and drawn with the measurement value with the measuring instrument and measure with the line as a reference, it is easy to draw around the waist, and the length of the clothes can be put out in parallel with the HL as the reference, so the eyes of the horizontal land on the skirt I can pass.AlsoChest dart shoulder dart also adjusts the amount of dispersion by design and clothes,Can move as needed. It is easy to unfold the cloth thickness and overlap, as long as they are added appropriately at the front center, back center, side lines, shoulder lines, etc.
[0011]
In the present invention, the relationship between the body and arms with a measuring instrumentAnd how to lower armsYou can draw a tight prototype of each person's sleeve, and use it as a guide for developing each design.It is easy to draw.
[0012]
DETAILED DESCRIPTION OF THE INVENTION
A method and an embodiment of the present invention for producing a garment prototype and a garment template based on the prototype.In women's clothingThis will be described in detail below. I measure it finely, but when I get used to it, I made something that was made by sheeting in advance.wearAlthough it can be corrected and completed, here, in order to explain the basics, a method of measuring and drawing with a measuring instrument and a measure is taken.
[0013]
…measurementPreparation of…
With each measuring instrument of the present invention, measure and weightKiMajor (marker),Flexible curve ruler (50cm),Prepare a point sticker (or disappearing chaco pencil). Before measurement, a belt made of sheeting 2.5 cm wide is wound around a human body (or a person) wearing a bra and a girdle at a position where the waist (W) is easy to fit. Point seals are attached at the positions indicated by the circles in FIGS. 1A and 1B of the following points (may be marked with a chaco pencil). While standing up with a marker in a standing posture with both feet in place, the nipple point (BP), front center (FC) at the same height (BL) as BP, side, side line, back, back center (BC) Tonobu rear impact point, BC of the same height (HL), on the side line, directly below BP and FC, rear center neck point (BNP), front center neck point (FNP), side neck point (SNP) , Shoulder point (SP), waistline (waist belt top) BC, side line, FC, front saddle point, back saddle point, side point (1 cm below the base of the arm on the side) The saddle point as seen from the front side(Branch point between front and rear arms and torso)The center point of the arm width, the center point of the elbow width, and the center point of the wrist width.
[0014]
... for body confirmationmeasurement…
In the pattern making method of the present embodiment, first, in order to confirm the body shape, the measurement points a to d shown in FIG.With measure with weightMeasure with ▲ 1 ▼▲ 2 ▼Measure the dimension value from HL to BL in (3) with a flexible curve plastic ruler (may be a major) along the body. At that time, measure in a posture standing naturally with both feet. The waistline (WL) is the upper belt.
A Nipple point height: The height to BP is the height of the bust line (BL).
(B) Height of the rear part of the buttock ... The height to the rear part of the buttock is the height of the hip line (HL).
C. Shoulder length ... Length from floor to SNP through BP
D Rear shoulder length: The length from the floor through the buttocks rear projection to the SNP through the upper shoulder back projection
(1) A curve ruler (may be a major) is attached to the body from the BL just below the upper shoulder point of the upper shoulder to the HL, and the waist is measured slightly apart (floating). Also check the numbers from BL to WL.
(2) A curve ruler (may be a measure) is attached to the body at the vertical point from BL to HL, and the waist part is slightly separated (floating). Also check the numbers from BL to WL. (The upper body leans back slightly toward the side points along the body)
(3) A curve ruler (may be a major) is attached to the body from the front BP to the vertical point of HL, and it is measured a little apart (floating) between the bottom of the bust and the waist. Check the numbers from BL to WL.
The numerical values of (1), (2), and (3) vary from mm units to 1 cm depending on the body shape. An example is shown in FIG. If it is a straight silhouette (or flare, etc.) clothing that does not fit the body, ▲ 1 ▼▲ 2 ▼③ is the same value for any body type. This number is also the number of (a) minus (minus) b. In addition, the body shape can be known from the difference between U and D, and the difference between U and D is also the difference between the front and back of the side neck point from BL, and the body shape such as the size and posture of the breast can be known.
[0015]
…breastDartsFrequencymeasurement…
The size of the human breast varies so that the brassiere has A cup to F cup. It is necessary to express the size of the chest on the chest dart on the drawing, but the frequency of the
How to make a chest dart frequency meter (Fig. 3) ... Prepare two thin and transparent plastic (polypropylene) plates with the dimensions shown in Fig. 3 on side A and side B, and draw BL lines. By inserting several lines perpendicular to the BL at 5 mm intervals in the FC part of the A surface and entering the dimensions from the BP, the dimensions between the nipples can also be known. Insert a line vertically on BP. BP on the B sideDraw a reference line perpendicular to BLInsert a frequency scale and use the BP point as the axis.A side B sideFasten with clasp so that it rotates again.
breastDartsHow to measure frequency (Fig. 4) ... ChestDartsThe frequency meter BP point is applied to the BP of the human body (human stand), and the BL line on the A surface is applied to the BL of the human body (human stand). Put the FC line parallel to the human body (human stand) FC. When the surface A is pressed and fixed by hand and the BL line on the surface B is matched with the BL of the human body (person), the overlapping portion of the line a is the breast frequency. (1 to 2 degrees as a margin when drawing the prototypeDecrement)
[0016]
... neck, shoulder line, shoulder dartmeasurement…
There is a difference in the width of the neck of the human body. Also, the inclination of shoulder lines and the amount of shoulder darts are different for each person. Figure 5 shows how to make a measuring instrument.How to measureIs shown in FIG.
Neck, shoulderLine, shoulder dartsHow to make a measuring instrument (Fig. 5) ... Thin, transparent plastic plate with a standard size line as shown in the figureBodyOne side behindBodyPut them on the two sides, cut the outside to the size shown in the figure, and fasten it with the clasp so that it moves (rotates) with the SNP point and shoulder dart stop point overlapped.
measurementHow to (Fig. 6) ... as shownMeasuring instrument SNPIs fixed to the body SNP, and the FC is aligned with the body FC in parallel. The front panel is fixed and BC is parallel to the body BC, and the shoulder darts are overlapped so as to naturally follow the shoulders, and the shoulder lines are overlapped.clipTo fasten the shoulder. Mark the neckline, FC, BC, shoulder line, and SP on the measuring instrument with a chaco pencil. Remove it and copy it on the tracing paper. (Use as is if drafting immediately after)
[0017]
... back waistWhatNarrow dartsQuantity measurement…
Although the back is obese and large, the waist on the skeleton is usually narrower than the scapula and hips. Narrow darts on the waist usually have more darts on the side than darts near the center of the back.
Back waist narrowed dartMeasuring instrumentHow to make (Fig. 7) ... Thin 3 transparent plastic plates that are transparent and transparent, put a standard size line (from 3cm above WL) and scale as shown in the figure. Fasten with a clasp so that it moves (rotates) with the stop points on top of each other.
measurementHow to do (Figure 8) ...InstrumentationAlign the back saddle point with the body, align BC and BL parallel to the body's BL and BC, and attach the darts near the back to the body so as to overlap, so that the side lines do not protrude beyond the vertical line from the side points. Align the side BL in parallel (may be slightly inclined), float the back saddle point a little (clear), pile up the darts on the side and fasten it with a gem clip, Mark the lines, BL, and BC, and note the amount of overlap for each dart. (Many darts on the side of the skeleton)
[0018]
... Body and sleeve relationship and armsmeasurement…
How to put the arm on the shoulder,How to lower arms(Swing of sleeves) and arm condition are each person. When measuring with this measuring instrument, the armholes under the sleeves of the body and the sleeves of the sleeves (in relation to the side lines of the body), Sodeyama Line,shoulder(SP)You can see the relationship. You can also see the sleeve crests and armrests, the saddle width of the body, and the saddle width of the sleeves.
Relationship between body and sleeves and armMeasuring instrumentHow to make (Fig. 9) ... Put standard size lines as shown in the figure on four thin, transparent and flexible plastic plates, and cut the outside as shown in the figure.WhenThe next saddle point and side point move in layers(Rotate)So that it holds with a clasp. At the rear saddle point, a measure with a length of 25 cm, which is 68 cm long and 5 mm wide with the right end of the sodama line, 15 cm above and 53 cm below can be moved sideways.
measurementHow to do (Figure 10) ...Lower your arm naturally,Align the side points with the body, align the side lines front and back, fasten the waist with a gem clip, fit with the shoulder and fasten the shoulder tip and SNP side with the gem clip. Stretch a 25cm measure from the back saddle point to wrap your arm around the front saddle point.HanFasten with tape. Move the right edge of the 65cm measure to the center of the arm width, extend the 53cm to the center of the elbow, make a sleeve mountain line, and extend it straight to the wrist. See the sleeve length and elbow length.Top15cmmajorExtend the length to the Sodeyama Line to see the difference between the length and the body SP. Check again that the side points are aligned with the side points of the body, mark the side line,With the BL sectionArm width slightly above the elbow with a chaco pencilBodyMark on the panel. Remove the body from the body and copy the front and back saddle points, armpit lower armholes, armpits, and arm widths at the elbows on the tracing paper. Draw a sleeve width line that passes through the side point at right angles to the line, and the sleeve width of the saddle point is marked on both sides from the center point (C point on the Sodeyama line) (usually the back is more than about 1 cm ahead) ). SP(shoulder)Also mark the position of as a guide. Record the sleeve length, elbow length, and elbow length.
[0019]
... for body fitting prototype and sleeve tight prototype drawingmeasurementExplanation of the location ...
In the pattern making method of the present embodiment, the dimension values of measuring points O to E shown in FIGS. 11A, 11B, and 11C are measured with a measure for use in body pattern and sleeve tight pattern drawing. The waistline (WL) is the upper belt.
(BL surrounding) ... Horizontal circumference passing through BP.
Oh, the back half of the body from the side line of the BL enclosure is 1 cm (clear). … The scapula protrusion will be added later as a dart when drawing.
Front side half body plus 1cm (clear) from the side line of mosquito BL.
(Back width)… The length from the right rear saddle point to the left rear saddle point.
G Half width plus 1 cm (clearance with the arm in front).
(Chest width)… The length from the right front saddle point to the left front saddle point.
K Chest width half plus 0.5cm (clear).
K Shoulder width… From SNP to SP.
E Half the length of the back shoulder point (SP) interval.
SA BC BL to BNP (Including scapula protrusion)
The length from the rear SNP to the BL directly below.
S Length from rear saddle point to SP.
(Nipple spacing): Distance between left and right nipple points (clearance 0.3 cm).
C Half of the nipple interval.
So FC BL to FNP (including breast protrusion).
The length of BP to SNP.
H BP to SP length.
Tsu The length of the SP from the forehead.
Te Aside point from side line BL (1 cm below the base of the arm).
(Waist circumference)… The circumference where the belt is set.
Half of the length from the front right side to the left side of the waist circumference plus 1 cm (clearance).
Na Half of the length from the right side to the left side after the waist circumference plus 1 cm or more (clear).
(HL circumference) ... Horizontal circumference passing through the buttocks rear protrusion (including abdominal swelling)
D Half of the previous dimension plus 1 cm (clearance) including the bulge of the abdomen from the right side point to the left side point of HL.
Half of the rear dimension from the right side to the left side of Nu HL plus 1 cm (clearance).
(MHL circumference): Horizontal circumference passing through the front abdominal point.
Half of the front dimension of nem hip (MH) + 0.5cm or more (clear).
No MH rear dimension plus 0.5cm or more (clear).
C 腋 Point width: The width from the back saddle point to the front saddle point (measured with the object side), plus 1 cm (clearance).
上 Upper arm circumference ... Length around the base of the arm plus 2.5 cm or more (clear).
F Elbow circumference: The length around the elbow plus 2 cm or more (the space required to bend the elbow is about 2 cm later when drawing).
F Wrist circumference: Length around wrist plus 1 cm or more (clear).
E Hand circumference: Length around the hand at the base of the thumb plus 1 cm or more (length that allows the hand to pass through the cuffs).
[0020]
... How to make a body fit prototype ...
Hereinafter, in 1 to 13, a procedure for creating a body fit prototype will be described. Using the numerical values of (1) to (3), (a) to (c) and the data of the measuring instrument, a standard body with a breast degree of 16 degrees is used as shown in FIG. (Dimensions of HL to BL are shown in Fig. 2 using standard body breast frequency of 16 °)
1 Draw a line at the center of the back (BC) vertically on the left end, and take a line that is half the length of the HL enclosure (or BL enclosure if the BL enclosure is large) plus 5 cm in a horizontal line, and vertically connect the FC line vertically. Pull and mark the back of the HL enclosure and the front.
2 First, draw a line from the center of the back of the BL to the lower part of the scapula with a dimension of (1) from the HL, mark the side part from the HL with the dimension of (2), and from the BP to the FC (3) from the HL Take the BL. (In the standard body without habit, BL is parallel to HL and straight from BC to FC) WL positionTheMark from the measured value.
3 On the BL, mark the size of the rear BL from the BC with a dart portion (approx. 2.5 cm) and mark the size of the front BL from the FC. Mark the front and rear side points (1 cm below the base of the arm).
4 Mark the back saddle point from the back width key and the measuring instrument (with a height of about 6 cm from BL as a guide) and draw a line under the back sleeve.
5 HL on the back body waist dart line is less than the amount of measuring instrumentThanPull 2-3 cm above. Take the dart from the side as shown in the figure, directly below the
6 Keep the back side line at the waist so that it does not enter more than 1.5cm below the side point.To beDraw a line with a rounded waist on the dimensions of the ML box towards the HL mark.
7 Mark the BP center and draw a line with the waist dart from the bottom 1.5cm as shown. (Chest size and waist narrowingThe amount varies depending on the condition) Side darts may not be needed by people.
8 Adjust the amount of dart so that it is the size of the front waist girth so that the front body side line does not enter more than 2.5cm below the side point at the waist, and the dimension of the ML girth toward the HL mark Draw a line with rounded waist.
9 Mark the size of the back center above the BL, mark the BNP, mark the size of the chin at the height of the SNP, mark the shoulder darts between the shoulder tips by adding about 1 cm, looking at the measuring instrument, Take the size of the strap from the back saddle point, mark the height of the SP, match the tracing paper line copied from the neck shoulder measuring instrument, take the neck width, neck line, shoulder line, shoulder dart line Check the shoulder width and draw a line, and draw a armhole line from the SP toward the saddle point. Make a mark with the sleeve 7cm from the SP.
10 Extend the back side line and check the saddle point width. Set the front side line to 1cm higher than the back saddle point so that the front side line is extended and the saddle point width is aligned with the front and back. Draw an underline.
11 Chest was measured by drawing a line from the prone point to BPDartsDraw a line of the same length with the frequency minus 2 degrees (clear) as a chest dart, and the front chest widthTheFrom the FC and adjust the dart position.
12 Take the dimension of the front center so that it is above BL, mark FNP, and mark the height of SNP from BP,TsuTake the dimensions of the front saddle point, mark the height of the SP, mark the BP to SP dimension h, and match the line taken from the neck shoulder measuring instrument, take the neck width, the neck line, the shoulder line Draw a sleeve line from the SP of the shoulder width and mark the joint with the sleeve at a
13 As shown in the figure, to escape the auxiliary lines of the chest darts and shoulder darts as dart movement and clearanceIn the neck and shoulder sleevesPull and finish.
[0021]
... Drawing of the back body prototype of the antibody ...
The prototype of the anti-body is HL from the back BLDimensionsIs about 2mm to 5mm long,NormalBL goes down to the side line. An example of the prototype is shown in FIG. In the example of the opposite body in FIG. 2, the rear BL to HL is 0.5 cm longer than the standard. There will also be more darts on the side.
[0022]
... Drawing a prototype around the front of a person with big breasts ...
When the chest is large, HL is about 1 mm to 1 cm longer than the previous BP, so that the side BL is lowered from the BP toward the side line BL. Decreases chest darts by several minutes. An example of the prototype is shown in FIG. Since the numerical value of BL to HL of the breast frequency of 21 degrees in FIG. 2 is 0.5 cm longer than the standard, BL falls from BP toward the side line BL. Chest frequency is the remainder of 1.5 degrees for the lowering and 2 degrees of clearance minus the frequency of the chest darts. Here, 17.5 degrees is obtained by subtracting 3.5 degrees from 21 degrees. Since the chest is large, it is 2 cm longer at the front BL body, plus 1 cm at the chest width, BP-SNP plus 0.5 cm, BP-SP plus 0.5 cm longer than the standard. The amount of darts under BP also increases.
[0023]
... How to make a sleeve tight prototype ...
Hereinafter, in 1-13, the procedure which produces a sleeve tight original pattern is demonstrated. Using the above-mentioned numerical values of ha to ho and the data of the measuring instrument, the drawing is performed as shown in FIG.
1 The sleeve width of the saddle line (or the front height) parallel to the sleeve width line, sleeve width line, saddle point lower armhole line, sleeve width line of the measurement data transferred to the tracing paper (the dimension from point C is the back Copy the arm width (slightly above the elbow), side lines and side points on the drawing sheet, and draw the sleeve length elbow length parallel to the sleeve width line and perpendicular to the sleeve mountain line. Also mark SP as a guide.
2. Draw an elbow line from the elbow position of the Sodega Line to the cuff, and draw a cuff line at a right angle to the line.
3 Mark the sleeve width of the collar point with a space of 1 cm or more in front and 1.5 mm or more in the back so that the arm can be put out in front. Pull the guideline only to the point where the quarter length of the elbow around the sleeve is on both sides from the Sodeyama line, and the cuff is on the quarter side of the armhole on the both sides from the elbow line. Connect to the outside of the elbow line 1cm, and connect to the quarter point of the cuff, showing the side guideline of the sleeve.
4 Body from sleeve saddle point set to 3 for sleeve width lineLinear dimension from the armhole point to the side pointAfter drawing a straight line of the same size as the underline of the armhole. Check how much the set sleeve width is around the upper arm (1.5 cm front, 2 cm behind).
5 Draw a straight line from the front / rear saddle point of the sleeve to the sleeve mountain point, 2cmBefore and afterInflate and draw Sodeyama curve. As shown in the figure, put an obsolete part and mark it with the body (the SP may be shifted depending on the obsolete part).
6 Look at the space under the
7 With the rear sleeve underline around the upper arm as shown in the figure, allow a space of 1.5 cm or more behind (to put the arm forward)SetFrom the back sleeve width pointbehindelbowwidthDraw a straight line at the point (same size on the back elbow line ... the space for bending the 2cm elbow is behind) and extend it straight to the cuffs.
8 Back cuff line from sleeve underlineHoMark and draw a quarter of the size of the line with the remainder as elbow darts.
[0024]
… Fit prototype correction…
In order to make a more accurate prototype that fits the body, fitting correction of the prototype is indispensable. It implements in the procedure of 1-9.
1 Seek with vertical and horizontal lines of eyes is prepared with a steam iron.
2 Put out the original HL in parallel and make it knee-length, open it in front, open it back, and sew it with a presser foot. Sodeyama should be sewn. (Normally right sleeve only)
3 Wrap a 2.5cm wide black waist belt around your waist
4 Put on the human body (or platform) and pin the back center.
5 Check the BL and HL positions with a marker. If they do not match, adjust with the shoulder line. Look at the floor up again with the marker and mark it with a chaco pencil.
6 The prototype is fitted to the body, but it should not be too small.
7 WL mark the top of the black waist belt attached below.
8 The sleeves are fastened with pins at the front and rear saddle points, and the sleeve mountain lines are aligned and adjusted while adjusting the SP.
9 Check that the armpit and sleeves are aligned with the armpit and armpit line
[0025]
... Fit prototype finish ...
Copy the corrected prototype onto the drafting paper, the auxiliary lines, BL, WL, HL size, chestDartsIt is easy to use it for drawing development of clothes if the frequency etc. is put.
[0026]
... Drawing development example to blouse ...
FIG. 17 shows the distributed movement of the dart of the fit type blouse as shown in FIG. 16, FIG. 18 shows the completed drawing, and FIG. 19 shows the drawing of the sleeve. Here, drawing is performed using the prototype of FIG. 12 having a breast frequency of 16 °. The cloth is cotton broad.
1 As shown in the figure, spread the chest darts and shoulder darts in an appropriate amount and move the chest darts on it.
2 Using the
3 As for the sleeve, a tight sleeve of the arm vertically lowered as shown in FIG. 19A is drawn as shown in FIG. 19B.Side points and side lines are closer to the front.In the measurement, SP coincides with the Sodeyama line. The clear sleeve width is 1.2cm front and 1.8cm rear.As a result, the sleeve width is also increased.
[0027]
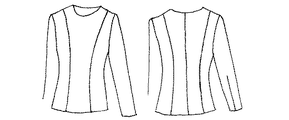
... Drawing example of upper garment ...
FIG. 21 shows the distribution of the darts for the upper panel changeover as shown in FIG. 20, and FIG. 22 shows the completed drawing. Here, the standard prototype of FIG. 12 is used for the back body, and the prototype of FIG. 14 having a breast degree of 21 degrees is used for the front body. Drawing of two sleeves is shown in FIG. The cloth (developed using the sleeve tight pattern in FIG. 15) is a medium thickness, and the thickness of the shoulder pad is 0.5 cm.
Figure 121As the garment leaves the body likeFor neckline, shoulders and sleevesDartsFromDisperse and tear.
2As shown in FIG.Lower the side points 1.5 cm both front and back, and at the side points, give 1.3 cm front and 1.8 cm clearance and cloth thickness, chest width 0.3 cm, back width 0.8 cm, and shoulder to the appropriate Draw a line (check that the saddle point width is not too wide. The upper garment is nude size + 2 cm). Draw side lines on the waist and hips with the original lines. The thickness of the fabric is 0.3cm at the center of the back, the front center is added 0.5cm, the shoulder line is 0.3cm at the neck point, and the thickness of the pad is 0.5cm at the tip of the shoulder, adding 0.8cm. Make it high. Draw a switching line using the
3As shown in FIG.Take a picture of the sleeve tight prototype sleeve sleeve line, sleeve width line, elbow line, elbow line, cuff line (sleeve length) body side line, SP and guidelines.
4 As for the sleeve width line, the side point of the body has dropped 1.5 cm, so deduct 0.5 cm for raising the arm and lower it by 1 cm. The intersection of the line and the side line is the side point, and the side point and the side line are aligned with the side point side line on the upper body.ofCopy the lower armhole from the saddle point of the body (after confirming that the position of the side line has not changed from the original).
5 Mark the sleeve width at the saddle point with a margin of 1.3 cm before and 2.3 cm behind, and mark it at a half position from the saddle point. The elbow line is 0.5cm in front of the original guideline (1cm to the bottom of the sleeve) and 0.7cm behind (1.4cm to the bottom of the sleeve). As a clear line (cuffs are 2 cm wide), connect each point and use it as a guideline for two sleeves. Draw a curve along the front and back to follow the arm above the elbow.
6 Sodeyama is 0.8cm higher than the shoulder pad and cloth thickness. As for SP, the armhole of the front body becomes long by the tear of the chest dart, so it shifts back a little.
[0028]
【effect】
As described above, the measuring instrument of the present invention can measure a portion that is necessary for drafting and could not be measured conventionally, so that a fitting prototype suitable for each person can be made.
[0029]
The prototype drawing method and the development method of the present invention fit moderately,Easy to wearYou can produce a pattern of clothes with a beautiful silhouette.
[0030]
In addition, when the chest darts are processed with the upper body, clothes with tight silhouettes can see through the side of the skirt line, so it can be finished with plain cloth as well as checks.
[0031]
In addition, the fit prototype and sleeve tight prototype of the present invention are used for drafting blouse, vest, dress, jacket, coat, etc. as a prototype corresponding to each person's body shape of custom clothing and as a prototype of ready-made clothing I can do it.
[Brief description of the drawings]
FIG. 1 Point positions and measurement points for body type confirmation. (A) is the body. (B) is an arm.
[Figure 2] Figures from BL to HL of fit silhouette by body type.
[Figure 3] ChestDartsfrequencyMeasuring instrumentDrawings of
[Figure 4] ChestDartsfrequencyMeasuring instrumentHow to use.
FIG. 5 is a drawing of a neck, shoulder line, and shoulder dart measuring instrument.
FIG. 6 shows how to use a neck, shoulder line, and shoulder dart measuring instrument.
FIG. 7 is a drawing of a back waist dart measuring instrument.
[FIG. 8] How to use the back waist dart measuring instrument.
[Figure 9] Relationship between body and sleeves and armsofDrawing of the measuring instrument.
[Figure 10] Relationship between body and sleeves and armsofHow to use the instrument.
[FIG. 11] Measurement points for body fitting prototype and sleeve tight prototype drawing. (A) is the back body. (B) is the front body. (C) is a sleeve.
FIG. 12 shows a drawing order and a completed drawing of the body fit prototype.
FIG. 13 is a completed drawing of an anti-body back body fitting prototype.
[Figure 14] ChestDartsThe completed figure of the front body fit prototype of 21 degrees.
FIG. 15 is a drawing order and completed drawing of a sleeve tight prototype.
FIG. 16 Blouse design image.
FIG. 17 is a development of a blouse body prototype.
FIG. 18: Drawing of the blouse body completed.
FIG. 19: Drawing of a blouse tight sleeve with arms lowered vertically. (A) A state of the Sodeyama line when the arm is vertically lowered. (B) Drawing of a tight sleeve.
FIG. 20 is a design picture of the upper garment.
FIG. 21 is an exploded view of the upper body of the upper garment.
FIG. 22: Drawing of the upper body of the upper garment.
FIG. 23: Drawing of two sleeves of upper garment.
Claims (4)
Priority Applications (1)
| Application Number | Priority Date | Filing Date | Title |
|---|---|---|---|
| JP2002383175A JP3671401B2 (en) | 2002-05-08 | 2002-12-12 | Measuring instrument and prototype drawing method |
Applications Claiming Priority (2)
| Application Number | Priority Date | Filing Date | Title |
|---|---|---|---|
| JP2002169278 | 2002-05-08 | ||
| JP2002383175A JP3671401B2 (en) | 2002-05-08 | 2002-12-12 | Measuring instrument and prototype drawing method |
Publications (3)
| Publication Number | Publication Date |
|---|---|
| JP2004027462A JP2004027462A (en) | 2004-01-29 |
| JP2004027462A5 JP2004027462A5 (en) | 2005-06-16 |
| JP3671401B2 true JP3671401B2 (en) | 2005-07-13 |
Family
ID=31190268
Family Applications (1)
| Application Number | Title | Priority Date | Filing Date |
|---|---|---|---|
| JP2002383175A Expired - Fee Related JP3671401B2 (en) | 2002-05-08 | 2002-12-12 | Measuring instrument and prototype drawing method |
Country Status (1)
| Country | Link |
|---|---|
| JP (1) | JP3671401B2 (en) |
Cited By (1)
| Publication number | Priority date | Publication date | Assignee | Title |
|---|---|---|---|---|
| CN103610256A (en) * | 2013-10-23 | 2014-03-05 | 胡亨有 | KND original number tailoring method of clothing shoulder piece |
Families Citing this family (5)
| Publication number | Priority date | Publication date | Assignee | Title |
|---|---|---|---|---|
| JP2014034749A (en) * | 2012-08-10 | 2014-02-24 | Yutaka Yamamoto | Dressmaking paper pattern preparing method |
| CN103610254B (en) * | 2013-10-23 | 2014-11-05 | 胡亨有 | Clothing neck line QY original data tailoring method automatically determining depth of open collar |
| JP5925284B1 (en) * | 2014-12-12 | 2016-05-25 | エム アンド ティー ファミリー カンパニー リミテッド | clothes |
| KR101990292B1 (en) * | 2018-02-21 | 2019-09-30 | 김정희 | One piece drafting method |
| CN110215002B (en) * | 2018-03-01 | 2023-01-31 | 青岛亿艺通服饰有限公司 | Plate making method for male garment prototype according to armhole matched sleeves |
-
2002
- 2002-12-12 JP JP2002383175A patent/JP3671401B2/en not_active Expired - Fee Related
Cited By (2)
| Publication number | Priority date | Publication date | Assignee | Title |
|---|---|---|---|---|
| CN103610256A (en) * | 2013-10-23 | 2014-03-05 | 胡亨有 | KND original number tailoring method of clothing shoulder piece |
| CN103610256B (en) * | 2013-10-23 | 2014-12-31 | 胡亨有 | KND original number tailoring method of clothing shoulder piece |
Also Published As
| Publication number | Publication date |
|---|---|
| JP2004027462A (en) | 2004-01-29 |
Similar Documents
| Publication | Publication Date | Title |
|---|---|---|
| JP3740684B2 (en) | Wearable prototype maker and drawing method for clothing pattern | |
| EP2849594B1 (en) | Method for drafting garment patterns from photographs and style drawings | |
| US9456647B2 (en) | System and method for drafting garment patterns | |
| US4137634A (en) | Universal custom fit garment patterns and method of using the same | |
| JP3671401B2 (en) | Measuring instrument and prototype drawing method | |
| Uh et al. | Apparel making in fashion design | |
| Campbell | Designing patterns: A fresh approach to pattern cutting | |
| JP2004027462A5 (en) | ||
| Stanley | Flat pattern cutting and modelling for fashion | |
| JP2015120985A (en) | Suit pattern and measuring device for the same | |
| Abling et al. | Integrating draping, drafting and drawing | |
| CN115067600A (en) | Three-dimensional cutting method for upper and lower women's dresses | |
| US3883955A (en) | Pattern fitting tool and method of custom fitting patterns | |
| KR100727630B1 (en) | Method for fabricating diving suit using three dimension human body and diving suit fabricated using the same | |
| JPS6314083B2 (en) | ||
| JP2000265313A (en) | Preparation of paper pattern for outerwear | |
| EP3139781B1 (en) | Basic guide tables for developing tailor patterns and their use | |
| WO2015170359A1 (en) | Basic guide tables for developing tailor patterns and their use | |
| JP2571552Y2 (en) | Simple size-up construction for sleeved clothing | |
| JP2001073217A (en) | Dress forming method and dress | |
| Moore | The development of a men's clothing construction course with an emphasis on fit | |
| US2666558A (en) | Dressmaker's foundation and guide | |
| CN1164368A (en) | One-half lateral measuring cutting-out method for clothing | |
| US1607795A (en) | Adjustable chart for drafting garments | |
| US546199A (en) | Adjustable pattern |
Legal Events
| Date | Code | Title | Description |
|---|---|---|---|
| A521 | Written amendment |
Free format text: JAPANESE INTERMEDIATE CODE: A523 Effective date: 20040913 |
|
| A621 | Written request for application examination |
Free format text: JAPANESE INTERMEDIATE CODE: A621 Effective date: 20040913 |
|
| A871 | Explanation of circumstances concerning accelerated examination |
Free format text: JAPANESE INTERMEDIATE CODE: A871 Effective date: 20040913 |
|
| A975 | Report on accelerated examination |
Free format text: JAPANESE INTERMEDIATE CODE: A971005 Effective date: 20041217 |
|
| A131 | Notification of reasons for refusal |
Free format text: JAPANESE INTERMEDIATE CODE: A131 Effective date: 20050104 |
|
| A521 | Written amendment |
Free format text: JAPANESE INTERMEDIATE CODE: A523 Effective date: 20050124 |
|
| TRDD | Decision of grant or rejection written | ||
| A01 | Written decision to grant a patent or to grant a registration (utility model) |
Free format text: JAPANESE INTERMEDIATE CODE: A01 Effective date: 20050322 |
|
| A61 | First payment of annual fees (during grant procedure) |
Free format text: JAPANESE INTERMEDIATE CODE: A61 Effective date: 20050408 |
|
| R150 | Certificate of patent or registration of utility model |
Free format text: JAPANESE INTERMEDIATE CODE: R150 |
|
| FPAY | Renewal fee payment (event date is renewal date of database) |
Free format text: PAYMENT UNTIL: 20090428 Year of fee payment: 4 |
|
| FPAY | Renewal fee payment (event date is renewal date of database) |
Free format text: PAYMENT UNTIL: 20100428 Year of fee payment: 5 |
|
| FPAY | Renewal fee payment (event date is renewal date of database) |
Free format text: PAYMENT UNTIL: 20110428 Year of fee payment: 6 |
|
| FPAY | Renewal fee payment (event date is renewal date of database) |
Free format text: PAYMENT UNTIL: 20120428 Year of fee payment: 7 |
|
| FPAY | Renewal fee payment (event date is renewal date of database) |
Free format text: PAYMENT UNTIL: 20130428 Year of fee payment: 8 |
|
| R250 | Receipt of annual fees |
Free format text: JAPANESE INTERMEDIATE CODE: R250 |
|
| R250 | Receipt of annual fees |
Free format text: JAPANESE INTERMEDIATE CODE: R250 |
|
| LAPS | Cancellation because of no payment of annual fees |